图15
1、配置 CentOS 7 yum 源,参考:《CentOS、Ubuntu、Debian依赖源配置》 。更新缓存时报错:File contains no section headers. Loaded plugins: fastestmirror 。原因在于 CentOS 停止维护。
[root@iZ23wv7v5ggZ ~]# cd /etc/yum.repos.d/
[root@iZ23wv7v5ggZ yum.repos.d]# ls -l
total 8
-rw-r--r-- 1 root root 2523 Jan 28  2022 CentOS-Base.repo
-rw-r--r-- 1 root root  664 Jan 28  2022 epel.repo
[root@iZ23wv7v5ggZ yum.repos.d]# rm -rf /etc/yum.repos.d/*.repo
[root@iZ23wv7v5ggZ yum.repos.d]# ls -l
total 0
[root@iZ23wv7v5ggZ yum.repos.d]# curl -o /etc/yum.repos.d/CentOS-Base.repo https://mirrors.aliyun.com/repo/Centos-7.repo
  % Total    % Received % Xferd  Average Speed   Time    Time     Time  Current
                                 Dload  Upload   Total   Spent    Left  Speed
100  7221  100  7221    0     0   3763      0  0:00:01  0:00:01 --:--:--  3762
[root@iZ23wv7v5ggZ yum.repos.d]# curl -o /etc/yum.repos.d/epel.repo http://mirrors.aliyun.com/repo/epel-7.repo
  % Total    % Received % Xferd  Average Speed   Time    Time     Time  Current
                                 Dload  Upload   Total   Spent    Left  Speed
100  7215  100  7215    0     0  11531      0 --:--:-- --:--:-- --:--:-- 11525
[root@iZ23wv7v5ggZ yum.repos.d]# yum makecache
Loaded plugins: fastestmirror


File contains no section headers.
file: file:///etc/yum.repos.d/CentOS-Base.repo, line: 1
'<!DOCTYPE HTML PUBLIC "-//W3C//DTD HTML 4.01//EN" "http://www.w3.org/TR/html4/strict.dtd">\n'
[root@iZ23wv7v5ggZ yum.repos.d]# ls -l
total 16
-rw-r--r-- 1 root root 7221 Jun  6 14:32 CentOS-Base.repo
-rw-r--r-- 1 root root 7215 Jun  6 14:32 epel.repo
[root@iZ23wv7v5ggZ yum.repos.d]#
2、参考:阿里云针对CentOS EOL迁移方案 。准备将现在使用的CentOS迁移到Alibaba Cloud Linux操作系统。
3、在迁移前为ECS实例创建快照备份数据,避免操作过程中导致数据丢失。如图1
4、CentOS 7迁移Alibaba Cloud Linux 2详细迁移步骤,请参见 CentOS 7迁移Alibaba Cloud Linux 2
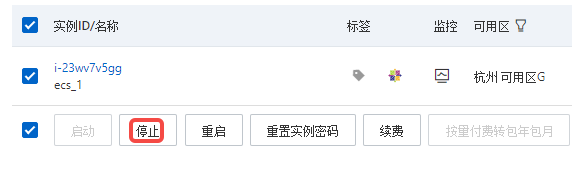
5、停止 ECS 实例。如图2
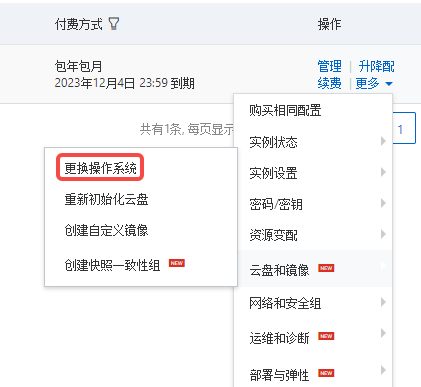
6、登录ECS管理控制台。找到目标实例,在操作列选择更多 > 云盘和镜像 > 更换操作系统。如图3
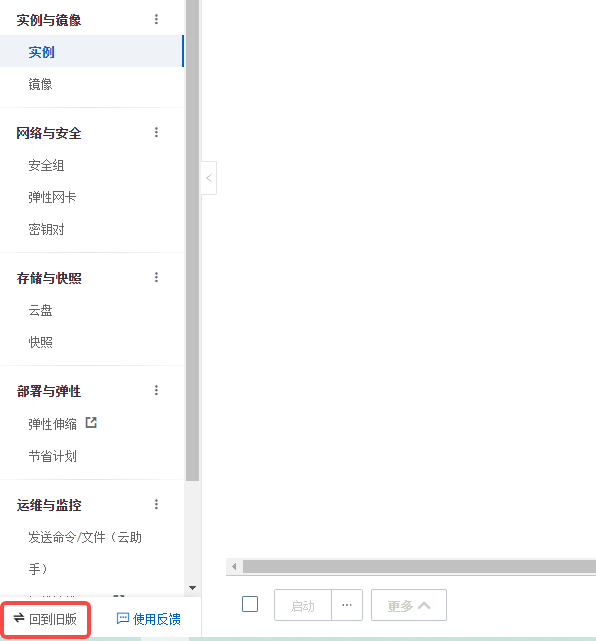
7、没有操作系统迁移的选项,需要切换至新版本的控制台。如图4
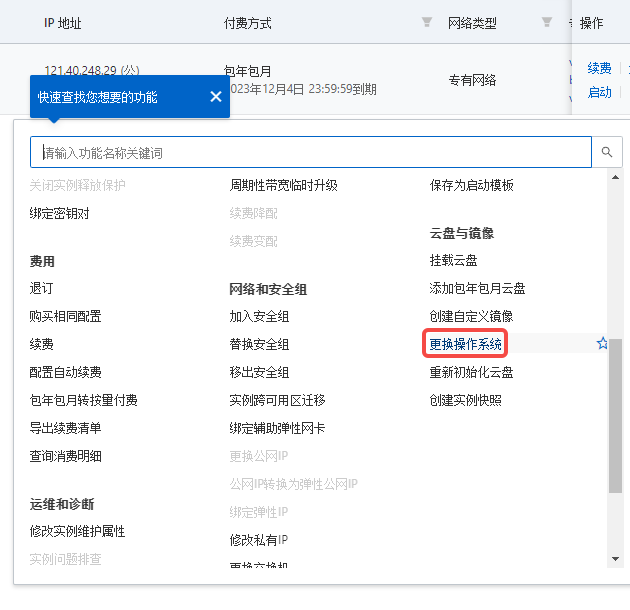
8、在操作列选择更多 > 云盘和镜像 > 更换操作系统。如图5
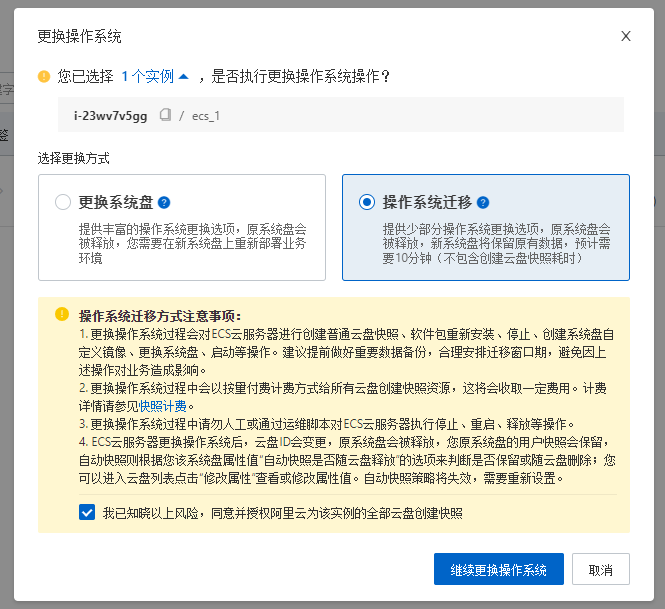
9、在更换操作系统对话框,选中操作系统迁移。如图6
10、目标操作系统,选择 Alibaba Cloud Linux 3 停止支持日期:2031年4月30日。如图7
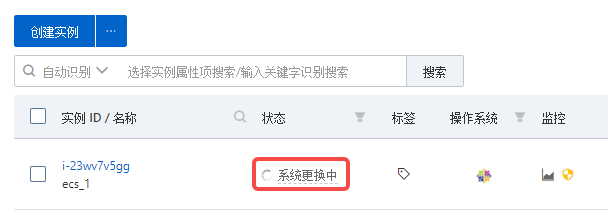
11、状态显示为系统更换中。更换失败,已停止 普通停机模式。如图8
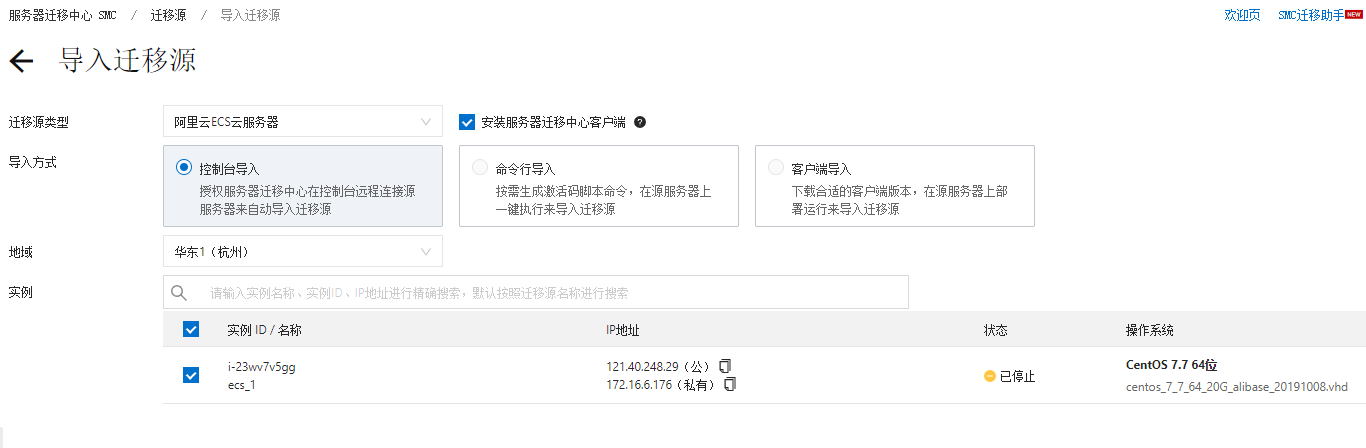
12、服务器迁移中心 SMC,导入迁移源。如图9
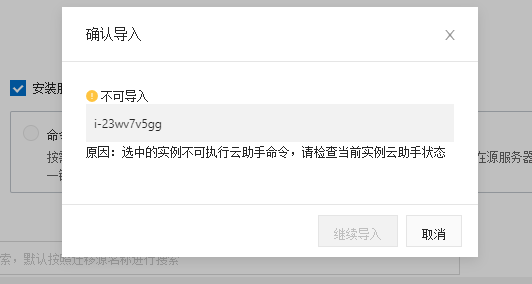
13、不可导入 原因:选中的实例不可执行云助手命令,请检查当前实例云助手状态。如图10
14、启动实例后,再次导入迁移源。迁移源状态:导入中。如图11
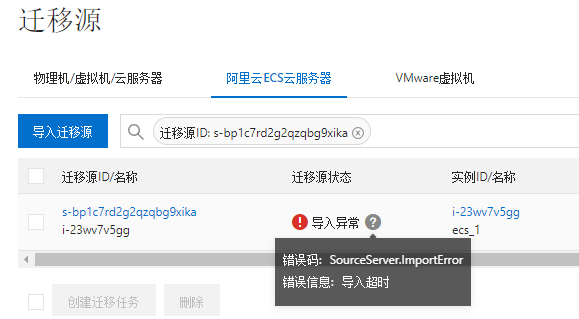
15、导入异常。删除后,重新导入。仍然报错:错误码:SourceServer.ImportError 错误信息: 导入超时。如图12
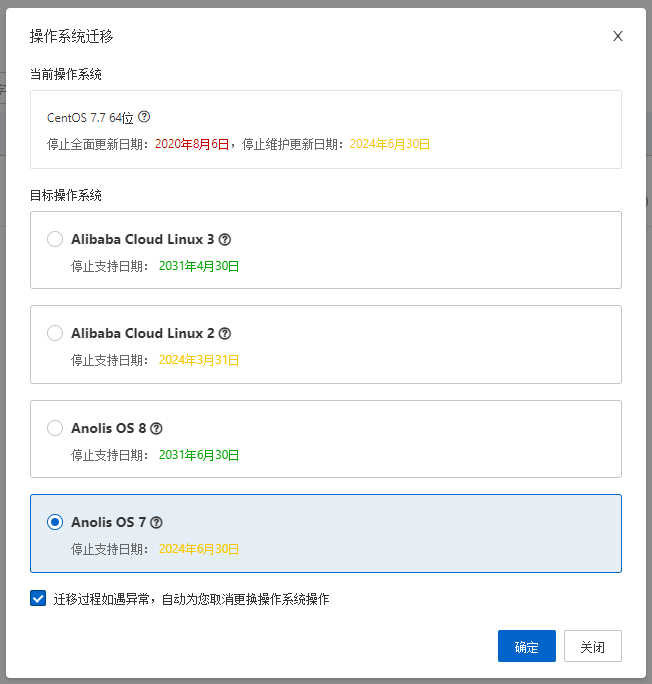
16、删除后,停止实例,目标操作系统,选择 Anolis OS 7 停止支持日期:2024年6月30日。如图13
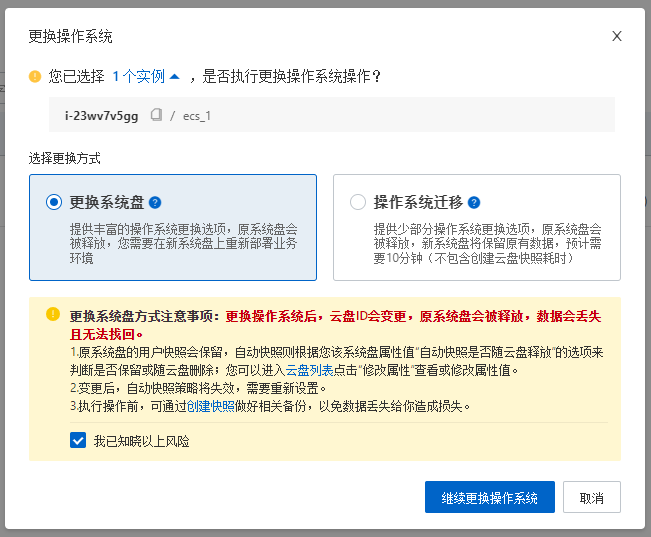
17、最后发现 操作系统迁移 下的 4 个目标系统,皆迁移失败。
18、现阶段唯一的办法只剩下更换系统盘选项了,然后重新部署相关环境。如图14
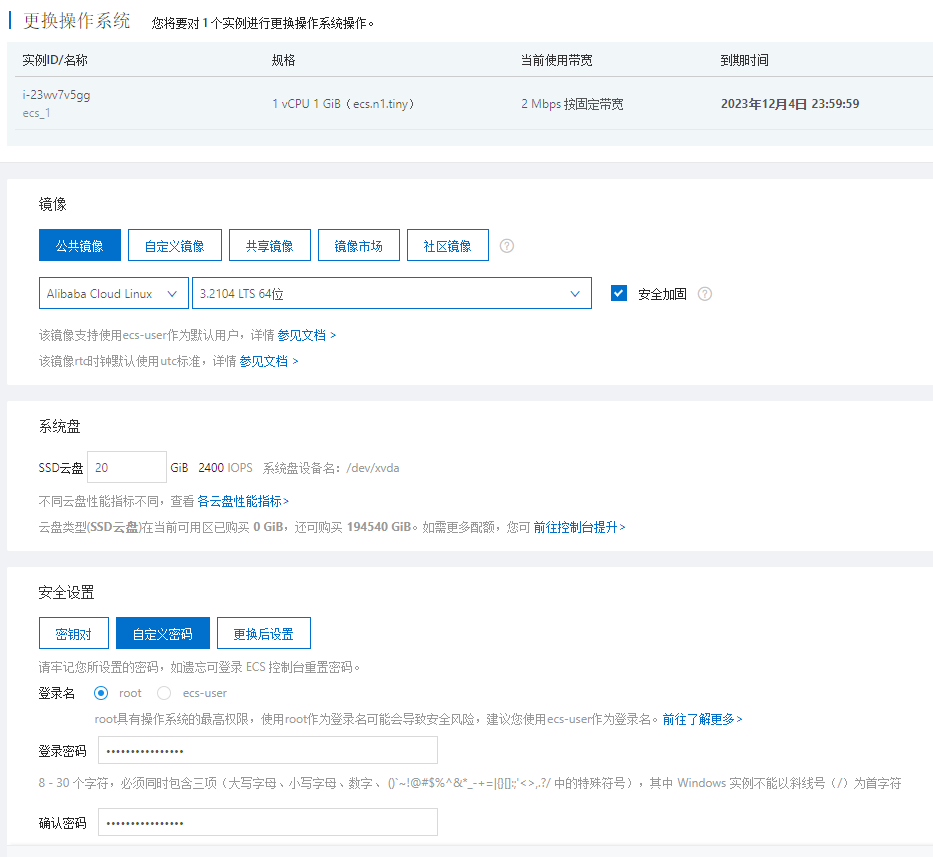
19、选择镜像:Alibaba Cloud Linux , 3.2104 LTS 64位。如图15
20、如果更换操作系统前后都是Linux系统且数据盘设置了开机自动挂载分区。切换操作系统后,数据盘分区挂载信息会丢失,需要更新/etc/fstab配置。具体操作,请参见 在fstab文件中配置UUID方式自动挂载数据盘。运行以下命令检查挂载结果
[root@iZ23wv7v5ggZ ~]# df -h
Filesystem      Size  Used Avail Use% Mounted on
devtmpfs        464M     0  464M   0% /dev
tmpfs           482M     0  482M   0% /dev/shm
tmpfs           482M  440K  481M   1% /run
tmpfs           482M     0  482M   0% /sys/fs/cgroup
/dev/vda1        20G  2.9G   16G  16% /
tmpfs           482M     0  482M   0% /tmp
tmpfs            97M     0   97M   0% /run/user/0
21、运行以下命令查看实例的云盘信息
[root@iZ23wv7v5ggZ ~]#  fdisk -lu
Disk /dev/vda: 20 GiB, 21474836480 bytes, 41943040 sectors
Units: sectors of 1 * 512 = 512 bytes
Sector size (logical/physical): 512 bytes / 512 bytes
I/O size (minimum/optimal): 512 bytes / 512 bytes
Disklabel type: dos
Disk identifier: 0x51cf5d51

Device     Boot Start      End  Sectors Size Id Type
/dev/vda1  *     2048 41943039 41940992  20G 83 Linux


Disk /dev/vdb: 40 GiB, 42949672960 bytes, 83886080 sectors
Units: sectors of 1 * 512 = 512 bytes
Sector size (logical/physical): 512 bytes / 512 bytes
I/O size (minimum/optimal): 512 bytes / 512 bytes
Disklabel type: dos
Disk identifier: 0xc0ac4089

Device     Boot Start      End  Sectors Size Id Type
/dev/vdb1        2048 83886079 83884032  40G 83 Linux
[root@iZ23wv7v5ggZ ~]#
22、运行以下命令查询云盘的UUID信息。
[root@iZ23wv7v5ggZ ~]# blkid
/dev/vda1: UUID="3bda0135-1a08-4c3e-8216-e07c05dd073a" BLOCK_SIZE="4096" TYPE="ext4" PARTUUID="51cf5d51-01"
/dev/vdb1: UUID="0feecc5e-62d8-4282-98b3-cdc8ecf51952" BLOCK_SIZE="4096" TYPE="ext4" PARTUUID="c0ac4089-01"
[root@iZ23wv7v5ggZ ~]#
23、运行以下命令分别创建数据盘的挂载点。创建 /dev/vdb1 的挂载点 /data
[root@iZ23wv7v5ggZ /]# mkdir /data
24、在fstab文件中添加挂载信息。运行以下命令编辑 fstab。新增以下挂载信息。结果如下所示。如图16
[root@iZ23wv7v5ggZ /]# vi /etc/fstab
[root@iZ23wv7v5ggZ /]# cat /etc/fstab

#
# /etc/fstab
# Created by anaconda on Thu May 25 04:02:20 2023
#
# Accessible filesystems, by reference, are maintained under '/dev/disk/'.
# See man pages fstab(5), findfs(8), mount(8) and/or blkid(8) for more info.
#
# After editing this file, run 'systemctl daemon-reload' to update systemd
# units generated from this file.
#
UUID=3bda0135-1a08-4c3e-8216-e07c05dd073a /                       ext4    defaults        1 1
UUID=0feecc5e-62d8-4282-98b3-cdc8ecf51952   /data     ext4    defaults     0   0
[root@iZ23wv7v5ggZ /]#
25、运行以下命令挂载数据盘分区的文件系统。挂载 /dev/vdb1
[root@iZ23wv7v5ggZ /]# mount /dev/vdb1 /data
26、运行以下命令检查挂载结果。
[root@iZ23wv7v5ggZ /]# df -h
Filesystem      Size  Used Avail Use% Mounted on
devtmpfs        464M     0  464M   0% /dev
tmpfs           482M     0  482M   0% /dev/shm
tmpfs           482M  440K  481M   1% /run
tmpfs           482M     0  482M   0% /sys/fs/cgroup
/dev/vda1        20G  2.9G   16G  16% /
tmpfs           482M     0  482M   0% /tmp
tmpfs            97M     0   97M   0% /run/user/0
/dev/vdb1        40G   24G   14G  65% /data
[root@iZ23wv7v5ggZ /]#
27、配置完成后,重启ECS实例,再次检查挂载结果,系统将自动挂载数据盘。
[root@iZ23wv7v5ggZ ~]# df -h
Filesystem      Size  Used Avail Use% Mounted on
devtmpfs        464M     0  464M   0% /dev
tmpfs           482M     0  482M   0% /dev/shm
tmpfs           482M  436K  481M   1% /run
tmpfs           482M     0  482M   0% /sys/fs/cgroup
/dev/vda1        20G  2.9G   16G  16% /
tmpfs           482M     0  482M   0% /tmp
/dev/vdb1        40G   24G   14G  65% /data
tmpfs            97M     0   97M   0% /run/user/0
[root@iZ23wv7v5ggZ ~]#
28、进入 /etc/yum.repos.d/ 目录,查看 yum 源,符合预期
[root@iZ23wv7v5ggZ ~]# cd /etc/yum.repos.d/
[root@iZ23wv7v5ggZ yum.repos.d]# ls -l
total 20
-rw-r--r-- 1 root root 1475 May 25 12:15 AliYun.repo
-rw-r--r-- 1 root root  703 Jun 10  2022 epel-modular.repo
-rw-r--r-- 1 root root  664 Jun 10  2022 epel.repo
-rw-r--r-- 1 root root  781 Jun 10  2022 epel-testing-modular.repo
-rw-r--r-- 1 root root  742 Jun 10  2022 epel-testing.repo
[root@iZ23wv7v5ggZ yum.repos.d]#
View Comments