月度归档: 2021 年 3 月

  • 在 Shell 脚本中,避免 $APPID$ 报错:/config/init/config0.sh: line 184 APPID unbound variable 的排查分析(避免变量被替换)

    在 Shell 脚本中,避免 $APPID$ 报错:/config/init/config0.sh: line 184 APPID unbound variable 的排查分析(避免变量被替换)

    1、在 Shell 脚本中,运行时报错:/config/init/config0.sh line 184 APPID unbound variable。如图1
    在 Shell 脚本中,运行时报错:configinitconfig0.sh line 184 APPID unbound variable。
    图1
    
    
    /config/init/config0.sh: line 184: APPID: unbound variable


    2、查看 Shell 脚本,其赋值为:https://console.${RMT_MAIN_DOMAIN}/ccpauth/wx-msg-event/$APPID$/receive 。${RMT_MAIN_DOMAIN} 需要被替换为:dev.xxx.cn。$APPID$ 无需要替换,保持原样,但是,现在却被当做变量来处理。因此,报错。
    
    
    if [[ `echo $RMT_MAIN_DOMAIN` == '' ]]
    then
        echo "需要设置 RMT_MAIN_DOMAIN"
        exit 1
    else
        echo "设置的 RMT_MAIN_DOMAIN 为:$RMT_MAIN_DOMAIN"
    fi
    
    env | grep "CHANNEL_PUB_API_CFG_WX_OPEN_COMPONENT_MSG_EVENT_RECEIVE" || export CHANNEL_PUB_API_CFG_WX_OPEN_COMPONENT_MSG_EVENT_RECEIVE="https://console.${RMT_MAIN_DOMAIN}/ccpauth/wx-msg-event/$APPID$/receive"


    3、编辑 Shell 脚本,$APPID$ 修改为:\$APPID\$。在 $ 前添加转义字符。代码如下
    
    
    env | grep "CHANNEL_PUB_API_CFG_WX_OPEN_COMPONENT_MSG_EVENT_RECEIVE" || export CHANNEL_PUB_API_CFG_WX_OPEN_COMPONENT_MSG_EVENT_RECEIVE="https://console.${RMT_MAIN_DOMAIN}/ccpauth/wx-msg-event/\$APPID\$/receive"


    4、运行时,不再报错。查看运行日志,未再报错。如图2
    运行时,不再报错。查看运行日志,未再报错。
    图2
    
    
    CHANNEL_PUB_API_CFG_WX_OPEN_COMPONENT_MSG_EVENT_RECEIVE replace https://console.dev.xxx.cn/ccpauth/wx-msg-event/$APPID$/receive -> /mcloud/www/ccp_api/environments/dev/common/config/params-local.php


    5、查看 /mcloud/www/ccp_api/environments/dev/common/config/params-local.php 中的最终替换结果。${RMT_MAIN_DOMAIN} 需要被替换为:dev.xxx.cn。$APPID$ 无需要替换,保持原样。符合预期。如图3
    查看 /mcloud/www/ccp_api/environments/dev/common/config/params-local.php 中的最终替换结果。${RMT_MAIN_DOMAIN} 需要被替换为:dev.xxx.cn。$APPID$ 无需要替换,保持原样。符合预期。
    图3
  • 在 Rancher 环境变量中,在一个环境变量的值中引用另一个环境变量的实现

    在 Rancher 环境变量中,在一个环境变量的值中引用另一个环境变量的实现

    1、现阶段,有 4 个 Rancher 环境变量(未设置默认值,必须设置),其值包含公共部分:dev.xxx.cn
    
    
    PCS_API_CFG_SCMS_EDITOR_HOST_INFO=https://editor.dev.xxx.cn # 内容管理系统编辑器的 HOME URL
    PCS_API_CFG_PCS_API_ASSET_HOST_INFO=https://web.dev.xxx.cn # 策划指挥系统接口的资源的 HOME URL
    PCS_API_CFG_CPU_HOST_INFO=https://fcpu.dev.xxx.cn # CP上传的 HOME URL
    PCS_API_CFG_SCMS_FRONT_HOST_INFO=https://web.dev.xxx.cn # 内容管理系统的 HTTP 客户端的前端的 HOME URL


    2、新阶段,更新 4 个 Rancher 环境变量(已设置默认值,可无需设置)。添加新的值为公共部分的环境变量:RMT_MAIN_DOMAIN
    
    
    RMT_MAIN_DOMAIN=dev.xxx.cn # 融媒体环境的主域名
    PCS_API_CFG_SCMS_EDITOR_HOST_INFO=https://editor.${RMT_MAIN_DOMAIN} # 内容管理系统编辑器的 HOME URL
    PCS_API_CFG_PCS_API_ASSET_HOST_INFO=https://web.${RMT_MAIN_DOMAIN} # 策划指挥系统接口的资源的 HOME URL
    PCS_API_CFG_CPU_HOST_INFO=https://fcpu.${RMT_MAIN_DOMAIN} # CP上传的 HOME URL
    PCS_API_CFG_SCMS_FRONT_HOST_INFO=https://web.${RMT_MAIN_DOMAIN} # 内容管理系统的 HTTP 客户端的前端的 HOME URL


    3、Shell 脚本如下所示。如图1
    Shell 脚本如下所示。
    图1
    
    
    # Rancher 环境变量(未设置默认值,必须设置)
    if [[ `echo $RMT_MAIN_DOMAIN` == '' ]]
    then
        echo "需要设置 RMT_MAIN_DOMAIN"
        exit 1
    else
        echo "设置的 RMT_MAIN_DOMAIN 为:$RMT_MAIN_DOMAIN"
    fi
    
    # Rancher 环境变量(已设置默认值,可无需设置)
    env | grep "PCS_API_CFG_SCMS_EDITOR_HOST_INFO" || export PCS_API_CFG_SCMS_EDITOR_HOST_INFO="https://editor.${RMT_MAIN_DOMAIN}"
    
    sed -i "s#PCS_API_CFG_SCMS_EDITOR_HOST_INFO#$PCS_API_CFG_SCMS_EDITOR_HOST_INFO#g" $DEV_COMMON_CONFIG_PARAMS_LOCAL_PATH
    echo "PCS_API_CFG_SCMS_EDITOR_HOST_INFO replace $PCS_API_CFG_SCMS_EDITOR_HOST_INFO -> $DEV_COMMON_CONFIG_PARAMS_LOCAL_PATH"
    echo "PCS_API_CFG_SCMS_EDITOR_HOST_INFO replace $PCS_API_CFG_SCMS_EDITOR_HOST_INFO -> $DEV_COMMON_CONFIG_PARAMS_LOCAL_PATH" >> $DIR/change.log


    4、当在 Rancher 中未添加环境变量:RMT_MAIN_DOMAIN 时,升级容器时,报错,如图2
    当在 Rancher 中未添加环境变量:RMT_MAIN_DOMAIN 时,升级容器时,报错
    图2
    
    
    /config/init/config0.sh: line 18: RMT_MAIN_DOMAIN: unbound variable
    
    需要设置 RMT_MAIN_DOMAIN


    5、当在 Rancher 中添加环境变量:RMT_MAIN_DOMAIN= ,其值为空字符串时,升级容器时,报错,如图3
    当在 Rancher 中添加环境变量:RMT_MAIN_DOMAIN= ,其值为空字符串时,升级容器时,报错
    图3
    
    
    需要设置 RMT_MAIN_DOMAIN


    6、当在 Rancher 中添加环境变量:RMT_MAIN_DOMAIN=dev.xxx.cn ,其值为 dev.xxx.cn 时,升级容器时,升级成功,环境变量已经生效。如图4
    当在 Rancher 中添加环境变量:RMT_MAIN_DOMAIN=dev.xxx.cn ,其值为 dev.xxx.cn 时,升级容器时,升级成功,环境变量已经生效。
    图4
    
    
    // 内容管理系统编辑器
    'scmsEditor' => [
        'hostInfo' => 'https://editor.dev.xxx.cn', // HOME URL
        'baseUrl' => '', // BASE URL
    ],


  • 排查分析 http 请求响应 500 的过程,jQuery 属性操作 – attr() 方法,设置 src 属性导致

    排查分析 http 请求响应 500 的过程,jQuery 属性操作 – attr() 方法,设置 src 属性导致

    1、上传图片成功之后,GET 请求:https://console.xxx.cn/upload/20210319/20210385015127.png ,响应 500。根源在于上传成功后的图片的域名不是:https://console.xxx.cn ,而是:https://web.xxx.cn 。如图1
    上传图片成功之后,GET 请求:https://console.xxx.cn/upload/20210319/20210385015127.png ,响应 500。根源在于上传成功后的图片的域名不是:https://console.xxx.cn ,而是:https://web.xxx.cn 。
    图1
    2、打开发起程序选项卡,查看请求调用堆栈,在页面的第 516 行执行的 GET 请求。如图2
    打开发起程序选项卡,查看请求调用堆栈,在页面的第 516 行执行的 GET 请求。
    图2
    3、点击进入,JS 代码如下。jQuery 属性操作 – attr() 方法,设置 src 属性。如图3
    点击进入,JS 代码如下。jQuery 属性操作 - attr() 方法,设置 src 属性。
    图3
    
    
    goodsSl.on('uploadSuccess', function (file, json) {
        $('.edit_img_tipthumb').attr("src", json.theUrl);
        $('input[name="data[Product][thumb_img]"]').val(json.theUrl);
    })


    4、json.theUrl 的值:/upload/20210319/20210385015127.png。决定使用绝对地址,添加域名前缀:https://web.xxx.cn 。编辑代码如下
    
    
    goodsSl.on('uploadSuccess', function (file, json) {
        $('.edit_img_tipthumb').attr("src", 'https://web.xxx.cn/creditshop_back' +  json.theUrl);
        $('input[name="data[Product][thumb_img]"]').val(json.theUrl);
    })


    5、上传图片成功之后,GET 请求:https://web.xxx.cn/upload/20210319/20210385015127.png ,响应 200。如图3
    上传图片成功之后,GET 请求:https://web.xxx.cn/upload/20210319/20210385015127.png ,响应 200。
    图3
  • CakePHP 2.x 版本的部署,BASE URL 调整的实现(/ -> /creditshopback)

    CakePHP 2.x 版本的部署,BASE URL 调整的实现(/ -> /creditshopback)

    1、当前的 BASE URL 为 /,https://creditshopback.xxx.cn/ 。响应 200。如图1
    当前的 BASE URL 为 /,https://creditshopback.xxx.cn/ 。响应 200。
    图1
    2、编辑程序文件,输出当前的版本号为:2.6.4。如图2
    编辑程序文件,输出当前的版本号为:2.6.4。
    图2
    
    
    echo Configure::version();
    exit;


    3、现在期望网址调整为:https://console.xxx.cn/creditshopback 。参考开发安装方式:https://book.cakephp.org/2/zh/installation.html 。如图3
    现在期望网址调整为:https://console.xxx.cn/creditshopback 。参考开发安装方式:https://book.cakephp.org/2/zh/installation.html 。
    图3
    4、查看现阶段的 Nginx 配置
    
    
    server {
        listen 82;
        charset utf-8;
        
        root /mcloud/creditshop_back/app/webroot;
        index index.php;
    
        location / {
            # modsecurity on;
            # modsecurity_rules_file /etc/nginx/modsec_includes_lite.conf;
            if (!-e $request_filename) {
                rewrite ^/(.+)$ /index.php?url=$1 last;
                break;
            }
        }
    
        location /creditf {
            # modsecurity on;
            # modsecurity_rules_file /etc/nginx/modsec_includes_lite.conf;
            alias /webtv/wangjie/creditshop_back/h5jifen/files;
            index index.html;
        }
    
        location /upload {
            alias /webtv/wangjie/creditshop_back/upload;
            index index.html;
        }
    
        # pass the PHP scripts to FastCGI server listening on 127.0.0.1:9000
        #
        location ~ \.php$ {
            fastcgi_pass   127.0.0.1:9000;
            fastcgi_index  index.php;
            fastcgi_param  SCRIPT_FILENAME  /mcloud/creditshop_back/app/webroot$fastcgi_script_name;
            include        fastcgi_params;
        }
        #error_page  404              /404.html;
        # redirect server error pages to the static page /50x.html
        #
        error_page   500 502 503 504  /50x.html;
        location = /50x.html {
            root   /usr/share/nginx/html;
        }
        # deny access to .htaccess files, if Apache's document root
        # concurs with nginx's one
        #
        location ~ /\.ht {
            deny  all;
        }
    }


    5、剪切目录:/mcloud/creditshop_back/* 至 /mcloud/creditshop_back/creditshopback/*。如图4
    剪切目录:/mcloud/creditshop_back/* 至 /mcloud/creditshop_back/creditshopback/*。
    图4
    6、编辑 Nginx 配置
    
    
    server {
        listen 82;
        charset utf-8;
    
        root /mcloud/creditshop_back/;
        index index.php;
    
        location / {
            # modsecurity on;
            # modsecurity_rules_file /etc/nginx/modsec_includes_lite.conf;
            if (!-e $request_filename) {
                rewrite ^/(.+)$ /index.php?url=$1 last;
                break;
            }
        }
    
        location /creditshopback/creditf {
            # modsecurity on;
            # modsecurity_rules_file /etc/nginx/modsec_includes_lite.conf;
            alias /webtv/wangjie/creditshop_back/h5jifen/files;
            index index.html;
        }
    
        location /creditshopback/upload {
            alias /webtv/wangjie/creditshop_back/upload;
            index index.html;
        }
    
        # pass the PHP scripts to FastCGI server listening on 127.0.0.1:9000
        #
        location ~ \.php$ {
            fastcgi_pass   127.0.0.1:9000;
            fastcgi_index  index.php;
            fastcgi_param  SCRIPT_FILENAME  /mcloud/creditshop_back/$fastcgi_script_name;
            include        fastcgi_params;
        }
        #error_page  404              /404.html;
        # redirect server error pages to the static page /50x.html
        #
        error_page   500 502 503 504  /50x.html;
        location = /50x.html {
            root   /usr/share/nginx/html;
        }
        # deny access to .htaccess files, if Apache's document root
        # concurs with nginx's one
        #
        location ~ /\.ht {
            deny  all;
        }
    }


    7、响应中存在 404。其网址:https://console.xxx.cn/creditshopback/css/common.css 。需要调整为:https://console.xxx.cn/creditshopback/app/webroot/css/common.css 。如图5
    响应中存在 404。其网址:https://console.xxx.cn/creditshopback/css/common.css 。需要调整为:https://console.xxx.cn/creditshopback/app/webroot/css/common.css 。
    图5
    8、在目录:/app/View 中批量替换 echo $this->Html->css(‘ 为 echo $this->Html->css(‘/app/webroot/css/。类似于 echo $this->Html->css(‘cake.generic’); 的不做替换。如图6
    在目录:/app/View 中批量替换 echo $this->Html->css(' 为 echo $this->Html->css('/app/webroot/css/。类似于 echo $this->Html->css('cake.generic'); 的不做替换。
    图6
    9、在目录:/app/View 中批量替换 echo $this->Html->script(‘ 为 echo $this->Html->script(‘/app/webroot/js/。类似于 echo $this->Html->css(‘cake.generic’); 的不做替换。 10、响应中不存在 404。https://console.xxx.cn/creditshopback/app/webroot/css/common.css 。响应 200。如图7
    响应中不存在 404。https://console.xxx.cn/creditshopback/app/webroot/css/common.css 。响应 200。
    图7
    11、打开网址:https://console.xxx.cn/creditshopback/products/AddNewProduct?tenantid=2a20ea857030b75d3efa343cd625ee03 。响应 404。 12、参考网址:https://www.shuijingwanwq.com/2018/08/16/2836/ 。编辑 Nginx 配置
    
    
    server {
        listen 82;
        charset utf-8;
    
        root /mcloud/creditshop_back;
        index index.php;
    
        location /creditshopback {
            alias /mcloud/creditshop_back/creditshopback/app/webroot/;
            location = /creditshopback {
                try_files $uri /creditshopback/creditshopback/app/webroot/index.php$is_args$args;
            }
            try_files $uri $uri/ /creditshopback/creditshopback/app/webroot/index.php$is_args$args;
        }
    
        location /creditshopback/creditf {
            # modsecurity on;
            # modsecurity_rules_file /etc/nginx/modsec_includes_lite.conf;
            alias /webtv/wangjie/creditshop_back/h5jifen/files;
            index index.html;
        }
    
        location /creditshopback/upload {
            alias /webtv/wangjie/creditshop_back/upload;
            index index.html;
        }
    
        # pass the PHP scripts to FastCGI server listening on 127.0.0.1:9000
        #
        location ~ ^/.+\.php(/|$) {
            rewrite (?!^/creditshopback/app/webroot)^/creditshopback(/.+)$ /creditshopback/app/webroot$1 break;
            fastcgi_pass   127.0.0.1:9000;
            fastcgi_index  index.php;
            fastcgi_param  SCRIPT_FILENAME  $document_root$fastcgi_script_name;
            include        fastcgi_params;
            try_files      $fastcgi_script_name =404;
        }
        #error_page  404              /404.html;
        # redirect server error pages to the static page /50x.html
        #
        error_page   500 502 503 504  /50x.html;
        location = /50x.html {
            root   /usr/share/nginx/html;
        }
        # deny access to .htaccess files, if Apache's document root
        # concurs with nginx's one
        #
        location ~ /\.ht {
            deny  all;
        }
    }


    13、打开网址:https://console.xxx.cn/creditshopback/products/AddNewProduct?tenantid=2a20ea857030b75d3efa343cd625ee03 。响应 200。 14、还原第 8、9 步骤。最终结果全部响应 200,符合预期。
  • 在 nginx/1.17.8 下响应 502 Bad Gateway 的排查分析(不再启用 ModSecurity)

    在 nginx/1.17.8 下响应 502 Bad Gateway 的排查分析(不再启用 ModSecurity)

    1、响应 200 的 Nginx 配置文件内容如下。
    
    
    server {
        listen 82;
        charset utf-8;
        
        root /mcloud/creditshop_back/app/webroot;
        index  index.php;
    
        location / {
                    modsecurity on;
                    modsecurity_rules_file /etc/nginx/modsec_includes_lite.conf;
            if (!-e $request_filename) {
                rewrite ^/(.+)$ /index.php?url=$1 last;
                break;
            }
        }
    
            location /creditf {
                    modsecurity on;
                    modsecurity_rules_file /etc/nginx/modsec_includes_lite.conf;
                    alias /webtv/wangjie/creditshop_back/h5jifen/files;
                index index.html;
        }
    
        # pass the PHP scripts to FastCGI server listening on 127.0.0.1:9000
        #
        location ~ \.php$ {
            fastcgi_pass   127.0.0.1:9000;
            fastcgi_index  index.php;
            fastcgi_param  SCRIPT_FILENAME  /mcloud/creditshop_back/app/webroot$fastcgi_script_name;
            include        fastcgi_params;
        }
        #error_page  404              /404.html;
    
        # redirect server error pages to the static page /50x.html
        #
        error_page   500 502 503 504  /50x.html;
        location = /50x.html {
            root   /usr/share/nginx/html;
        }
    
        # deny access to .htaccess files, if Apache's document root
        # concurs with nginx's one
        #
        location ~ /\.ht {
            deny  all;
        }
    
            location ~ ^/(status|ping)$ {
            include fastcgi_params;
            fastcgi_pass 127.0.0.1:9000;
            fastcgi_param SCRIPT_FILENAME $fastcgi_script_name;
            access_log off;
            allow 127.0.0.1;
            allow 10.42.0.0/16;
            allow 10.244.0.0/8;
            allow 192.168.0.0/8;
            allow 172.17.0.0/8;
            deny all;
        }
    }


    2、查看 Nginx 版本:nginx version: nginx/1.10.3。如图1
    查看 Nginx 版本:nginx version: nginx/1.10.3。
    图1
    
    
    nginx version: nginx/1.10.3
    built by gcc 4.8.5 20150623 (Red Hat 4.8.5-4) (GCC) 
    built with OpenSSL 1.0.1e-fips 11 Feb 2013
    TLS SNI support enabled
    configure arguments: --prefix=/etc/nginx --sbin-path=/usr/sbin/nginx --add-module=/data/openresty-1.11.2.3/bundle/ngx_devel_kit-0.3.0 --add-module=/data/openresty-1.11.2.3/bundle/iconv-nginx-module-0.14 --add-module=/data/openresty-1.11.2.3/bundle/echo-nginx-module-0.60 --add-module=/data/openresty-1.11.2.3/bundle/xss-nginx-module-0.05 --add-module=/data/openresty-1.11.2.3/bundle/ngx_coolkit-0.2rc3 --add-module=/data/openresty-1.11.2.3/bundle/set-misc-nginx-module-0.31 --add-module=/data/openresty-1.11.2.3/bundle/form-input-nginx-module-0.12 --add-module=/data/openresty-1.11.2.3/bundle/encrypted-session-nginx-module-0.06 --add-module=/data/openresty-1.11.2.3/bundle/srcache-nginx-module-0.31 --add-module=/data/openresty-1.11.2.3/bundle/ngx_lua-0.10.8 --add-module=/data/openresty-1.11.2.3/bundle/ngx_lua_upstream-0.06 --add-module=/data/openresty-1.11.2.3/bundle/headers-more-nginx-module-0.32 --add-module=/data/openresty-1.11.2.3/bundle/array-var-nginx-module-0.05 --add-module=/data/openresty-1.11.2.3/bundle/memc-nginx-module-0.18 --add-module=/data/openresty-1.11.2.3/bundle/redis2-nginx-module-0.14 --add-module=/data/openresty-1.11.2.3/bundle/redis-nginx-module-0.3.7 --add-module=/data/openresty-1.11.2.3/bundle/rds-json-nginx-module-0.14 --add-module=/data/openresty-1.11.2.3/bundle/rds-csv-nginx-module-0.07 --add-module=/data/ModSecurity-nginx-master --with-ld-opt=-Wl,-rpath,/usr/local/openresty/luajit/lib --modules-path=/usr/lib64/nginx/modules --conf-path=/etc/nginx/nginx.conf --error-log-path=/var/log/nginx/error.log --http-log-path=/var/log/nginx/access.log --pid-path=/var/run/nginx.pid --lock-path=/var/run/nginx.lock --http-client-body-temp-path=/var/cache/nginx/client_temp --http-proxy-temp-path=/var/cache/nginx/proxy_temp --http-fastcgi-temp-path=/var/cache/nginx/fastcgi_temp --http-uwsgi-temp-path=/var/cache/nginx/uwsgi_temp --http-scgi-temp-path=/var/cache/nginx/scgi_temp --user=nginx --group=nginx --with-http_ssl_module --with-http_realip_module --with-http_addition_module --with-http_sub_module --with-http_dav_module --with-http_flv_module --with-http_mp4_module --with-http_gunzip_module --with-http_gzip_static_module --with-http_random_index_module --with-http_secure_link_module --with-http_stub_status_module --with-http_auth_request_module --with-http_xslt_module=dynamic --with-http_image_filter_module=dynamic --with-http_geoip_module=dynamic --with-http_perl_module=dynamic --with-threads --with-stream --with-stream_ssl_module --with-http_slice_module --with-mail --with-mail_ssl_module --with-file-aio --with-ipv6 --with-http_v2_module --with-cc-opt='-O2 -g -pipe -Wall -Wp,-D_FORTIFY_SOURCE=2 -fexceptions -fstack-protector-strong --param=ssp-buffer-size=4 -grecord-gcc-switches -m64 -mtune=generic' --with-pcre


    3、升级至 Nginx 版本:nginx version: nginx/1.17.8,在 nginx/1.17.8 下响应 502 Bad Gateway。如图2
    升级至 Nginx 版本:nginx version: nginx/1.17.8,在 nginx/1.17.8 下响应 502 Bad Gateway。
    图2
    
    
    [root@back-7d88c84cdd-xpc6x /]# nginx -V
    nginx version: mcloud web server/v1.1
    built by gcc 4.8.5 20150623 (Red Hat 4.8.5-44) (GCC) 
    built with OpenSSL 1.0.2k-fips  26 Jan 2017
    TLS SNI support enabled
    configure arguments: --prefix=/etc/nginx --sbin-path=/usr/sbin/nginx --add-module=/data/openresty-1.13.6.2/bundle/ngx_devel_kit-0.3.0 --add-module=/data/openresty-1.13.6.2/bundle/echo-nginx-module-0.61 --add-module=/data/openresty-1.13.6.2/bundle/xss-nginx-module-0.06 --add-module=/data/openresty-1.13.6.2/bundle/ngx_coolkit-0.2rc3 --add-module=/data/openresty-1.13.6.2/bundle/set-misc-nginx-module-0.32 --add-module=/data/openresty-1.13.6.2/bundle/form-input-nginx-module-0.12 --add-module=/data/openresty-1.13.6.2/bundle/encrypted-session-nginx-module-0.08 --add-module=/data/openresty-1.13.6.2/bundle/srcache-nginx-module-0.31 --add-module=/data/openresty-1.13.6.2/bundle/ngx_lua-0.10.13 --add-module=/data/openresty-1.13.6.2/bundle/ngx_lua_upstream-0.07 --add-module=/data/openresty-1.13.6.2/bundle/array-var-nginx-module-0.05 --add-module=/data/openresty-1.13.6.2/bundle/memc-nginx-module-0.19 --add-module=/data/openresty-1.13.6.2/bundle/redis2-nginx-module-0.15 --add-module=/data/openresty-1.13.6.2/bundle/rds-json-nginx-module-0.15 --add-module=/data/openresty-1.13.6.2/bundle/rds-csv-nginx-module-0.09 --add-module=/data/ModSecurity-nginx-master --with-ld-opt=-Wl,-rpath,/usr/local/openresty/luajit/lib --modules-path=/usr/lib64/nginx/modules --conf-path=/etc/nginx/nginx.conf --error-log-path=/var/log/nginx/error.log --http-log-path=/var/log/nginx/access.log --pid-path=/var/run/nginx.pid --lock-path=/var/run/nginx.lock --http-client-body-temp-path=/var/cache/nginx/client_temp --http-proxy-temp-path=/var/cache/nginx/proxy_temp --http-fastcgi-temp-path=/var/cache/nginx/fastcgi_temp --http-uwsgi-temp-path=/var/cache/nginx/uwsgi_temp --http-scgi-temp-path=/var/cache/nginx/scgi_temp --user=nginx --group=nginx --with-http_ssl_module --with-http_realip_module --with-http_addition_module --with-http_sub_module --with-http_dav_module --with-http_flv_module --with-http_mp4_module --with-http_gunzip_module --with-http_gzip_static_module --with-http_random_index_module --with-http_secure_link_module --with-http_stub_status_module --with-http_auth_request_module --with-http_xslt_module=dynamic --with-http_image_filter_module=dynamic --with-http_geoip_module=dynamic --with-http_perl_module=dynamic --with-threads --with-stream --with-stream_ssl_module --with-http_slice_module --with-mail --with-mail_ssl_module --with-file-aio --with-ipv6 --with-http_v2_module --with-cc-opt='-O2 -g -pipe -Wall -Wp,-D_FORTIFY_SOURCE=2 -fexceptions -fstack-protector-strong --param=ssp-buffer-size=4 -grecord-gcc-switches -m64 -mtune=generic' --with-pcre


    4、编辑 Nginx 配置文件内容如下。不再启用 ModSecurity。响应 200。如图3
    编辑 Nginx 配置文件内容如下。不再启用 ModSecurity。响应 200。
    图3
    
    
    server {
        listen 82;
        charset utf-8;
        
        root /mcloud/creditshop_back/app/webroot;
        index index.php;
    
        location / {
            # modsecurity on;
            # modsecurity_rules_file /etc/nginx/modsec_includes_lite.conf;
            if (!-e $request_filename) {
                rewrite ^/(.+)$ /index.php?url=$1 last;
                break;
            }
        }
    
        location /creditf {
            # modsecurity on;
            # modsecurity_rules_file /etc/nginx/modsec_includes_lite.conf;
            alias /webtv/wangjie/creditshop_back/h5jifen/files;
            index index.html;
        }
    
        # pass the PHP scripts to FastCGI server listening on 127.0.0.1:9000
        #
        location ~ \.php$ {
            fastcgi_pass   127.0.0.1:9000;
            fastcgi_index  index.php;
            fastcgi_param  SCRIPT_FILENAME  /mcloud/creditshop_back/app/webroot$fastcgi_script_name;
            include        fastcgi_params;
        }
        #error_page  404              /404.html;
        # redirect server error pages to the static page /50x.html
        #
        error_page   500 502 503 504  /50x.html;
        location = /50x.html {
            root   /usr/share/nginx/html;
        }
        # deny access to .htaccess files, if Apache's document root
        # concurs with nginx's one
        #
        location ~ /\.ht {
            deny  all;
        }
    }


  • 微擎的部署,BASE URL 调整为:/cmpmain/web/index.php 的实现

    微擎的部署,BASE URL 调整为:/cmpmain/web/index.php 的实现

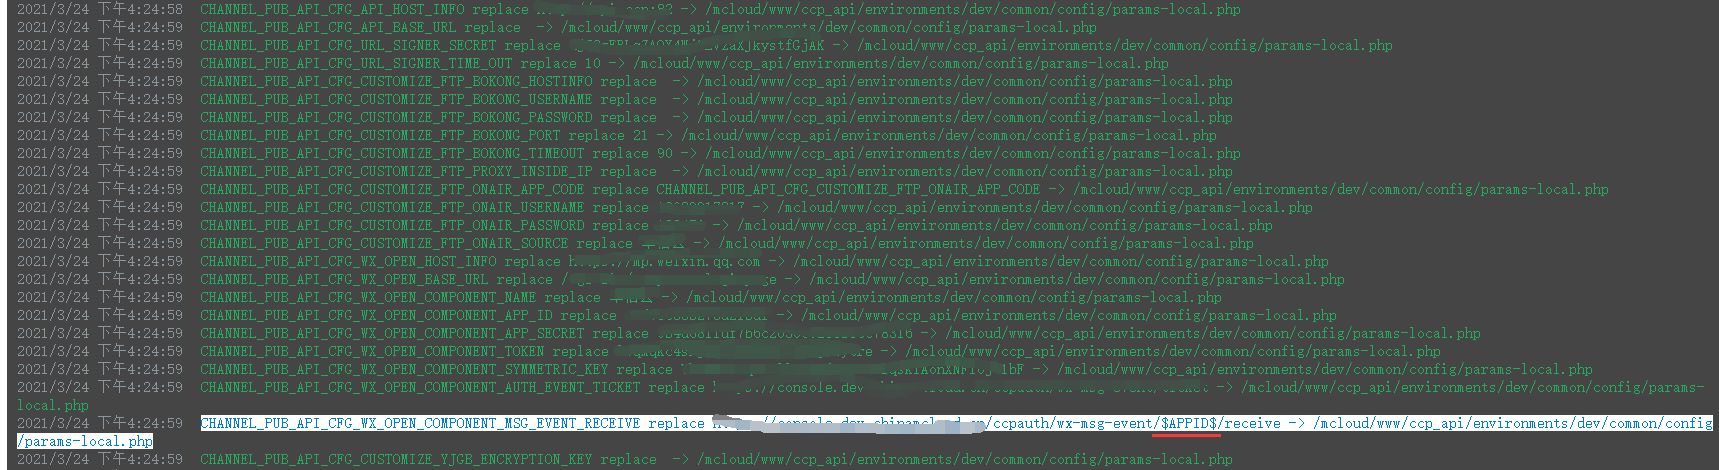
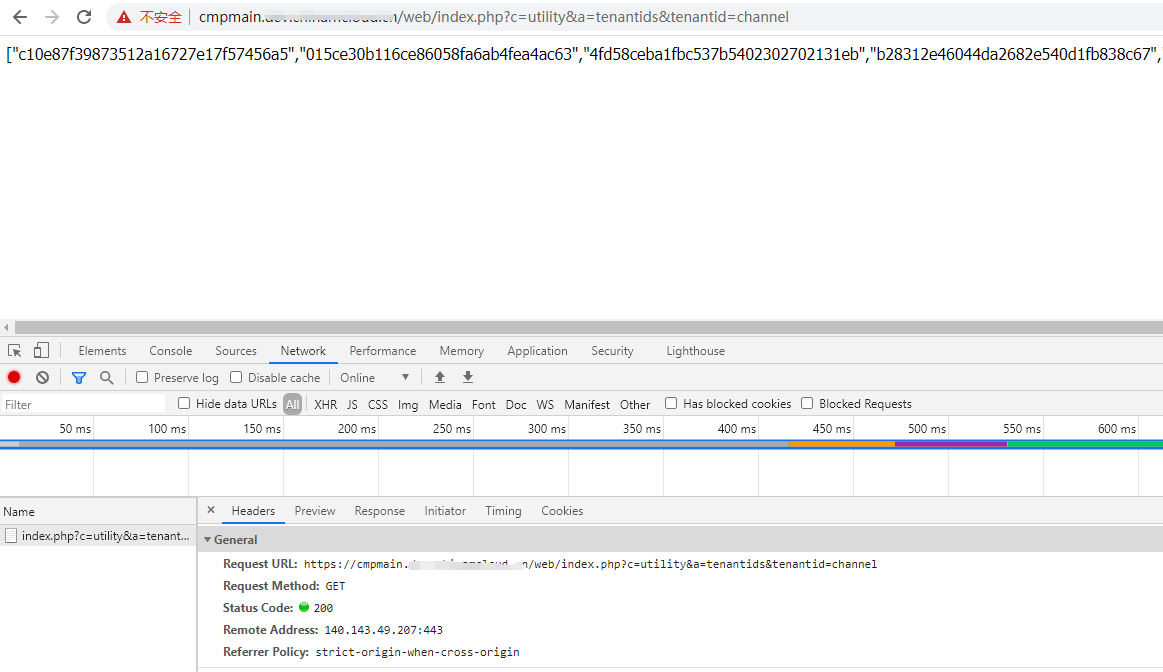
    1、微擎的部署,现阶段其 HOME URL 为:https://cmpmain.xxx.com 。其 BASE URL 为:/web/index.php。如图1
    微擎的部署,现阶段其 HOME URL 为:https://cmpmain.xxx.com 。其 BASE URL 为:/web/index.php。
    图1
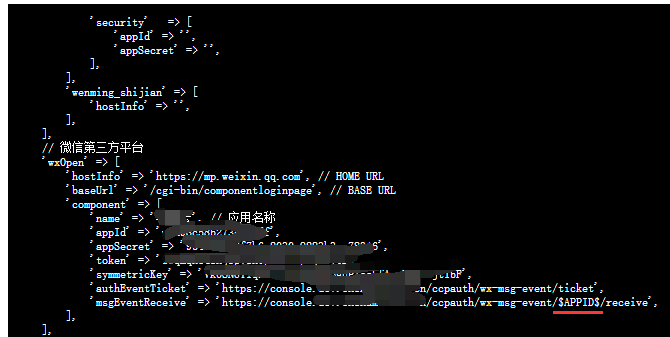
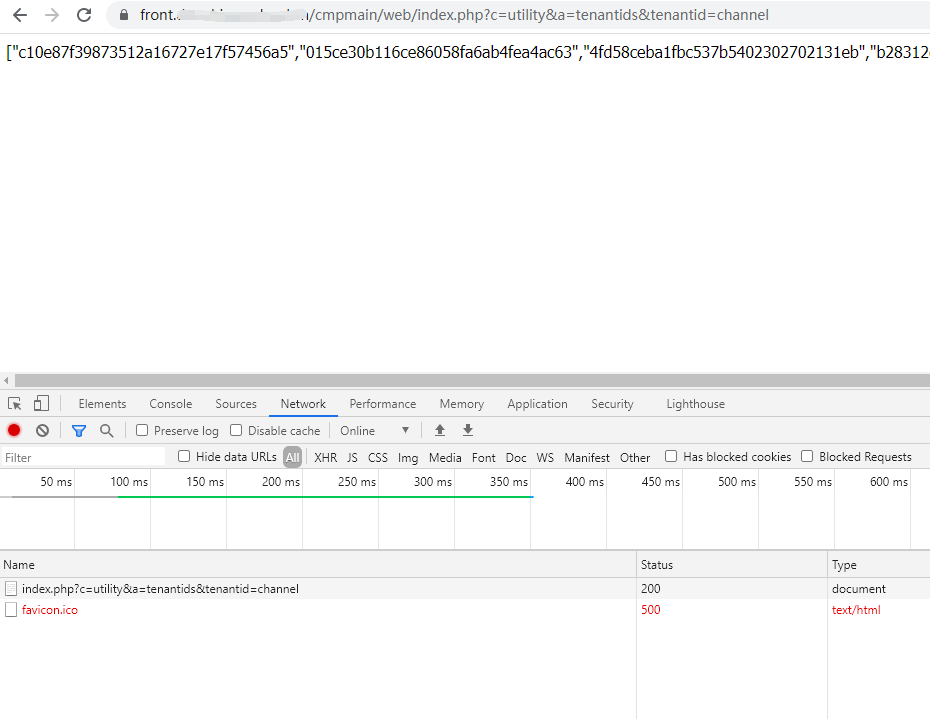
    2、微擎的部署,希望调整一下,新阶段其 HOME URL 为:https://front.xxx.com 。以确保所有产品前端的域名统一。其 BASE URL 为:/cmpmain/web/index.php。
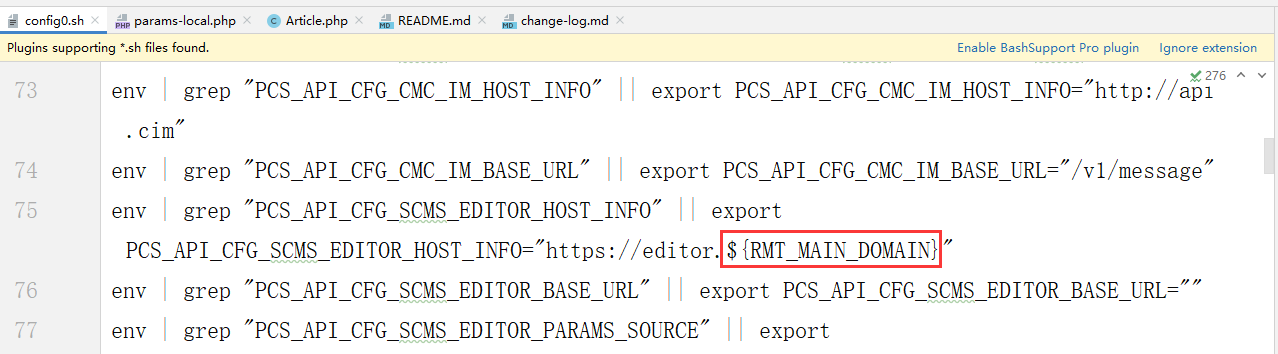
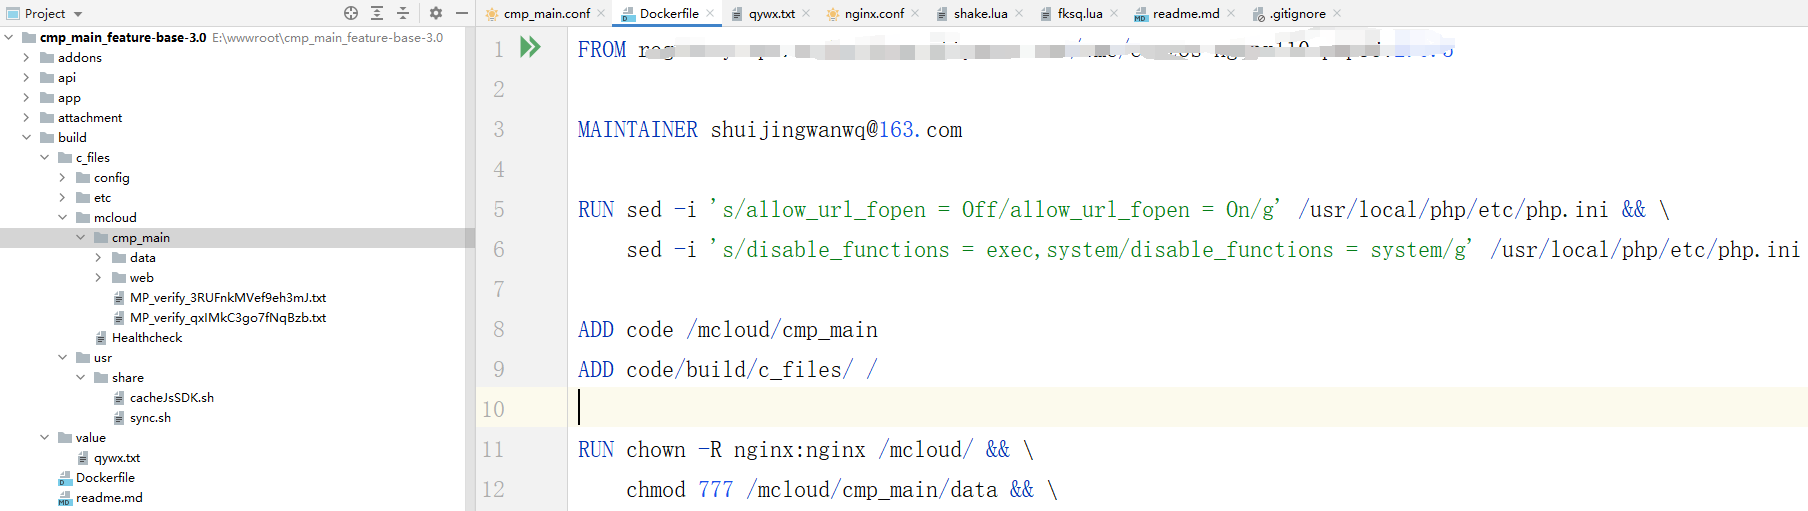
 3、其 Nginx 配置文件如下
    
    
    server {
        listen 80;
        charset utf-8;
        
        root /mcloud/cmp_main/;
        index  index.php;
    
        location /ncove/ {
            rewrite ^/ncove/(\d+)-(\d+)$ /app/index.php?i=$1&c=entry&tenantId=QYWX_YQ_TENANTID&link_id=$2&scope=snsapi_userinfo&do=index&m=thirdlink_generate permanent;
        }
    
    
    	location ~/*\.txt$ {
            root   /mcloud/cmp_main/attachment/txt;
        }
    
       location = /meepo_bigerwall/shake{
            #default_type 'text/html';
            #lua_code_cache off;
    
            content_by_lua_file /etc/nginx/shake.lua;
        }
    		location = /meepo_bigerwall/fksq{
            #default_type 'application/json';
            #lua_code_cache off;
    
            content_by_lua_file /etc/nginx/fksq.lua;
        }
    
        location / {
            if (!-e $request_filename) {
                rewrite ^/(.+)$ /index.php?url=$1 last;
                break;
            }
        }
        # pass the PHP scripts to FastCGI server listening on 127.0.0.1:9000
        #
        location ~ \.php$ {
            fastcgi_pass   127.0.0.1:9000;
            fastcgi_index  index.php;
            fastcgi_param  SCRIPT_FILENAME  /mcloud/cmp_main/$fastcgi_script_name;
            include        fastcgi_params;
        }
        #error_page  404              /404.html;
        # redirect server error pages to the static page /50x.html
        #
        error_page   500 502 503 504  /50x.html;
        location = /50x.html {
            root   /usr/share/nginx/html;
        }
        # deny access to .htaccess files, if Apache's document root
        # concurs with nginx's one
        #
        location ~ /\.ht {
            deny  all;
        }
    	location ~ ^/(status|ping)$ {
            include fastcgi_params;
            fastcgi_pass 127.0.0.1:9000;
            fastcgi_param SCRIPT_FILENAME $fastcgi_script_name;
            access_log off;
            allow 127.0.0.1;
            allow 10.42.0.0/16;
            allow 10.244.0.0/16;
            deny all;
        }
    }


    4、决定将 /mcloud/cmp_main/ 迁移至 /mcloud/cmp_main/cmpmain/。 5、编辑 Nginx 配置文件如下
    
    
    server {
        listen 80;
        charset utf-8;
        
        root /mcloud/cmp_main/;
        index  index.php;
    
        location /cmpmain/ncove/ {
            rewrite ^/cmpmain/ncove/(\d+)-(\d+)$ /cmpmain/app/index.php?i=$1&c=entry&tenantId=QYWX_YQ_TENANTID&link_id=$2&scope=snsapi_userinfo&do=index&m=thirdlink_generate permanent;
        }
    
    
    	location ~/*\.txt$ {
            root   /mcloud/cmp_main/cmpmain/attachment/txt;
        }
    
       location = /cmpmain/meepo_bigerwall/shake{
            #default_type 'text/html';
            #lua_code_cache off;
    
            content_by_lua_file /etc/nginx/shake.lua;
        }
    	location = /cmpmain/meepo_bigerwall/fksq{
            #default_type 'application/json';
            #lua_code_cache off;
    
            content_by_lua_file /etc/nginx/fksq.lua;
        }
    
        location / {
            if (!-e $request_filename) {
                rewrite ^/(.+)$ /index.php?url=$1 last;
                break;
            }
        }
        # pass the PHP scripts to FastCGI server listening on 127.0.0.1:9000
        #
        location ~ \.php$ {
            fastcgi_pass   127.0.0.1:9000;
            fastcgi_index  index.php;
            fastcgi_param  SCRIPT_FILENAME  /mcloud/cmp_main/$fastcgi_script_name;
            include        fastcgi_params;
        }
        #error_page  404              /404.html;
        # redirect server error pages to the static page /50x.html
        #
        error_page   500 502 503 504  /50x.html;
        location = /50x.html {
            root   /usr/share/nginx/html;
        }
        # deny access to .htaccess files, if Apache's document root
        # concurs with nginx's one
        #
        location ~ /\.ht {
            deny  all;
        }
    }


    6、访问静态资源文件:https://front.xxx.com/cmpmain/web/resource/js/lib/jquery.caret.js ,响应成功。如图2
    访问静态资源文件:https://front.xxx.com/cmpmain/web/resource/js/lib/jquery.caret.js ,响应成功。
    图2
    7、访问动态文件:https://front.xxx.com/cmpmain/web/index.php?c=utility&a=tenantids&tenantid=channel ,响应成功。如图3
    访问动态文件:https://front.xxx.com/cmpmain/web/index.php?c=utility&a=tenantids&tenantid=channel ,响应成功。
    图3
    8、编辑公众帐号,提交表单数据,响应成功。符合预期。如图4
    编辑公众帐号,提交表单数据,响应成功。符合预期。
    图4
  • 在存储中,新建目录与创建文件时,同时使用 root 与 nginx 用户时,报错:fopen(/webtv/wangjie/ccp_api/images/2021/03/08/1615170408.5917.1243625051.png): failed to open stream: Permission denied

    在存储中,新建目录与创建文件时,同时使用 root 与 nginx 用户时,报错:fopen(/webtv/wangjie/ccp_api/images/2021/03/08/1615170408.5917.1243625051.png): failed to open stream: Permission denied

    1、在运行命令行脚本时,使用 root 用户创建目录:/webtv/wangjie/ccp_api/images/2021/03/08,创建文件:1615170036.5115.2027450777.png。目录的所有者与所属的组皆为 root。如图1
    在运行命令行脚本时,使用 root 用户创建目录:/webtv/wangjie/ccp_api/images/2021/03/08,创建文件:1615170036.5115.2027450777.png。目录的所有者与所属的组皆为 root。
    图1
    2、在运行 HTTP 接口时,使用 nginx 用户在目录:/webtv/wangjie/ccp_api/images/2021/03/08 下创建文件:1615170408.5917.1243625051.png。报错:fopen(/webtv/wangjie/ccp_api/images/2021/03/08/1615170408.5917.1243625051.png): failed to open stream: Permission denied。如图2
    在运行 HTTP 接口时,使用 nginx 用户在目录:/webtv/wangjie/ccp_api/images/2021/03/08 下创建文件:1615170408.5917.1243625051.png。报错:fopen(/webtv/wangjie/ccp_api/images/2021/03/08/1615170408.5917.1243625051.png): failed to open stream: Permission denied。
    图2
    3、最终决定在创建目录后,将目录的所有者与所属的组修改为 nginx。如图3
    最终决定在创建目录后,将目录的所有者与所属的组修改为 nginx。
    图3
    
    
        // return chmod($path, $mode);
        @chmod($path, $mode);
        $user = 'nginx';
        @chown($path, $user);
        @chgrp($path, $user);
        return true;


    4、删除目录:/webtv/wangjie/ccp_api/images/2021/03/08。在运行命令行脚本时,使用 root 用户创建目录:/webtv/wangjie/ccp_api/images/2021/03/08,创建文件:1615173793.3843.742805318.png。目录的所有者与所属的组皆为 nginx。符合预期。如图4
    删除目录:/webtv/wangjie/ccp_api/images/2021/03/08。在运行命令行脚本时,使用 root 用户创建目录:/webtv/wangjie/ccp_api/images/2021/03/08,创建文件:1615173793.3843.742805318.png。目录的所有者与所属的组皆为 nginx。符合预期。
    图4
    5、在运行 HTTP 接口时,使用 nginx 用户在目录:/webtv/wangjie/ccp_api/images/2021/03/08 下创建文件:1615173932.3359.493433255.png 成功。符合预期。如图5
    在运行 HTTP 接口时,使用 nginx 用户在目录:/webtv/wangjie/ccp_api/images/2021/03/08 下创建文件:1615173932.3359.493433255.png 成功。符合预期。
    图5
    6、在运行 HTTP 接口时,使用 nginx 用户创建目录:/webtv/wangjie/ccp_api/images/2021/03/10,创建文件:1615340979.3862.490335317.png。目录的所有者与所属的组皆为 nginx。符合预期。如图6
    在运行 HTTP 接口时,使用 nginx 用户创建目录:/webtv/wangjie/ccp_api/images/2021/03/10,创建文件:1615340979.3862.490335317.png。目录的所有者与所属的组皆为 nginx。符合预期。
    图6
    7、在运行命令行脚本时,使用 root 用户在目录:/webtv/wangjie/ccp_api/images/2021/03/10 下创建文件:1615341025.4625.492305521.png 成功。符合预期。如图7
    在运行命令行脚本时,使用 root 用户在目录:/webtv/wangjie/ccp_api/images/2021/03/10 下创建文件:1615341025.4625.492305521.png 成功。符合预期。
    图7
  • Error processing tar file(exit status 1): unexpected EOF 的排查分析

    Error processing tar file(exit status 1): unexpected EOF 的排查分析

    1、在 Jenkins 中构建镜像,报错:Error processing tar file(exit status 1): unexpected EOF。如图1
    在 Jenkins 中构建镜像,报错:Error processing tar file(exit status 1): unexpected EOF。
    图1
    
    
    Step 10/10 : RUN chown -R nginx:nginx /mcloud/ &&     chmod 777 /mcloud/cmp_main/data &&     chmod 777 /usr/share/sync.sh &&     chmod 777 /mcloud/cmp_main/attachment &&     chmod +x /config/init/* &&     chmod +x /etc/nginx/conf.d/* &&     chmod +x /etc/supervisord.d/* &&     rm -rf /mcloud/cmp_main/data/tpl/ &&     rm -rf /etc/nginx/conf.d/status.conf
     ---> Running in 800972ee06bc
    Error processing tar file(exit status 1): unexpected EOF
    Build step 'Docker Build and Publish' marked build as failure
    Finished: FAILURE


    2、查看 Dockerfile ,应该是 ADD 命令的行数过多了一些,进而导致空间不足。参考网址:https://stackoverflow.com/questions/42784396/docker-error-error-processing-tar-fileexit-status-1-unexpected-eof 。如图2
    查看 Dockerfile ,应该是 ADD 命令的行数过多了一些,进而导致空间不足。
    图2
    
    
    ADD code /mcloud/cmp_main
    ADD code/build/c_files/ /
    ADD code/build/sync.sh /usr/share/sync.sh
    ADD code/build/cacheJsSDK.sh /usr/share/cacheJsSDK.sh
    ADD code/build/MP_verify_3RUFnkMVef9eh3mJ.txt /mcloud/cmp_main/
    ADD code/build/MP_verify_qxIMkC3go7fNqBzb.txt /mcloud/cmp_main/
    
    RUN sed -i 's/allow_url_fopen = Off/allow_url_fopen = On/g' /usr/local/php/etc/php.ini && \
        sed -i 's/disable_functions = exec,system/disable_functions = system/g' /usr/local/php/etc/php.ini
    
    RUN chown -R nginx:nginx /mcloud/ && \
        chmod 777 /mcloud/cmp_main/data && \
        chmod 777 /usr/share/sync.sh && \
        chmod 777 /mcloud/cmp_main/attachment && \
        chmod +x /config/init/* && \
        chmod +x /etc/nginx/conf.d/* && \
        chmod +x /etc/supervisord.d/* && \
        rm -rf /mcloud/cmp_main/data/tpl/ && \
        rm -rf /etc/nginx/conf.d/status.conf


    3、剪切 /build/sync.sh 至 /build/c_files/usr/share/sync.sh。剪切 /build/cacheJsSDK.sh 至 /build/c_files/usr/share/cacheJsSDK.sh。剪切 /build/MP_verify_3RUFnkMVef9eh3mJ.txt 至 /build/c_files/mcloud/cmp_main/MP_verify_3RUFnkMVef9eh3mJ.txt。剪切 /build/MP_verify_qxIMkC3go7fNqBzb.txt 至 /build/c_files/mcloud/cmp_main/MP_verify_qxIMkC3go7fNqBzb.txt。编辑 Dockerfile,删除了 4 行 ADD。如图3
    剪切 /build/sync.sh 至 /build/c_files/usr/share/sync.sh。剪切 /build/cacheJsSDK.sh 至 /build/c_files/usr/share/cacheJsSDK.sh。剪切 /build/MP_verify_3RUFnkMVef9eh3mJ.txt 至 /build/c_files/mcloud/cmp_main/MP_verify_3RUFnkMVef9eh3mJ.txt。剪切 /build/MP_verify_qxIMkC3go7fNqBzb.txt 至 /build/c_files/mcloud/cmp_main/MP_verify_qxIMkC3go7fNqBzb.txt。编辑 Dockerfile,删除了 4 行 ADD。
    图3
    
    
    RUN sed -i 's/allow_url_fopen = Off/allow_url_fopen = On/g' /usr/local/php/etc/php.ini && \
        sed -i 's/disable_functions = exec,system/disable_functions = system/g' /usr/local/php/etc/php.ini
    
    ADD code /mcloud/cmp_main
    ADD code/build/c_files/ /
    
    RUN chown -R nginx:nginx /mcloud/ && \
        chmod 777 /mcloud/cmp_main/data && \
        chmod 777 /usr/share/sync.sh && \
        chmod 777 /mcloud/cmp_main/attachment && \
        chmod +x /config/init/* && \
        chmod +x /etc/nginx/conf.d/* && \
        chmod +x /etc/supervisord.d/* && \
        rm -rf /mcloud/cmp_main/data/tpl/ && \
        rm -rf /etc/nginx/conf.d/status.conf


    4、再次构建,第一次构建报错:unknown parent image ID sha256:。不过第二次构建成功。如图4
    再次构建,第一次构建报错:unknown parent image ID sha256:。不过第二次构建成功。
    图4
    5、调整前后的镜像大小分别为:4711、3882。大小减少了:4711 – 3882 = 829。如图5
    调整前后的镜像大小分别为:4711、3882。大小减少了:4711 - 3882 = 829。
    图5
    6、另一个可能的原因在于 Dockerfile 刚经过大幅度的修改。此种情况下,建议多构建几次。最终还是可以构建成功。
  • 在 Konga 中实现 ccpapi.xxx.cn 至 apiv2.xxx.cn/ccpapi 的实现

    在 Konga 中实现 ccpapi.xxx.cn 至 apiv2.xxx.cn/ccpapi 的实现

    1、现阶段的域名为:ccpapi.xxx.cn。可以在外网正常调用。如图1

    现阶段的域名为:ccpapi.xxx.cn。可以在外网正常调用。
    图1

    2、现阶段的 Rancher 配置,负载均衡。如图2

    现阶段的 Rancher 配置,负载均衡。
    图2

    3、在 Konga 中,SERVICES – ADD NEW SERVICE。Name:api_ccp 。Url:http://api.ccp:82 。仅填写这 2 个字段。提交。如图3

    在 Konga 中,SERVICES - ADD NEW SERVICE。Name:api_ccp 。Url:http://api.ccp:82 。仅填写这 2 个字段。提交。
    图3

    4、在 Konga 中,SERVICES,查看 api_ccp 的详情。发现已经自动将 Url 的值拆分为 3 个字段(Protocol、Host、Port)的值。如图4

    在 Konga 中,SERVICES,查看 api_ccp 的详情。发现已经自动将 Url 的值拆分为 3 个字段(Protocol、Host、Port)的值。
    图4

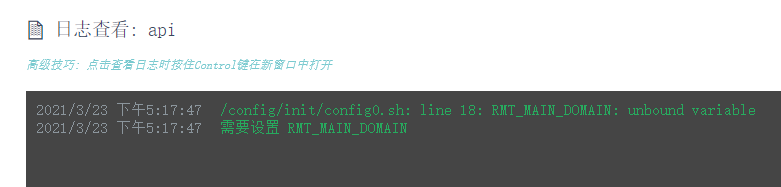
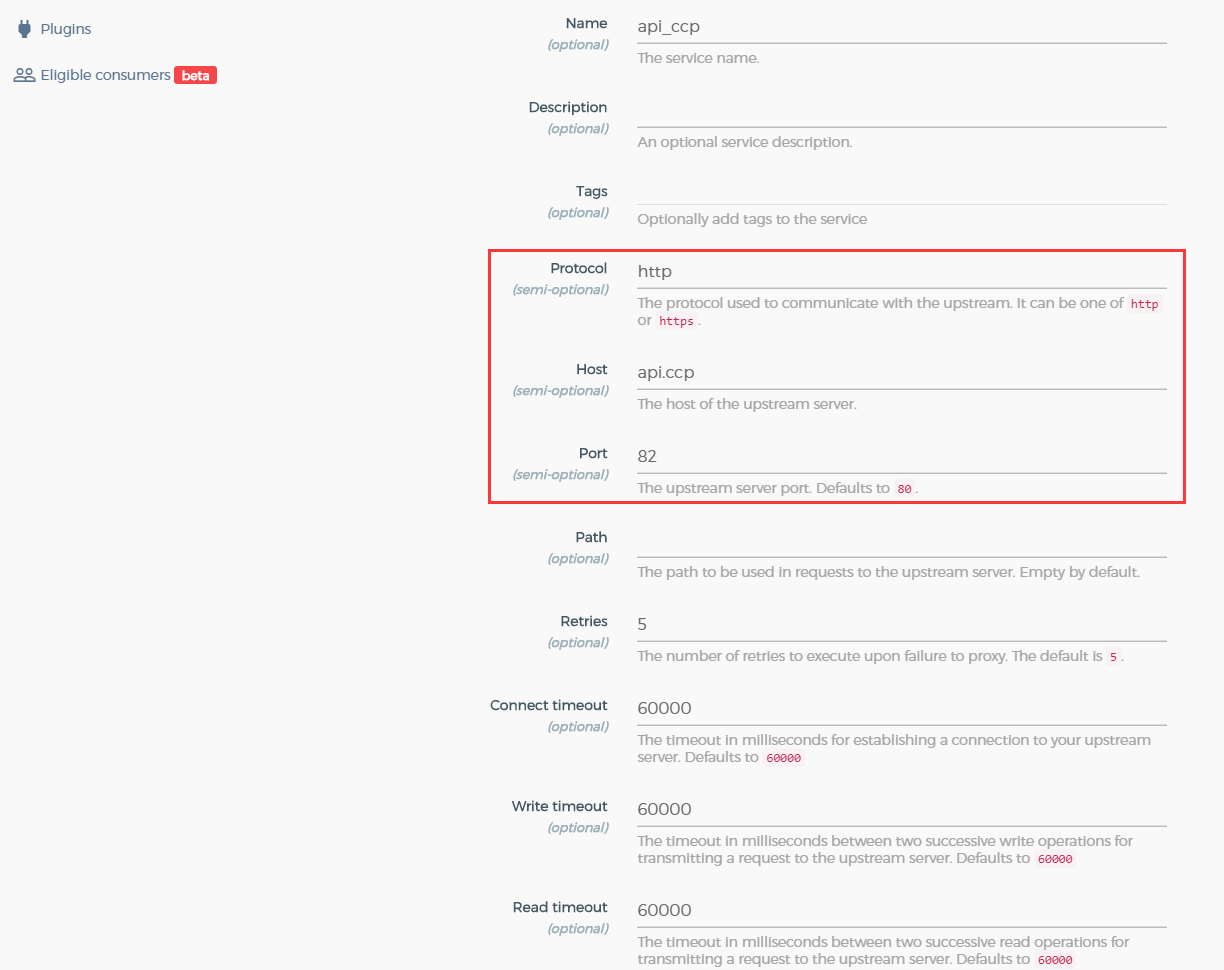
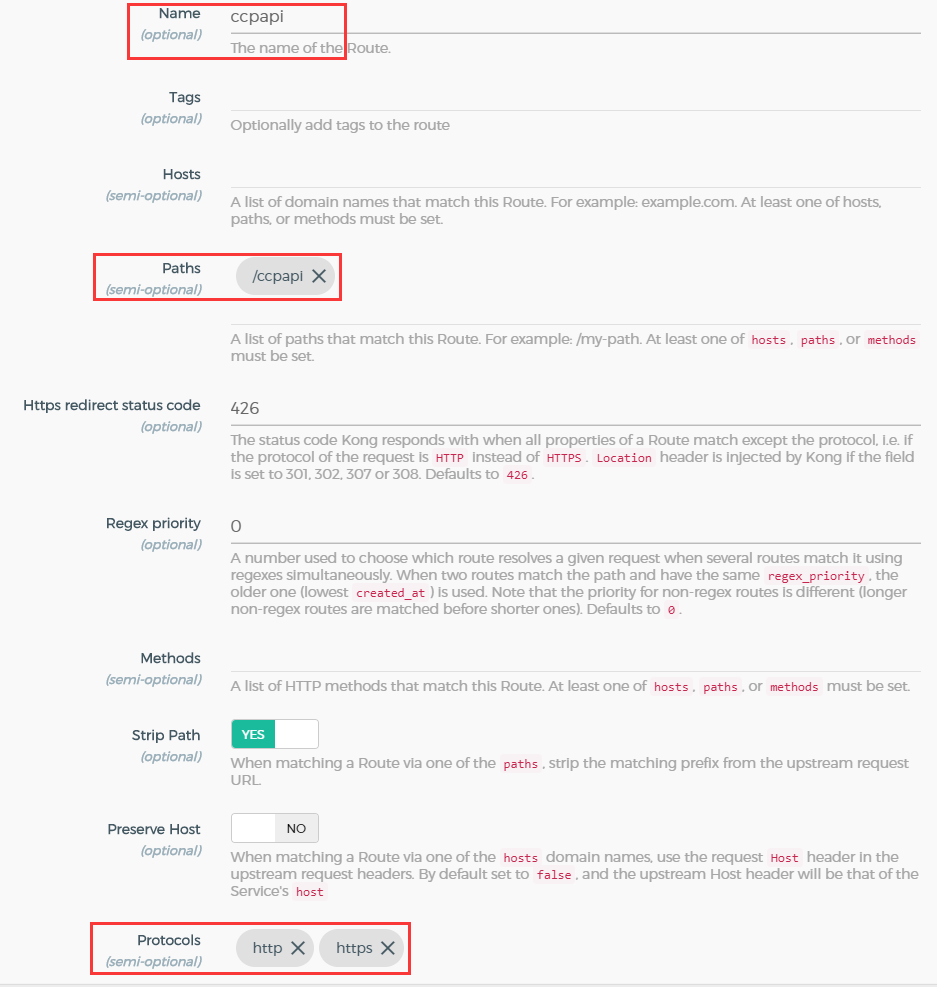
    5、在 Konga 中,SERVICES – Service api_ccp(注:修改了一下名称) – Routes – ADD ROUTE。Name:ccpapi 。Paths:/ccpapi 。提交报错:Submission failed. schema violation (must set one of ‘methods’, ‘hosts’, ‘headers’, ‘paths’, ‘snis’ when ‘protocols’ is ‘https’)。如图5

    在 Konga 中,SERVICES - Service api_ccp(注:修改了一下名称) - Routes - ADD ROUTE。Name:ccpapi 。Paths:/ccpapi 。提交报错:Submission failed. schema violation (must set one of 'methods', 'hosts', 'headers', 'paths', 'snis' when 'protocols' is 'https')。
    图5

    6、在 Paths 字段处,敲击回车键。Protocols:http、https,敲击回车键。提交。如图6

    在 Paths 字段处,敲击回车键。Protocols:http、https,敲击回车键。提交。
    图6

    7、在 Rancher 中,工作负载 – 升级服务 – 端口映射 – 添加规则。如图7

    在 Rancher 中,工作负载 - 升级服务 - 端口映射 - 添加规则。
    图7

    8、现阶段的 Rancher 配置,负载均衡。删除规则: ccpapi.xxx.cn。 如图8

    现阶段的 Rancher 配置,负载均衡。删除规则: ccpapi.xxx.cn。
    图8

    9、现阶段的域名为:apiv2.xxx.cn/ccpapi。可以在外网正常调用。只不过服务器接收到的请求为:http://api.ccp:82 。如图9

    现阶段的域名为:apiv2.xxx.cn/ccpapi。可以在外网正常调用。只不过服务器接收到的请求为:http://api.ccp:82 。
    图9


  • 在 ShowDoc 的 Markdown 中,转义字符 \ 的运用,以正常显示 *

    在 ShowDoc 的 Markdown 中,转义字符 \ 的运用,以正常显示 *

    1、在 ShowDoc 中,2 * 3600 显示为:2 * 3600。30 * 24 * 3600 显示为:30 24 3600。如图1
    在 ShowDoc 中,2 * 3600 显示为:2 * 3600。30 * 24 * 3600 显示为:30 24 3600。
    图1
    
    
    |CHANNEL_PUB_API_CFG_REFRESH_TOKEN_EXPIRES_IN | 刷新令牌有效期,单位(秒)  | 否|30 * 24 * 3600 |30 * 24 * 3600  |
    |CHANNEL_PUB_API_CFG_REFRESH_TOKEN_TIME_OUT | 刷新令牌超时时间,单位为秒  | 否|2 * 3600 |2 * 3600  |


    2、在 30 * 24 * 3600 中使用转义字符,修改为:30 \* 24 \* 3600。30 \* 24 \* 3600 显示为:30 * 24 * 3600。符合预期。如图2
    在 30 * 24 * 3600 中使用转义字符,修改为:30 \* 24 \* 3600。30 \* 24 \* 3600 显示为:30 * 24 * 3600。符合预期。
    图2
    
    
    |CHANNEL_PUB_API_CFG_REFRESH_TOKEN_EXPIRES_IN | 刷新令牌有效期,单位(秒)  | 否|30 \* 24 \* 3600 |30 \* 24 \* 3600  |
    |CHANNEL_PUB_API_CFG_REFRESH_TOKEN_TIME_OUT | 刷新令牌超时时间,单位为秒  | 否|2 * 3600 |2 * 3600  |