Branch and Merge Practice Specification in TortoiseSVN 1.8.8
1. The creation of the repository, based on VisualSVN Server 3.5.0
(1) Right-click repositories, select: Create new repository…, select: Regular FSFS repository, as shown in Figure 1

Figure 1
(2) Set the repository name: branch, as shown in Figure 2

Figure 2
(3) Select: single-project repository(with the top-leveltrunk,branchesAndtagsfolders), as shown in Figure 3

Figure 3
(4) Select: nobody has access, as shown in Figure 4

Figure 4
(5) Finish, as shown in Figure 5

Figure 5
(6) Right-click Branch, select: Properties, as shown in Figure 6

Figure 6
(7) Select the user group that needs to be authorized, and select: Develpoer, front_end_developer, as shown in Figure 7

Figure 7
(8) Permissions (permissions) are: read/write, confirm, as shown in Figure 8

8
2. Detection of the trunk
(1) Create a new directory branch, as shown in Figure 9

Figure 9
(2) Enter the directory branch, then right-click in the blank space, select: SVN to check out, as shown in Figure 10

Figure 10
(3) Fill in the repository url of the pop-up window: “https://192.168.2.63/svn/branch/trunk”, other defaults are enough, and finally click OK, as shown in Figure 11

Figure 11
(4) The detection is completed, determined, as shown in Figure 12

Figure 12
3. Submission of the trunk
(1) Enter the directory branch and create a new file 1.txt, as shown in Figure 13

Figure 13
(2) Enter the directory branch, then right-click on the blank space and select: SVN submit, as shown in Figure 14

Figure 14
(3) Select all in the pop-up window, add a note, and confirm, as shown in Figure 15

Figure 15
(4) The submission is completed, confirm
4. Create a branch V1
(1) Enter the directory branch, then right-click on the blank space, and select “tortoisesvn” -> “branch/mark”, as shown in Figure 16

Figure 16
(2) Fill in the “to path” of the pop-up window, you can fill in the branch address manually, or you can click the browse button at the back, as shown in Figure 17

Figure 17
(3) Click the browse button, the pop-up window, as shown in Figure 18

18
(4) Select: branches, OK, as shown in Figure 19

Figure 19
(5) Fill in the “to path” of the pop-up window: “/branches”, which has been filled in automatically, as shown in Figure 20

Figure 20
(6) Edit the address of the branch in the “To Path”: “/branches/v1”, copy it to the repository, select: the latest version in the repository, add log information, confirm, as shown in Figure 21

Figure 21
(7) The creation branch is completed, as shown in Figure 22

Figure 22
5. Switch to branch V1
(1) Enter the directory branch, then right-click on the blank, and select “tortoisesvn” -> “switch”, as shown in Figure 23

Figure 23
(2) Fill in the “to path” of the pop-up window, you can fill in the branch address manually, you can also click the drop-down list to select, or you can click the browsing button at the back to confirm, as shown in Figure 24

Figure 24
(3) The switching is completed, as shown in Figure 25

Figure 25
6. Submit a new file on branch v1
(1) Enter the directory branch (working copy), create a new file v1.txt, as shown in Figure 26

Figure 26
(2) Right-click on the blank space, select: SVN Submit, select all, and add log information, as shown in Figure 27

Figure 27
7. Switch to the main trunk
(1) Enter the directory branch, then right-click on the blank, and select “TortoiseSVN” -> “Switch”, as shown in Figure 28

Figure 28
(2) Fill in the “to path” of the pop-up window, you can fill in the branch address manually, you can also click the drop-down list to select, or you can click the browsing button at the back to confirm, as shown in Figure 29

Figure 29
(3) The switching is completed, as shown in Figure 30

Figure 30
8. Submit a modification on the trunk
(1) Enter the directory branch and edit the file 1.txt, as shown in Figure 31

Figure 31
(2) Right-click on the blank space, select: SVN Submit, select all, and add log information, as shown in Figure 32

Figure 32
(3) The submission is completed, as shown in Figure 33

Figure 33
9. Switch to branch V1 again
(1) Enter the directory branch, then right-click on the blank, and select “tortoisesvn” -> “switch”, as shown in Figure 34

Figure 34
(2) Fill in the “to path” of the pop-up window, you can fill in the branch address manually, you can also click the drop-down list to select, or you can click the browsing button at the back to confirm, as shown in Figure 35

Figure 35
(3) The switching is completed, as shown in Figure 36

Figure 36
(4) At this time, open 1.txt and find that the operation done in step 8 has been restored, because at that time it was submitted to the main trunk, not to the branch v1, as shown in Figure 37

Figure 37
10. Submit a modification on branch V1
(1) Enter the directory branch and edit the file 1.txt, as shown in Figure 38

Figure 38
(2) Right-click on the blank space, select: SVN Submit, select all, and add log information, as shown in Figure 39

Figure 39
(3) The submission is completed, as shown in Figure 40

Figure 40
11. Combine the trunk into the branch v1
(1) Enter the directory branch, then right-click on the blank space, and select “TortoiseSVN” -> “merge”, as shown in Figure 41

Figure 41
(2) Select the merge type of the pop-up window: merge a version range, the next step, as shown in Figure 42

Figure 42
(3) In the merge window, the merged source URL can be filled in manually, or you can click the drop-down list to select, or you can click the browse button at the back to confirm, as shown in Figure 43

Figure 43
(4) Click the browse button, the pop-up window, select: trunk, confirm, as shown in Figure 44

Figure 44
(5) At this time, the source of the merge has been automatically changed to:”https://192.168.2.63/svn/branch/trunk”, as shown in Figure 45

Figure 45
(6) The modified version range that will be merged, select: specified range (if you do not fill in the version range, all unmerged versions will be selected), as shown in Figure 46

Figure 46
(7) Merge options, just keep the default settings here, as shown in Figure 47

Figure 47
(8) Before clicking the Merge button, you can test the merge first to check whether it is successful or not, and the details of the merger, as shown in Figure 48

Figure 48
(9) Pop up the conflict resolution window, as shown in Figure 49
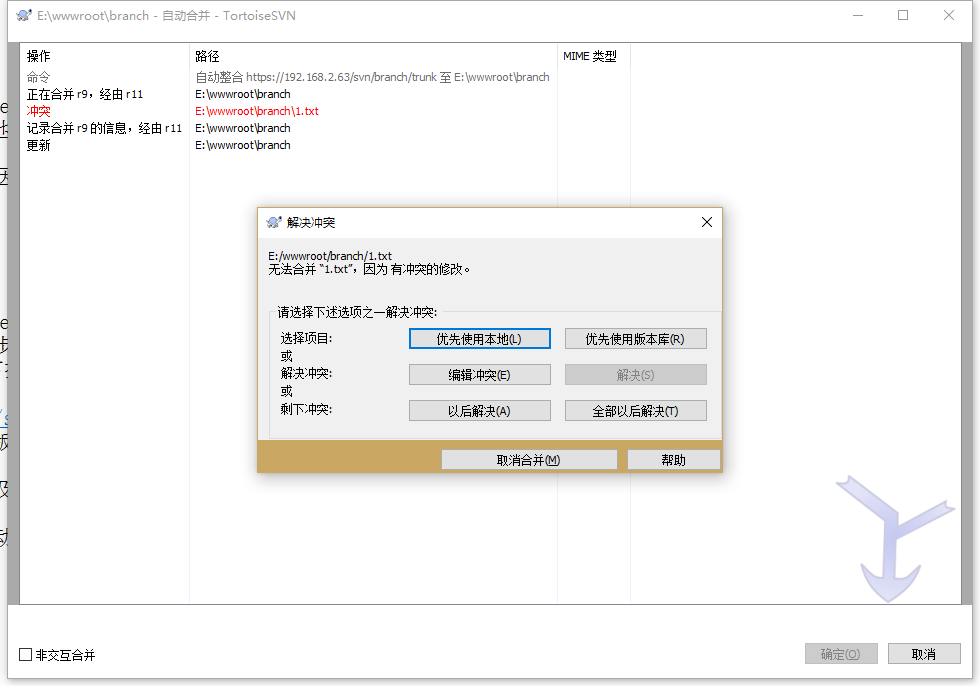
Figure 49
(10) Remaining conflicts: all will be resolved later, as shown in Figure 50

Figure 50
(11) The modifications made by the main trunk will be synchronized to the branch V1, and the merge is completed automatically, as shown in Figure 51

Figure 51
(12) Open 1.txt, as shown in Figure 52

Figure 52
(13) Manually resolve conflicts, edit 1.txt, and delete 3 conflict files starting with 1.txt., as shown in Figure 53

Figure 53
12. Submit the merged branch V1
(1) Submit, as shown in Figure 54

Figure 54
(2) The submission is completed. At this point, the branch V1 has been completely synchronized with the trunk. If the development of the branch V1 has ended, then the branch V1 will be branched. The merged back to the main trunk, of course, if the branch V1 is to continue to develop, it will continue to repeat the steps of 10-11, as shown in Figure 55

Figure 55
13. Merge the branch V1 into the trunk (premise: after the development of the branch V1)
(1) Switch to the main trunk first, you can refer to step 7, as shown in Figure 56

Figure 56
(2) Enter the directory branch, then right-click in the blank, and select “tortoisesvn” -> “merge”, as shown in Figure 57

Figure 57
(2) Select the merge type of the pop-up window: merge a version range, the next step, as shown in Figure 58

Figure 58
(3) In the merge window, the merged source URL can be filled in manually, or you can click the drop-down list to select, or you can click the browsing button at the back to confirm, as shown in Figure 59

Figure 59
(4) Click the browse button, the pop-up window, select: branches/v1, confirm, as shown in Figure 60

Figure 60
(5) At this time, the source of the merge has been automatically changed to:”https://192.168.2.63/svn/branch/branches/v1″, as shown in Figure 61

Figure 61
(6) The modified version range to be merged, select: the specified range (if you do not fill in the version range, all unmerged versions will be selected), as shown in Figure 62

Figure 62
(7) Merge options, just keep the default settings here, as shown in Figure 63

Figure 63
(8) Before clicking the Merge button, you can test the merge first to check whether the success or not, and the detailed information of the merger, as shown in Figure 64

Figure 64
(9) The automatic merge is completed, as shown in Figure 65

Figure 65
(10) Check the content of 1.txt, the modification made by branch v1 will be synchronized to the trunk, as shown in Figure 66

Figure 66
14. Submit the merged trunk
(1) Right-click on the blank space, select: SVN Submit, select All, and add log information, as shown in Figure 67

Figure 67
15. Display logs
(1) Display the log information, if checking the included version, you can view the information related to the merge, as shown in Figure 68

Figure 68
16. It is recommended to adjust the steps of 13-15 to 16-18, and merge the branch V5 into the trunk (premise: after the development of the branch V5)
(1) Switch to the main trunk first, you can refer to step 7
(2) Enter the directory branch, then right-click on the blank, and select “tortoisesvn” -> “merge”, as shown in Figure 70

Figure 70
(3) Select the merge type of the pop-up window: merge two different trees, the next step, as shown in Figure 71

Figure 71
(4) In the merge window, enter the complete folder address of the trunk in the start: area, as shown in Figure 72

Figure 72
(5) At the end: Enter the path of branch V4 in the area, you can click the browse button behind to select, as shown in Figure 73

Figure 73
(6) End at this time: the area has been automatically changed to:”https://192.168.2.63/svn/branch/branches/v5″, as shown in Figure 74

Figure 74
(7) At the end version, click the display log button after the version to view the starting version of branch V5 as: 26, as shown in Figure 75

Figure 75
(8) In the starting version, select the version, click the display log button after the version, and select the version: 25, that is, to add the previous version of the starting version 26 of the branch V5, as shown in Figure 76

Figure 76
(9) In the merge window, the final options are shown in Figure 77, click Next

Figure 77
(10) Before clicking the Merge button, you can test the merge first to see whether it is successful or not, and the detailed information of the merger, as shown in Figure 78

Figure 78
(11) The automatic merge is completed, as shown in Figure 79

Figure 79
17. Submit the combined backbone
(1) Right-click on the blank space, select: SVN Submit, select all, and add log information, as shown in Figure 80

Figure 80
18. Display the log
(1) Display the log information, if you check the included version, you can view the information related to the merge, as shown in Figure 81

Figure 81
19. Summary:
(1) Branches are mainly used for the development of new functions
(2) The merge occurs in the local working copy, as long as you don’t submit it, it will not affect the repository
(3) Before merging, you must perform updates and submissions, and save local modifications to the repository
(4) In the process of parallel development of the branch and the trunk (merge other branches into the trunk), it is necessary to synchronize frequently, merge the modification of the trunk into the branch, and select “specified range” when merging
(5) Only after the branch development is completed, the branches can be merged into the main trunk