Implementation Flow of Installing CentOS 7 in VirtualBox on Windows 10 64-bit
1. When creating a new virtual computer, it is found that the 64-bit system cannot be selected, as shown in Figure 1:

When creating a new virtual computer, it is found that the 64-bit system cannot be selected
2. Enter the BIOS to enable the virtualization technology, and set Intel Virtualization Technology to Enabled, as shown in Figure 2:

Enter BIOS to enable virtualization technology, and set Intel Virtualization Technology to Enabled
3. Save and exit the BIOS, as shown in Figure 3:

Save and exit the BIOS
4. When creating a new virtual computer, it is found that you can choose a 64-bit system, as shown in Figure 4:

When creating a new virtual computer, it is found that you can choose a 64-bit system
5. Select the memory size allocated to the virtual computer, as shown in Figure 5:

Select the size of the memory allocated to the virtual computer
6. Now create a virtual hard disk, as shown in Figure 6:

Now create a virtual hard disk
7. Select VDI for the file type of the virtual hard disk, as shown in Figure 7:

Virtual hard disk file type select VDI
8. Select a fixed size, because it is faster to use, as shown in Figure 8:

Choose a fixed size because it is faster to use
9. The size of the virtual hard disk is set to 20GB, as shown in Figure 9:

The size of the virtual hard disk is set to 20GB
10. Start the newly created virtual machine, and prompt to select the boot disk, as shown in Figure 10:

Start the newly created virtual machine and prompt to select the boot disk
11. Select a virtual disc file CentOS-7-x86_64-DVD-1511.iso, as shown in Figure 11:

Select a virtual disc file CentOS-7-X86_64-DVD-1511.ISO
12. Select the first item to install directly, as shown in Figure 12:
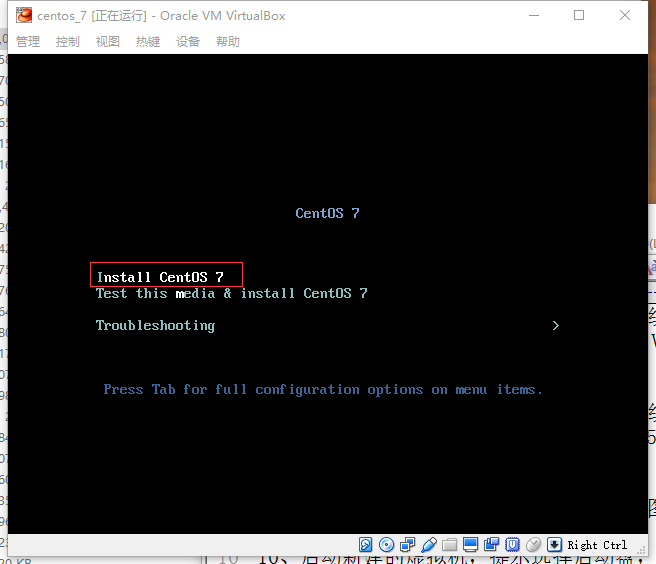
Select the first option to install directly
13. Select the language, here is Simplified Chinese, as shown in Figure 13:

Select the language, here is Simplified Chinese
14. Please complete the content with the icon mark first and then proceed to the next step, as shown in Figure 14:

Please complete the content with the icon mark before proceeding to the next step
15. Click the system, no need to operate, click the finish button, as shown in Figure 15:

Click the system, no need to operate, click the finish button
16. The automatic partition has been selected, and it is completed, and the installation starts, as shown in Figure 16:

Automatic partition has been selected, and complete, start installation
17. Root password settings, as shown in Figure 17:

root password settings
18. Click the Finish configuration button, as shown in Figure 18:

Click the Finish Configuration button
19. Restart the system, as shown in Figure 19:

restart the system
20. The system has been installed and has entered the system, as shown in Figure 20:

After the system is installed, it has entered the system