Based on Alibaba Cloud’s ECS and RDS, the personal blog migration is upgraded to: Docker (based on budget considerations, ultimately not realized), LNMP (CentOS 7.7, Nginx 1.16, MySQL 5.7, PHP 7.4), the process of HTTPS
1. Enter the CentOS server based on Xshell 6, compress and package the website program directory, execute the compression command, and the execution result is shown in Figure 1

Figure 1
cd /data/wwwroot/shuijingwanwq.com
zip -r shuijingwanwq.com-20191203.zip /data/wwwroot/shuijingwanwq.com
2. Connect to the FTP server based on FlashFXP, download the compressed package: shuijingwanwq.com-20191203.zip to the local, as shown in Figure 2

Figure 2
3. Connect to the MySQL server based on phpMyAdmin to export the database used by the personal blog: shuijingwanwq, the file name is: shuijingwanwq.sql, as shown in Figure 3

Figure 3
4. Create a cluster in the Alibaba Cloud container service, as shown in Figure 4, Figure 5, Figure 6, and Figure 7

Figure 4

Figure 5

Figure 6

Figure 7
5. It is found that the cost is seriously exceeding the budget (the budget is only 4K), even if the minimum configuration of the Master instance, 2 cores and 4G, after a year, the total cost is nearly 5 digits, and finally decided to continue to use the original CentOS, just re-upgrade the hardware configuration and software version
6. In terms of hardware configuration, it is decided to expand the data disk from 10 GiB to 40 GiB, as shown in Figure 8

8
7. The capacity after expansion is 40 GiB, as shown in Figure 9

Figure 9
8. Stop the ECS example, as shown in Figure 10

Figure 10
9. Replace the operating system, as shown in Figure 11

Figure 11
10. Replace the operating system, CentOS 7.7 64-bit, as shown in Figure 12

Figure 12
11. After stopping the ECS instance, in the instance disk list, after the system disk is replaced with the operating system, the system disk has been automatically initialized. Therefore, only the data disk needs to be re-initialized, as shown in Figure 13

Figure 13
12. Cloud database RDS, database type: MySQL 5.7, its availability area is consistent with ECS, as shown in Figure 14

Figure 14
13. Mount the data disk and open the URL:https://oneinstack.com/question/how-to-mount-a-data-disc/, the mount is successful, as shown in Figure 15

Figure 15
[root@iZ23wv7v5ggZ ~]# wget http://mirrors.linuxeye.com/scripts/auto_fdisk.sh
--2019-12-05 11:29:45--  http://mirrors.linuxeye.com/scripts/auto_fdisk.sh
Resolving mirrors.linuxeye.com (mirrors.linuxeye.com)... 61.160.200.234
Connecting to mirrors.linuxeye.com (mirrors.linuxeye.com)|61.160.200.234|:80... connected.
HTTP request sent, awaiting response... 200 OK
Length: 5598 (5.5K) [text/x-json]
Saving to: ‘auto_fdisk.sh’

100%[=======================================================================================>] 5,598       --.-K/s   in 0.006s

2019-12-05 11:29:45 (970 KB/s) - ‘auto_fdisk.sh’ saved [5598/5598]

[root@iZ23wv7v5ggZ ~]# chmod +x ./auto_fdisk.sh
[root@iZ23wv7v5ggZ ~]# ./auto_fdisk.sh

#######################################################################
#       OneinStack for CentOS/RedHat 5+ Debian 6+ and Ubuntu 12+      #
#                             Auto fdisk                              #
#       For more information please visit http://oneinstack.com       #
#######################################################################

Step 1.No lock file, begin to create lock file and continue

Step 2.Begin to check free disk
You have a free disk, Now will fdisk it and mount it
This system have free disk :
/dev/vdb

Step 3.Begin to fdisk free disk

Step 4.Begin to make directory

Please enter a location to mount (Default directory: /data):

Step 5.Begin to write configuration to /etc/fstab and mount device

Filesystem      Size  Used Avail Use% Mounted on
devtmpfs        486M     0  486M   0% /dev
tmpfs           496M     0  496M   0% /dev/shm
tmpfs           496M  436K  496M   1% /run
tmpfs           496M     0  496M   0% /sys/fs/cgroup
/dev/vda1        20G  1.8G   17G  10% /
tmpfs           100M     0  100M   0% /run/user/0
/dev/vdb1        40G   49M   38G   1% /data
14. Open the URL:https://oneinstack.com/auto/, based on the automatic installation of OneInStack, LNMP, PHP version 7.4, and copy installation command are selected, as shown in Figure 16

Figure 16
15. After starting the ECS instance, enter the CentOS server based on Xshell 6, paste and execute the installation command, as shown in Figure 17

Figure 17
16. Open the URL:http://121.40.248.29, which is the public network IP of ECS: 121.40.248.29, refer to the document tutorial for adding virtual hosts, and add a virtual host:www.shuijingwanwq.com,如图18

18
[root@iZ23wv7v5ggZ ~]# ls
auto_fdisk.sh  oneinstack  oneinstack-full.tar.gz
[root@iZ23wv7v5ggZ ~]# cd oneinstack
[root@iZ23wv7v5ggZ oneinstack]# ./vhost.sh

#######################################################################
#       OneinStack for CentOS/RedHat 6+ Debian 8+ and Ubuntu 14+      #
#       For more information please visit https://oneinstack.com      #
#######################################################################

What Are You Doing?
	1. Use HTTP Only
	2. Use your own SSL Certificate and Key
	3. Use Let's Encrypt to Create SSL Certificate and Key
	q. Exit
Please input the correct option: 3

Please input domain(example: www.example.com): www.shuijingwanwq.com
domain=www.shuijingwanwq.com

Please input the directory for the domain:www.shuijingwanwq.com :
(Default directory: /data/wwwroot/www.shuijingwanwq.com):
Virtual Host Directory=/data/wwwroot/www.shuijingwanwq.com

Create Virtul Host directory......
set permissions of Virtual Host directory......

Do you want to add more domain name? [y/n]: y

Type domainname or IP(example: example.com other.example.com): shuijingwanwq.com
domain list=shuijingwanwq.com

Do you want to redirect from shuijingwanwq.com to www.shuijingwanwq.com? [y/n]: y

Do you want to redirect all HTTP requests to HTTPS? [y/n]: y
[Thu Dec  5 13:42:04 CST 2019] Create account key ok.
[Thu Dec  5 13:42:04 CST 2019] Registering account
[Thu Dec  5 13:42:06 CST 2019] Registered
[Thu Dec  5 13:42:06 CST 2019] ACCOUNT_THUMBPRINT='YjoQ78tWzIgLHz3s7fhC7IoepTPjD3tKvXNrLwE417w'
[Thu Dec  5 13:42:06 CST 2019] Creating domain key
[Thu Dec  5 13:42:06 CST 2019] The domain key is here: /root/.acme.sh/www.shuijingwanwq.com/www.shuijingwanwq.com.key
[Thu Dec  5 13:42:06 CST 2019] Multi domain='DNS:www.shuijingwanwq.com,DNS:shuijingwanwq.com'
[Thu Dec  5 13:42:06 CST 2019] Getting domain auth token for each domain
[Thu Dec  5 13:42:09 CST 2019] Getting webroot for domain='www.shuijingwanwq.com'
[Thu Dec  5 13:42:09 CST 2019] Getting webroot for domain='shuijingwanwq.com'
[Thu Dec  5 13:42:10 CST 2019] Verifying: www.shuijingwanwq.com
[Thu Dec  5 13:42:13 CST 2019] Success
[Thu Dec  5 13:42:13 CST 2019] Verifying: shuijingwanwq.com
[Thu Dec  5 13:42:17 CST 2019] Success
[Thu Dec  5 13:42:17 CST 2019] Verify finished, start to sign.
[Thu Dec  5 13:42:17 CST 2019] Lets finalize the order, Le_OrderFinalize: https://acme-v02.api.letsencrypt.org/acme/finalize/73156074/1675742914
[Thu Dec  5 13:42:19 CST 2019] Download cert, Le_LinkCert: https://acme-v02.api.letsencrypt.org/acme/cert/03c589a531a1436b28e9162b53022c7e4bdd
[Thu Dec  5 13:42:20 CST 2019] Cert success.
-----BEGIN CERTIFICATE-----
MIIFdTCCBF2gAwIBAgISA8WJpTGhQ2so6RYrUwIsfkvdMA0GCSqGSIb3DQEBCwUA
MEoxCzAJBgNVBAYTAlVTMRYwFAYDVQQKEw1MZXQncyBFbmNyeXB0MSMwIQYDVQQD
ExpMZXQncyBFbmNyeXB0IEF1dGhvcml0eSBYMzAeFw0xOTEyMDUwNDQyMThaFw0y
MDAzMDQwNDQyMThaMCAxHjAcBgNVBAMTFXd3dy5zaHVpamluZ3dhbndxLmNvbTCC
ASIwDQYJKoZIhvcNAQEBBQADggEPADCCAQoCggEBAL5uSUG5EB2t482PVg3oXQ3W
1op5ZZph6c1Mgw+pugTM3GW7R+eR/au1FcSJUoSZhA9/Yvps27/B7jafVS6MrDYv
6l2vj9aqXuXqoto2DMrqCd7h11x3V+W55/pODaqTG3b8LPaWXcqoDQ1830R+XqDU
+/L29x0nunc6JYJmHrDMx1OU9cticXPaUV+/GLGvgh6JOF8Xn9IAIczvlJuu5Sak
umEEDsIft0GI78WSHgx2onT6KIBSBFWMWDtgOAhiaIjlUww/Qg11YjQMfDaaaFYo
Etg0b9qWz0MIZl7J+87dmy8uHvWlO3Ph7V5s4pdHCv+Y7AAXvn0SpRrb15RwYxMC
AwEAAaOCAn0wggJ5MA4GA1UdDwEB/wQEAwIFoDAdBgNVHSUEFjAUBggrBgEFBQcD
AQYIKwYBBQUHAwIwDAYDVR0TAQH/BAIwADAdBgNVHQ4EFgQUP+gvTkg2uTXmuKEc
JvqozkFfXsMwHwYDVR0jBBgwFoAUqEpqYwR93brm0Tm3pkVl7/Oo7KEwbwYIKwYB
BQUHAQEEYzBhMC4GCCsGAQUFBzABhiJodHRwOi8vb2NzcC5pbnQteDMubGV0c2Vu
Y3J5cHQub3JnMC8GCCsGAQUFBzAChiNodHRwOi8vY2VydC5pbnQteDMubGV0c2Vu
Y3J5cHQub3JnLzAzBgNVHREELDAqghFzaHVpamluZ3dhbndxLmNvbYIVd3d3LnNo
dWlqaW5nd2Fud3EuY29tMEwGA1UdIARFMEMwCAYGZ4EMAQIBMDcGCysGAQQBgt8T
AQEBMCgwJgYIKwYBBQUHAgEWGmh0dHA6Ly9jcHMubGV0c2VuY3J5cHQub3JnMIIB
BAYKKwYBBAHWeQIEAgSB9QSB8gDwAHYAb1N2rDHwMRnYmQCkURX/dxUcEdkCwQAp
Bo2yCJo32RMAAAFu1JSaBQAABAMARzBFAiEAjyN2kk8UHD+chH/Lpb0m0Ve0ORc6
tEwbx0/1rt0bBBYCIF3JMCisI70bNmHpIWcvirwBM0+1t6Yyy5b+xA65v6/BAHYA
B7dcG+V9aP/xsMYdIxXHuuZXfFeUt2ruvGE6GmnTohwAAAFu1JSZ/gAABAMARzBF
AiB4wGj9xD+Yj4Szu5yAb6/266KPSX2QxIL1J6YSyOSq+AIhAIZe0ii2cOvUn9Wb
gE2RmVXOKohPp8cmqR9OfRK7icBUMA0GCSqGSIb3DQEBCwUAA4IBAQB+8IQ0C4Zj
nDHy69nQ9hv2DnpWA20v8efPIr+mxmmESGZo3DlZBkzbuWgFB3ObpX2rYhzVm9gK
awDUZ4RI4CBG2JvzDhib7/C9OBSLQ4ZWxwPtwrGygACslBZ5t1hb531SawFd3PKf
CZBAa80oF52D//M2l0yoaCzoCcckih8t3MH1ehKQQMvYGaEjMuhtcBm1Z830YWzY
jmdIasyeSn5ErrgKW3asBgBnhO9U6fngot8HqUFU3stj0mAs5b2rumAHhgH1cvh3
AfXkQSnFh+MLErarwW92oxM7dDIiT3AHY4RAXM/uBMNTTMu8n01g9RW2zZo+a7wB
zyCDzi3YL8Bp
-----END CERTIFICATE-----
[Thu Dec  5 13:42:20 CST 2019] Your cert is in  /root/.acme.sh/www.shuijingwanwq.com/www.shuijingwanwq.com.cer
[Thu Dec  5 13:42:20 CST 2019] Your cert key is in  /root/.acme.sh/www.shuijingwanwq.com/www.shuijingwanwq.com.key
[Thu Dec  5 13:42:20 CST 2019] The intermediate CA cert is in  /root/.acme.sh/www.shuijingwanwq.com/ca.cer
[Thu Dec  5 13:42:20 CST 2019] And the full chain certs is there:  /root/.acme.sh/www.shuijingwanwq.com/fullchain.cer

Do you want to add hotlink protection? [y/n]: n

Allow Rewrite rule? [y/n]: y

Please input the rewrite of programme :
wordpress,opencart,magento2,drupal,joomla,codeigniter,laravel
thinkphp,pathinfo,discuz,typecho,ecshop,nextcloud,zblog,whmcs rewrite was exist.
(Default rewrite: other): wordpress
You choose rewrite=wordpress

Allow Nginx/Tengine/OpenResty access_log? [y/n]: y
You access log file=/data/wwwlogs/www.shuijingwanwq.com_nginx.log

nginx: the configuration file /usr/local/nginx/conf/nginx.conf syntax is ok
nginx: configuration file /usr/local/nginx/conf/nginx.conf test is successful
Reload Nginx......

#######################################################################
#       OneinStack for CentOS/RedHat 6+ Debian 8+ and Ubuntu 14+      #
#       For more information please visit https://oneinstack.com      #
#######################################################################
Your domain:                  www.shuijingwanwq.com
Virtualhost conf:             /usr/local/nginx/conf/vhost/www.shuijingwanwq.com.conf
Directory of:                 /data/wwwroot/www.shuijingwanwq.com
Rewrite rule:                 /usr/local/nginx/conf/rewrite/wordpress.conf
Let's Encrypt SSL Certificate:/usr/local/nginx/conf/ssl/www.shuijingwanwq.com.crt
SSL Private Key:              /usr/local/nginx/conf/ssl/www.shuijingwanwq.com.key
17. Manage FTP accounts and add FTP accounts:www.shuijingwanwq.com,如图19

Figure 19
[root@iZ23wv7v5ggZ oneinstack]# ./pureftpd_vhost.sh

#######################################################################
#       OneinStack for CentOS/RedHat 6+ Debian 8+ and Ubuntu 14+      #
#                 FTP virtual user account management                 #
#       For more information please visit https://oneinstack.com      #
#######################################################################

What Are You Doing?
	1. UserAdd
	2. UserMod
	3. UserPasswd
	4. UserDel
	5. ListAllUser
	6. ShowUser
	q. Exit
Please input the correct option: 5
User was not existed!

What Are You Doing?
	1. UserAdd
	2. UserMod
	3. UserPasswd
	4. UserDel
	5. ListAllUser
	6. ShowUser
	q. Exit
Please input the correct option: 1

Please input a username: www.shuijingwanwq.com

Please input the password:

Please input the directory(Default directory: /data/wwwroot): /data/wwwroot/www.shuijingwanwq.com
Password:
Enter it again:
#####################################

[www.shuijingwanwq.com] create successful!

You user name is : www.shuijingwanwq.com
You Password is :
You directory is : /data/wwwroot/www.shuijingwanwq.com


What Are You Doing?
	1. UserAdd
	2. UserMod
	3. UserPasswd
	4. UserDel
	5. ListAllUser
	6. ShowUser
	q. Exit
Please input the correct option: q
[root@iZ23wv7v5ggZ oneinstack]#
18. Manage RDS, create an account: shuijingwanwq, as shown in Figure 20

Figure 20
19. Manage RDS, create a new database: shuijingwanwq, character set: utf8mb4, as shown in Figure 21

Figure 21
20. Basic information, the intranet address is displayed after setting the whitelist, as shown in Figure 22

Figure 22
21. Add a whitelist group, and its value comes from the intranet IP of ECS, as shown in Figure 23

Figure 23
22. Basic information, the intranet address has been displayed, as shown in Figure 24

Figure 24
23. Log in to the database, as shown in Figure 25

Figure 25
24. Data scheme – import – new task – import sql file: shuijingwanwq.sql, as shown in Figure 26

Figure 26
25. After the import is completed, the number of SQLs successfully executed: 385, time-consuming: 8412ms, as shown in Figure 27

Figure 27
26. Refresh the database, check the table, and it has been successfully imported, as shown in Figure 28

Figure 28
27. Edit file: wp-config.php, adjust the value of the mysql host to: the intranet address of the RDS, and the other configurations remain unchanged, as shown in Figure 29

Figure 29
28. Based on FlashFXP, create a new site in the Site Manager, as shown in Figure 30

Figure 30
29. Based on FlashFXP, connect to the FTP server, and upload the decompressed program file, as shown in Figure 31

Figure 31
30. Open the URL: shuijingwanwq.com to test whether to automatically jump towww.shuijingwanwq.com,最终打开网址:https://www.shuijingwanwq.com/, as expected, and already support HTTPS, as shown in Figure 32

Figure 32
31. Previously, due to the version of PHP: 5.4.15, the program cannot be upgraded to: WordPress 5.3, because the version of the required PHP is: 5.6.20, as shown in Figure 33

Figure 33
32. The current version of PHP: 7.4.0, it can be upgraded normally, as shown in Figure 34

Figure 34
33. WordPress update, the wordpress you use is the latest version. Future security updates will be automatically installed. Plugins, themes, and translations are the latest versions. as shown in Figure 35
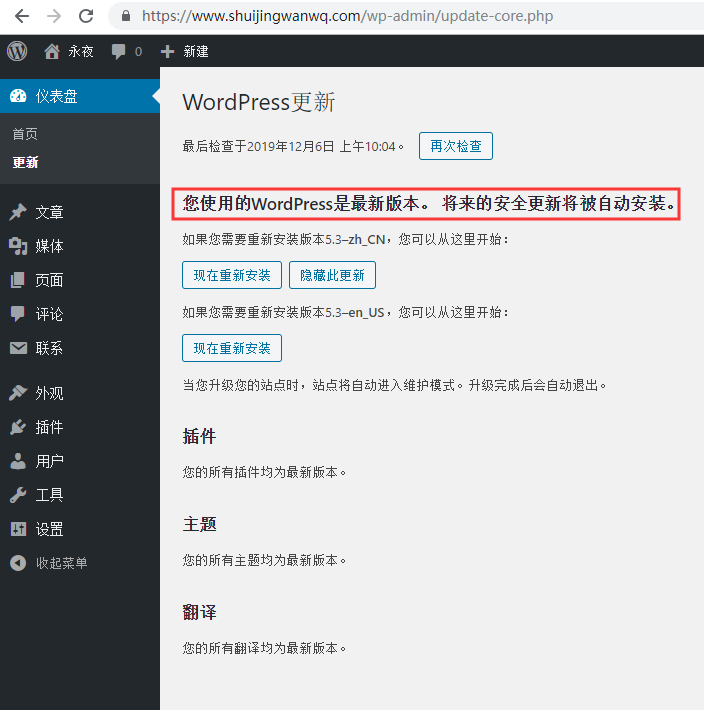
Figure 35