As a user who has long relied on VPN for overseas resource access and work communication, he has recently experienced the emergency situation of LetsVPN deactivated, from the alternative scheme to the final self-built Wireguard VPN It landed, stepped on a lot of pits in the process, and also accumulated reusable practical experience. This article will complete the entire process, from letsVPN deactivate notification, alternative screening, to the full steps of self-built VPN (cloud server selection, deployment, client installation and configuration), and attach key operational points and pitfall details for the reference of friends who have the same needs.
1. Emergency situation: LetsVPN is completely disabled, and temporary network access is in trouble
For a long time, I have been using LetsVPN to meet the daily overseas network access needs. Although there are occasional small problems of network fluctuation and unstable speed, the overall can be used normally and can stably support work and learning needs.
After entering mid-April, letsvpn There was obvious abnormality at the beginning: although the client can occasionally connect successfully, the network is extremely unstable, the delay is high, the packet loss is serious, and the web page is stuck frequently;
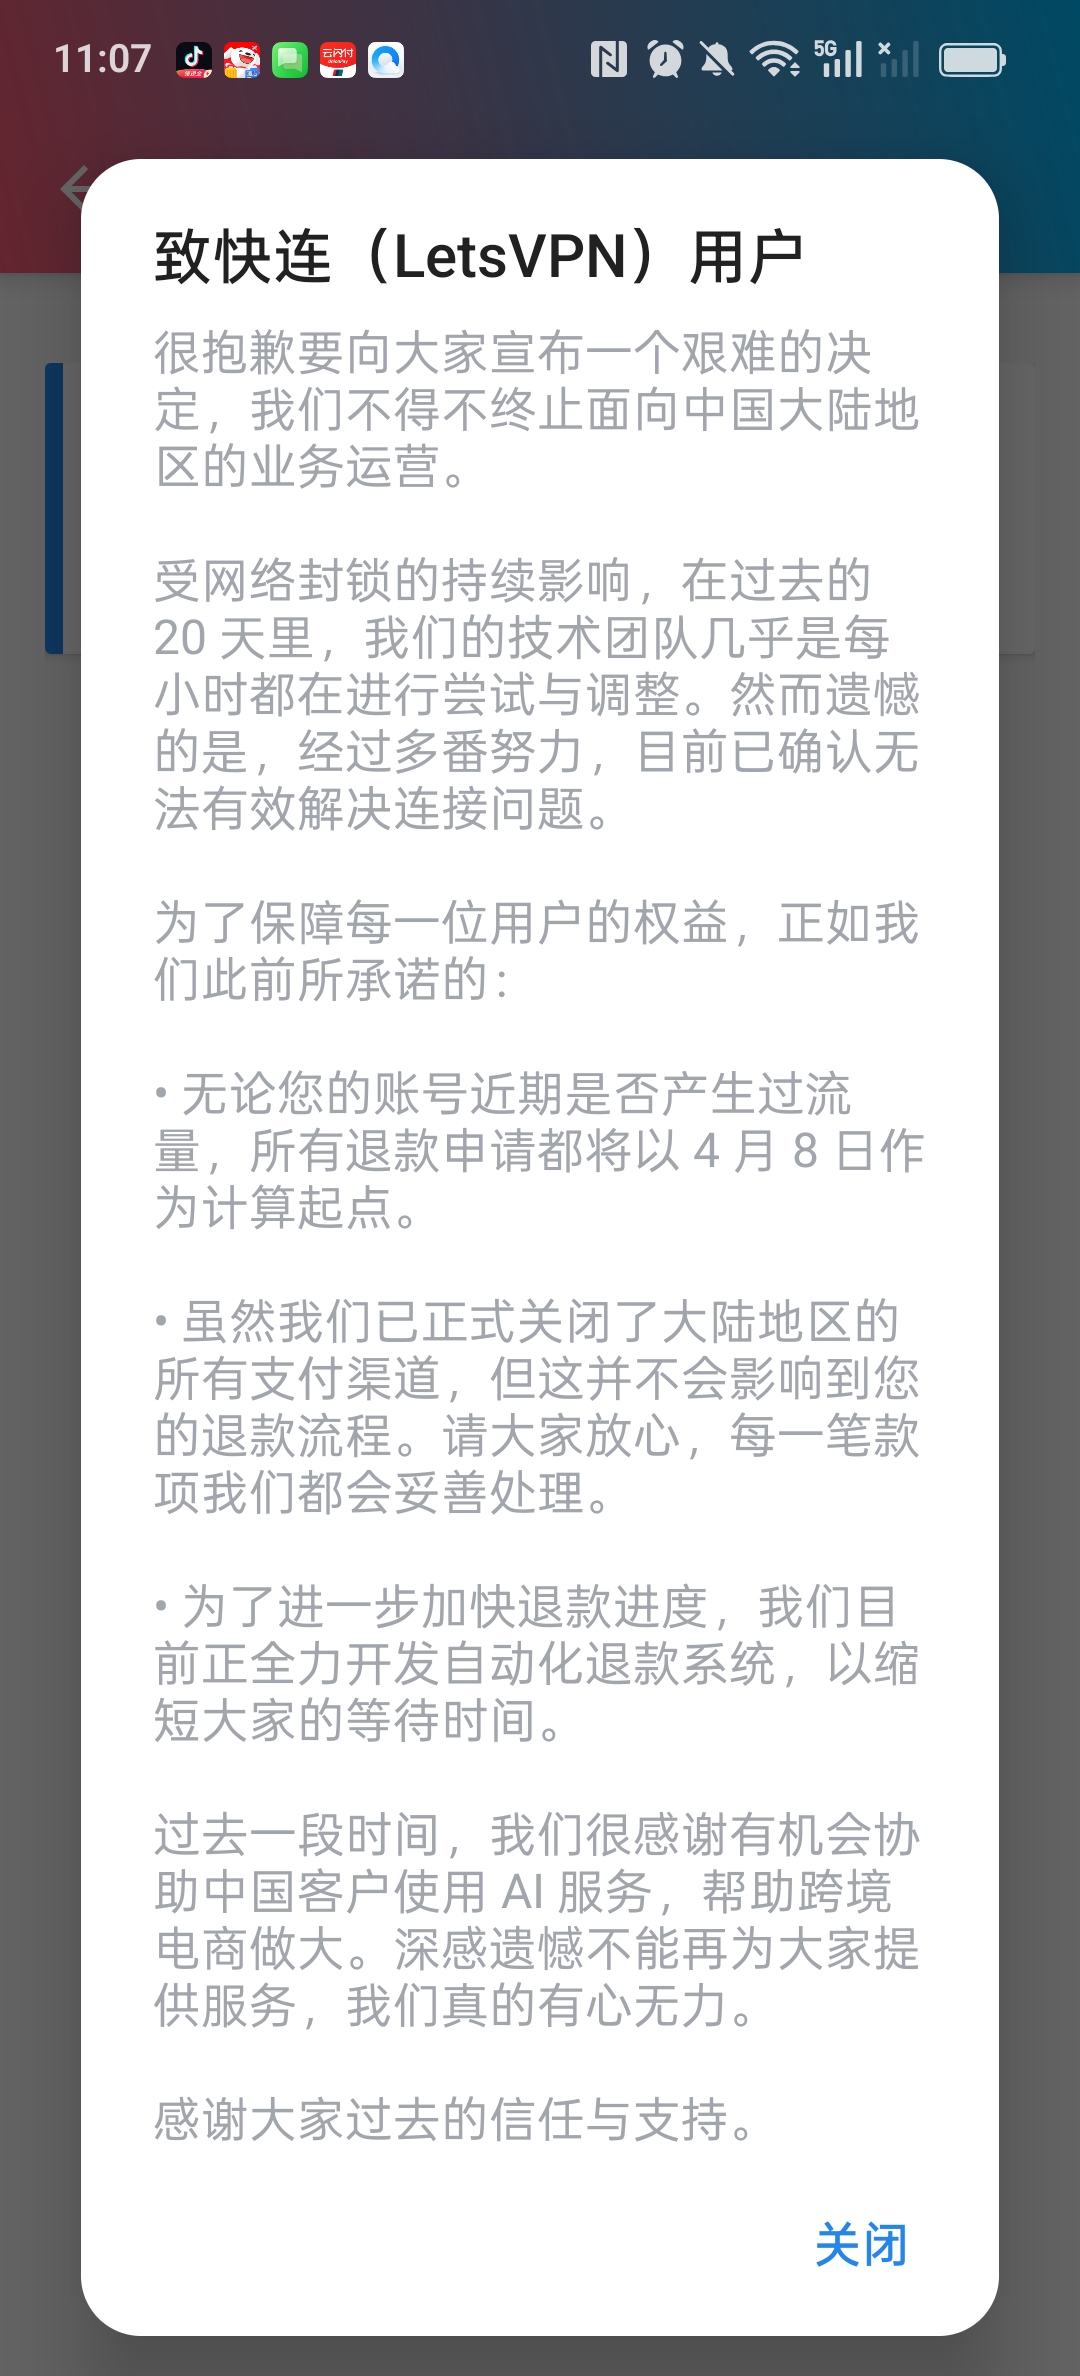
Until the end of April, the official official issued a shutdown announcement, clearly announced that LetsVPN will terminate all business operations for mainland China, and will no longer provide relevant services in the future. As shown in Figure 1: Screenshot of the official mainland business suspension announcement of letsVPN
Since then, the original network tools have been completely ineffective, and daily overseas website access, data access and other just-needed operations have been completely interrupted, and the normal work and learning rhythm has been severely disrupted. It is urgent to find stable and available alternatives as soon as possible.
2. Alternative solutions hit a wall: Enterprise version VPN threshold is too high, give up choice
Facing LetsVPN The predicament of stopping, the first thing that I thought of is to replace other people with VPNs (rather than directly selecting the enterprise version). , the vast majority of people on the market face the same compliance problem, not a technical failure, but a policy level limitation, which leads to the fact that most civil VPNs either cannot be used normally, or they may stop serving at any time, and The situation of LetsVPN is exactly the same. Under the balance, we turned to the enterprise version VPN instead of giving up the civil VPN selection for the enterprise version at the beginning – this needs to be clearly distinguished: letsvpn It belongs to the commercial VPN for individuals, not the enterprise version. After this survey, it is found that all people use commercial VPNs (whether or not) Fees), which are restricted by the policy, cannot be used and stable for a long time, so they have to give up the use of VPNs for a people and turn to the enterprise version of VPN.
However, after in-depth understanding, it is found that there are two insurmountable thresholds for the enterprise version of VPN: first, the price is high, and the monthly fee and annual fee of the mainstream enterprise version of the VPN are far exceeding the scope of individual tolerance, and the cost performance is extremely low for individual users; The second is that the qualification requirements are strict. The opening of the enterprise version VPN must provide relevant qualifications such as the enterprise business license, legal person information and other relevant qualifications. Individual users cannot meet them at all. WireGuard VPN This solution. (Figure 2: Screenshot of enterprise version VPN qualification requirements)

3. Final decision: self-built Wireguard VPN, take the initiative
People who use VPNs cannot be used and stable for a long time due to policy restrictions. The threshold for enterprise version of VPN is too high (qualification, price double restrictions), and under the balance, I finally decided to build my own VPN, and clearly choose the WireGuard protocol, not other open source VPN software. Compared with other mainstream open source VPN software, WireGuard has irreplaceable advantages. This is also the key to my abandonment of other open source VPNs and choosing WireGuard. The specific advantages are as follows:
- Lightweight and efficient, resource usage is extremely low: compared to other open source VPN software such as OpenVPN and SoftEther, WireGuard There is no need for complicated server configuration, and the implementation of the kernel level makes it occupy very little server memory and CPU resources, even if it is a low-profile cloud server (1 core and 1G), it can also run stably, and there will be no problems of lag and insufficient resources. This is very suitable for personal self-built scenarios.
- The connection is stable and the latency is lower: WireGuard adopts a minimalist encrypted transmission mechanism, there is no redundant configuration, the connection response speed is fast, and it is not easy to disconnect and stuck, compared with other open source VPNs (such as OpenVPN ), the delay can be reduced by more than 30%, especially suitable for watching high-definition videos, browsing overseas web pages and other scenarios, which is the core reason why I choose it first.
- The configuration is simple and does not require complicated operations: different from other open source VPN software (such as openvpn requires manual configuration of routes, certificates, etc.), WireGuard The configuration logic is more concise, just import the configuration file and turn on the switch to use it. There is no need to in-depth understanding of the underlying principles, and it is more friendly to non-professional users and meets my needs at that time.
- Strong compatibility, multi-device support friendly: WireGuard Support multiple devices at the same time (just generate independent configuration for different devices), and adapt to a variety of terminals such as computers, mobile phones, etc., without additional complex plug-ins, it is possible to realize multiple devices at the same time, which is difficult to achieve by many other open source VPN software.
- Avoid policy risks and adapt to individual scenarios: other open source VPN software (such as OpenVPN) are mostly suitable for enterprise or professional users, with cumbersome configuration and some functions are restricted by policy, while Wireguard The design of the protocol is more suitable for personal use scenarios, without the need for complicated qualification review, self-built deployments can avoid the policy restrictions of commercial VPNs, and at the same time take into account stability and security.
In general, WireGuard It is not only free of open source, but also suitable for my core needs of ‘personal use, stable and smooth, and simple operation’. Compared with other open source VPN software, it is more Lightweight and more suitable for personal self-built scenarios, so I finally chose to use WireGuard to build a personal VPN, rather than other open source VPN software.
The core idea of self-built VPN is: choose a reliable cloud service provider to deploy the server, and install WireGuard on the server The service, and then configure the client for the computer and mobile phone to realize the simultaneous stable connection of multiple devices.
4. Self-built WireGuard VPN full process practical operation (with pit details)
4.1 Step 1: Select a cloud service provider and deploy the basic server
The core of self-built VPN is to have an overseas cloud server, combined with personal needs (stability, cost performance, operation convenience), and after comparing mainstream overseas cloud service providers such as Vultr, DigitalOcean, and Hetzner, we finally chose VULTR: The global nodes are widely distributed, and support hourly billing. The monthly fee of entry-level servers (1-core 1G memory, 500G traffic) is only 5 US dollars, and it supports IPv6, and the deployment speed is fast. It is suitable for personal self-built VPNs.
Specific deployment steps
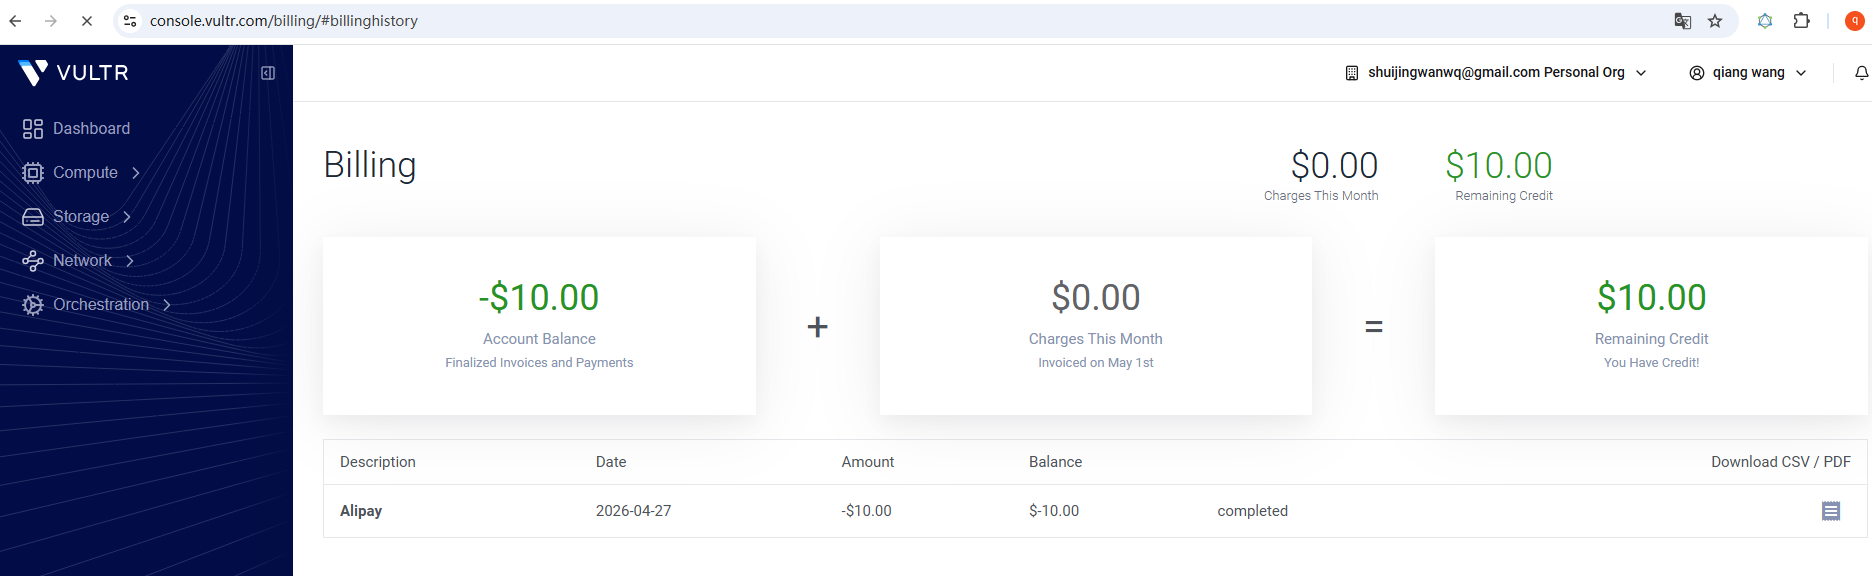
1. Register a Vultr account, complete the real-name authentication, and perform the recharge operation: give priority to Alipay payment, the recharge amount is 10 US dollars as shown in Figure 3
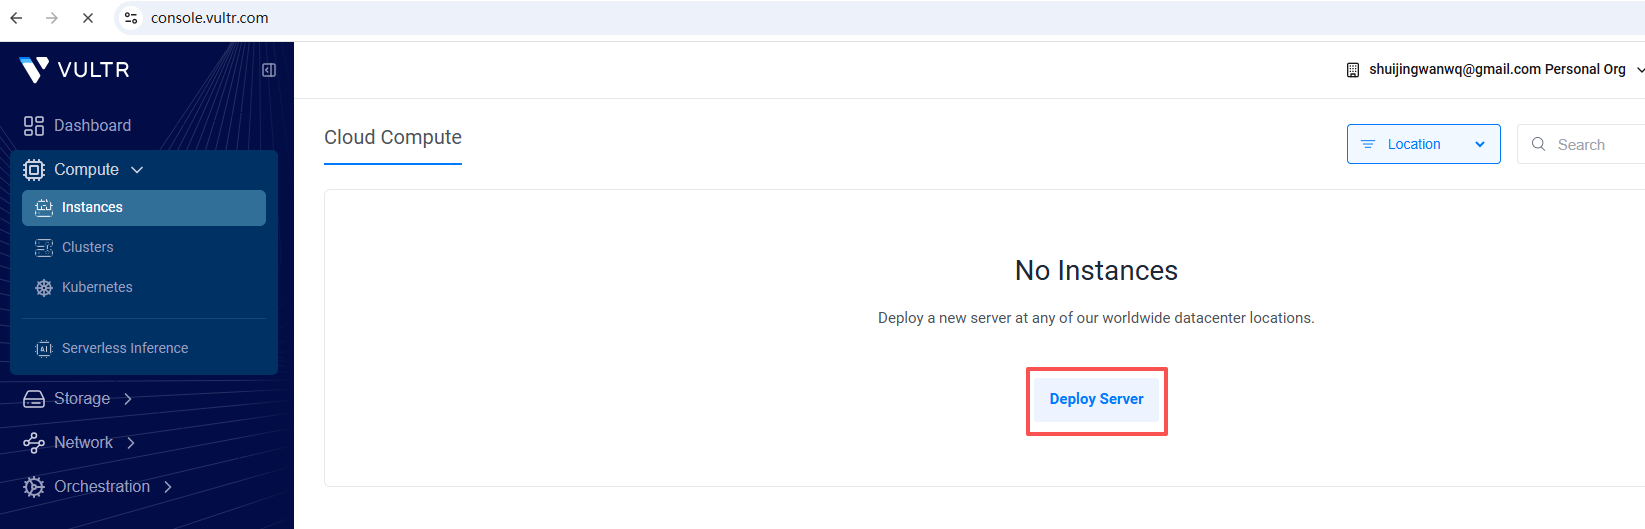
2. Create a server: After logging in to the vultr account, follow the path compute – instances – deploy server to enter the server deployment page (as shown in Figure 4). The specific configuration is as follows:
– Node selection: give priority to Singapore nodes (close to mainland China, low network latency and more stable speed);
– Server type: select Shared CPU (share CPU, meet daily needs, high cost performance);
– Package selection: $5 entry-level configuration per month (no need to over-configure, enough to support Wireguard operation);
– Other settings: Select ‘Disable’ for the automatic backup function (reduce the cost of use, and the key configuration can be manually backed up every day); as shown in Figure 5
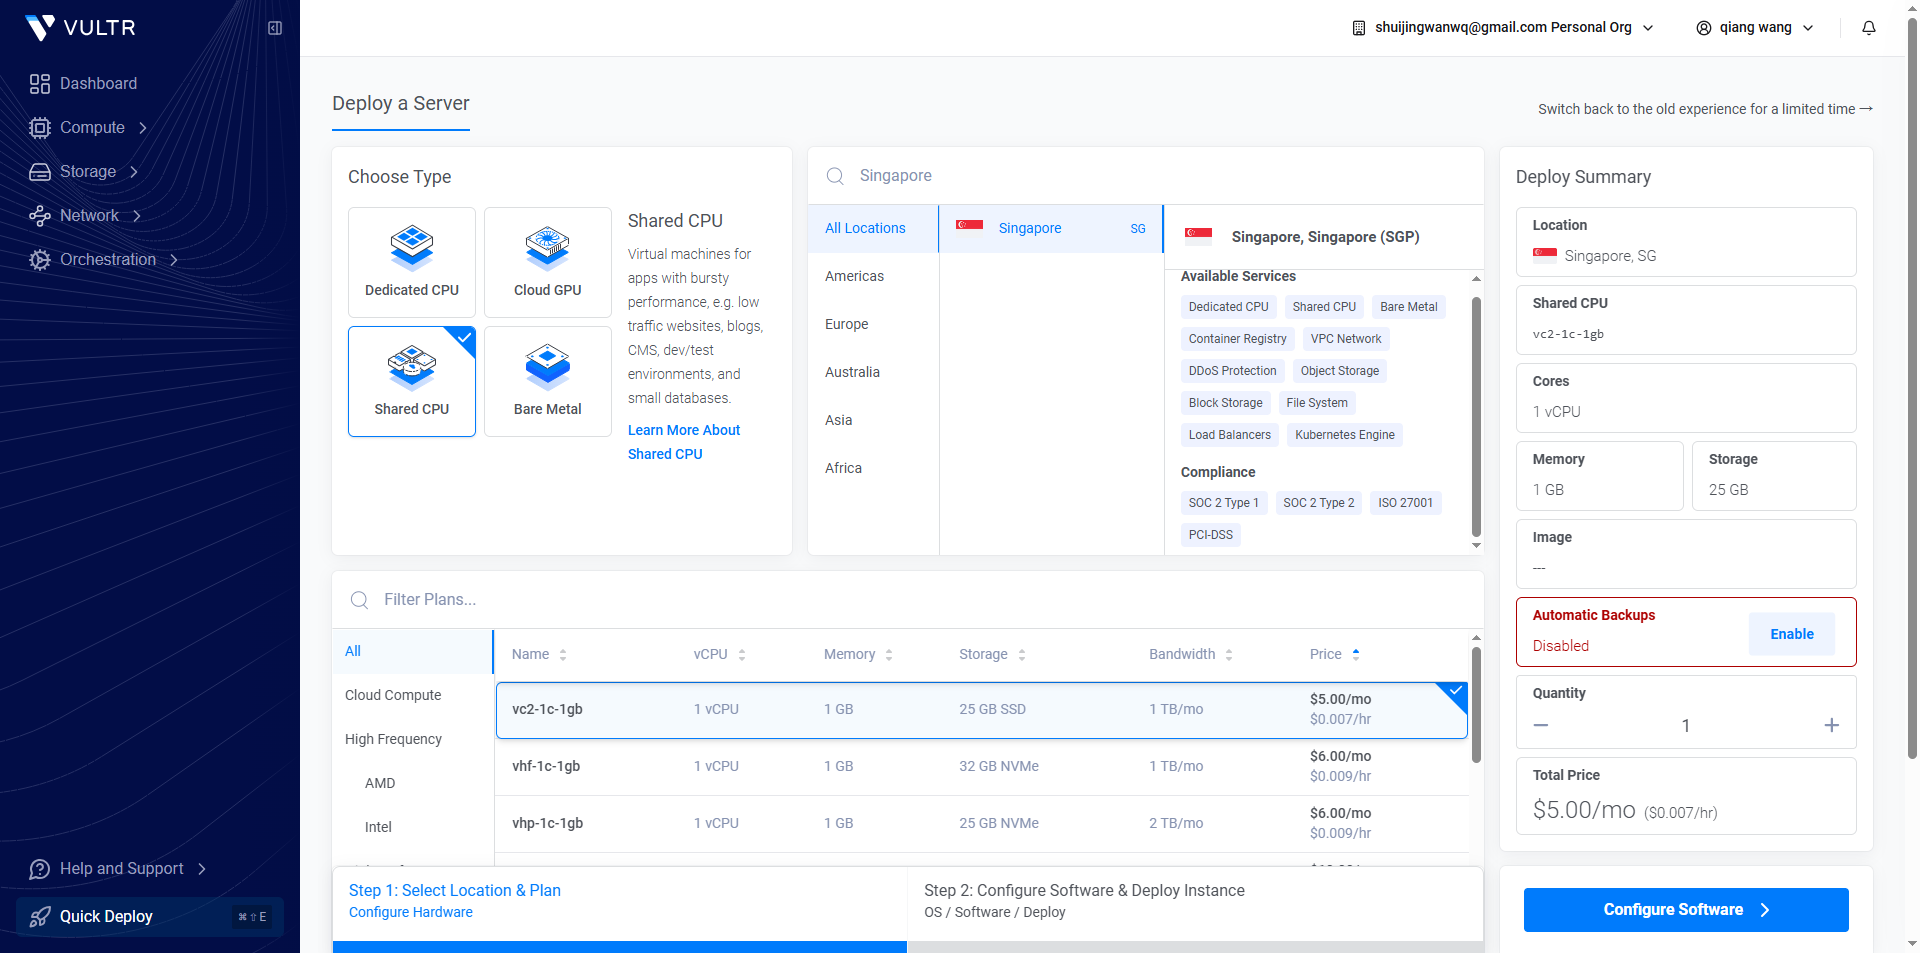
– Operating system: select Ubuntu 22.04
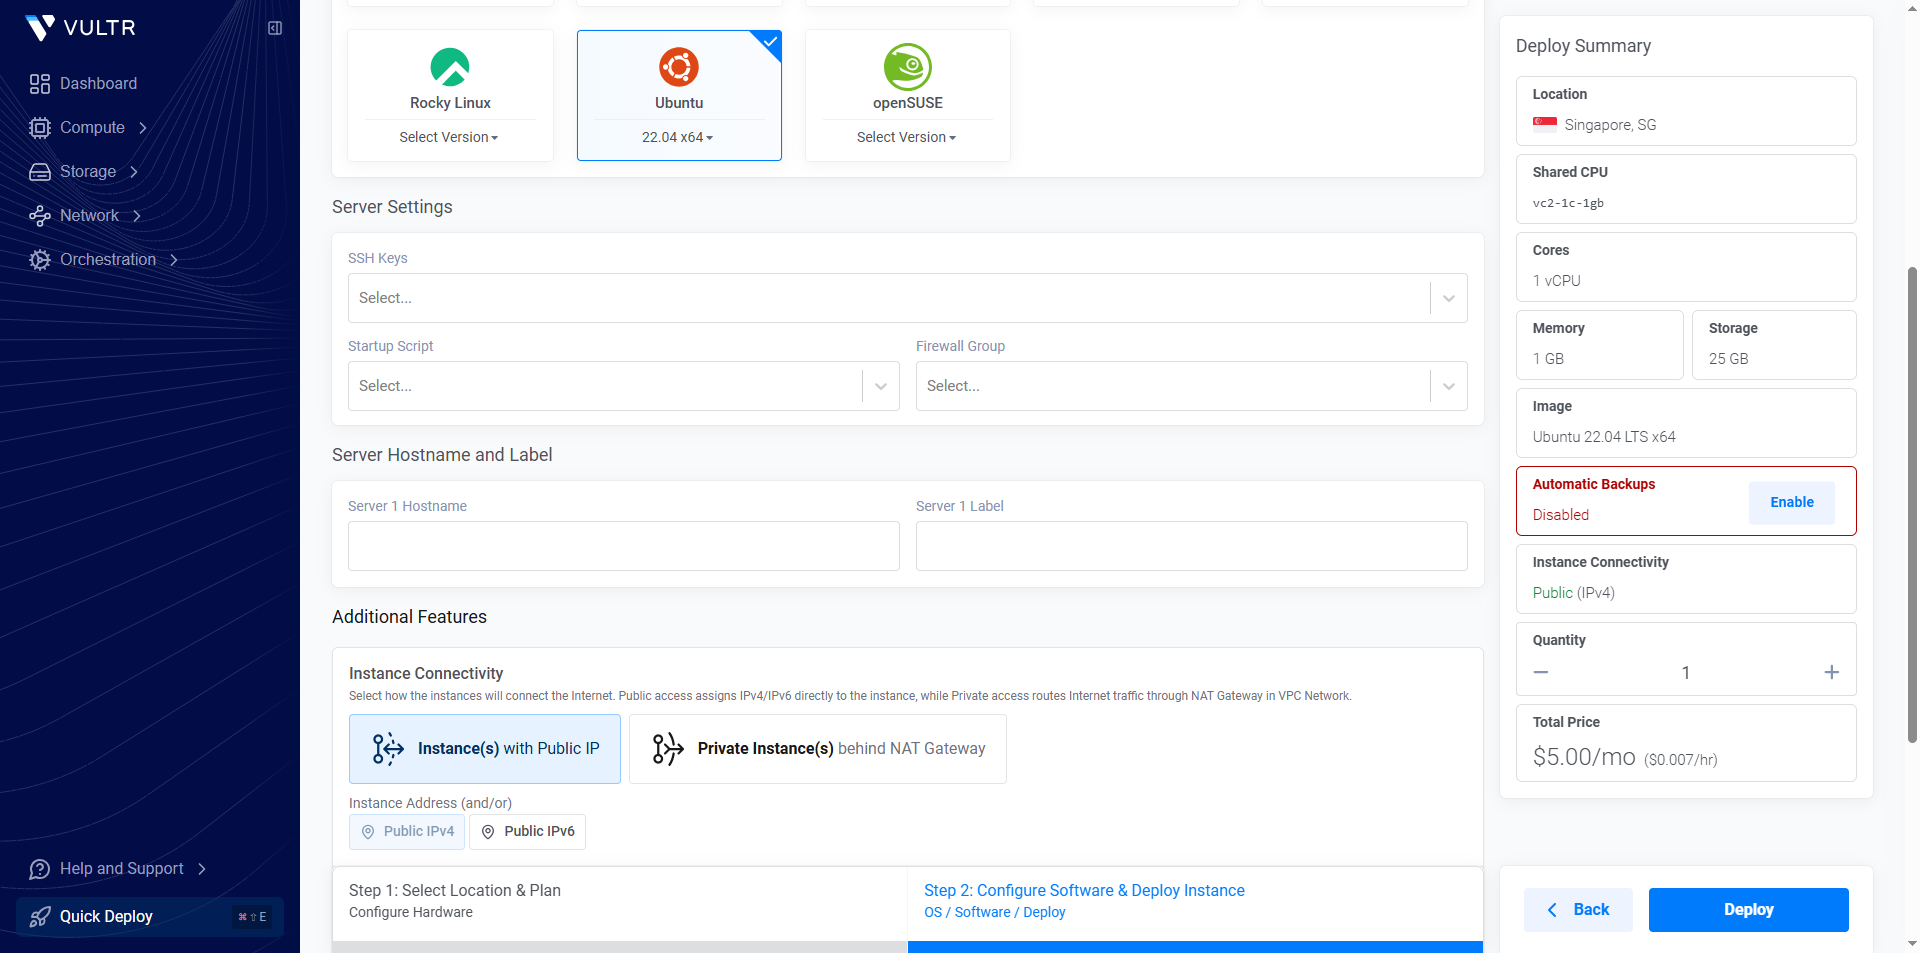
– The rest of the configuration remains default, click ‘Create’ after confirming that it is correct, and wait for the server to be deployed (usually it takes 1-3 minutes).
3. After the server is created, record the core information of the server in time: the public network IP, the default login account (the default account number is root) and the login password.
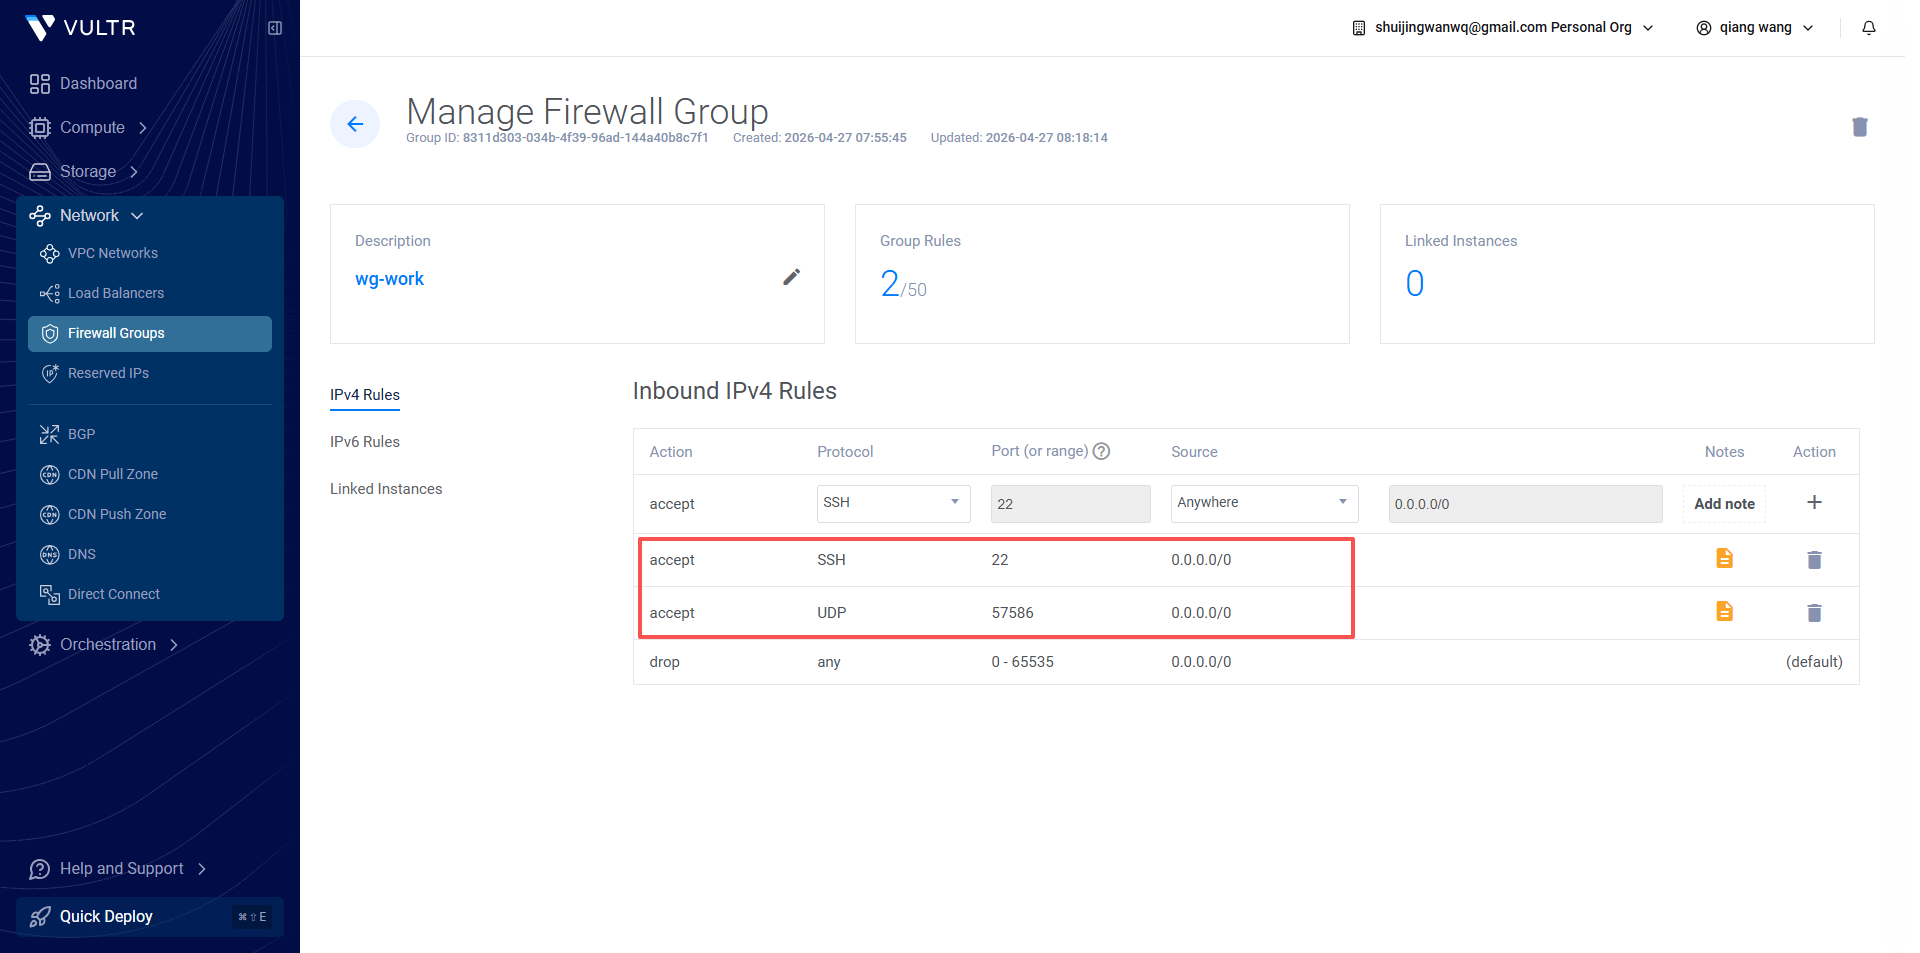
4. Configure the firewall rules: enter the vultr background, follow the path – firewall groups, click ‘New Firewall Group’, and name it wg-work (easy to identify, and wireguard Configuration correspondence); after the creation is completed, create 2 new rules under the firewall group to ensure that the subsequent operations are in normal operation. The specific rules are as follows:
– Rule 1: The protocol selects TCP, the port is filled in 22, and the remark is ‘SSH Remote Management’ (for subsequent SSH login servers for configuration operations);
– Rule 2: The protocol is UDP, the port is filled in 51820, and the remark is ‘WireGuard core port’ (the core port where Wireguard runs, it must be open, otherwise it will not be able to connect normally). as shown in Figure 7

Pit details:
1. When selecting the server node, try to avoid the nodes of the wall, you can query the availability of the node IP through online tools in advance, and avoid inaccessible after deployment;
2. When creating the server, strictly select the Ubuntu 22.04 system, do not use too high or too low version, reduce the software conflict during the subsequent WireGuard installation process;
3. The firewall rules must be accurately configured, and one of the two rules is indispensable, otherwise it will cause the SSH to be unable to log in or the WireGuard cannot be used normally;
4. When recharging, it is preferred to choose Alipay, the operation is more convenient, and 10 US dollars is enough to support the entry-level server to use for 1-2 months, avoiding waste caused by excessive recharge.
4.2 Step 2: Log in to the server and install the WireGuard service
After the server is deployed, you need to log in to the server through SSH, install and configure the WireGuard service, the specific steps are as follows:
1. SSH login server: use computer terminal (powershell for Windows or terminal, Linux/macOS terminal), enter the command ssh root@server public network IP, enter the server password, complete the login (the first login will prompt to confirm the key, just enter YES);
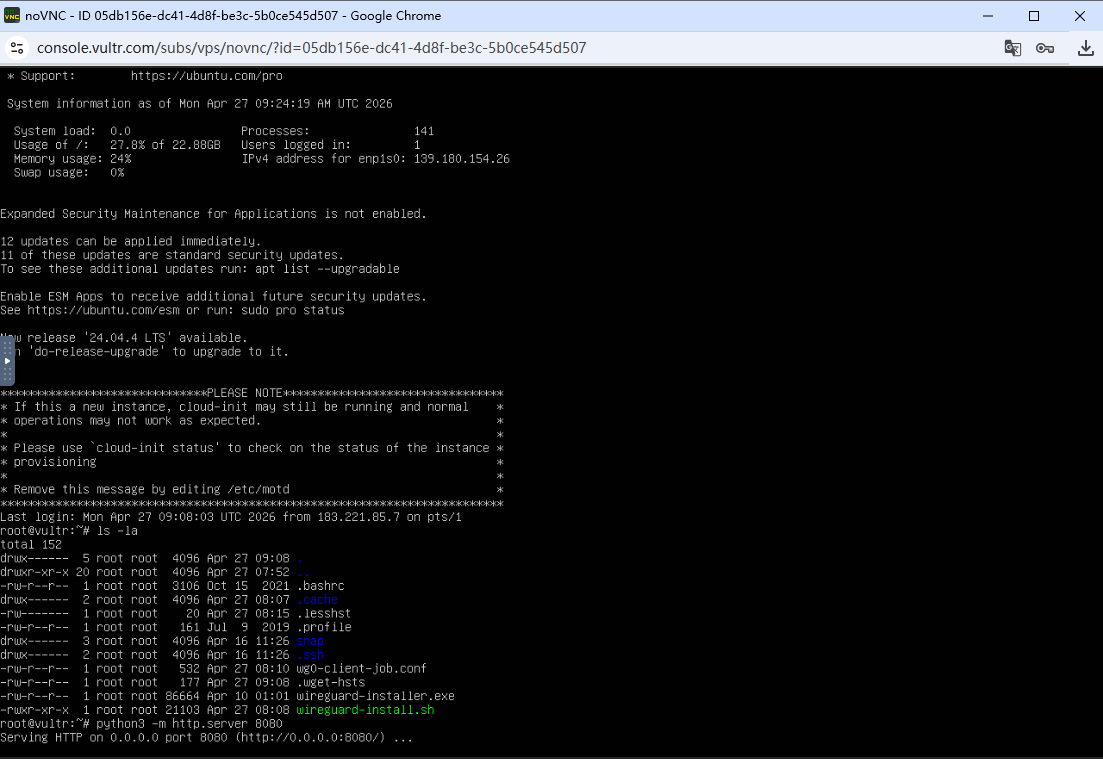
2. Install the WireGuard service: install Wireguard in one click (copy and paste directly to the whole block) (Figure 8: Screenshot of the WireGuard installation script)
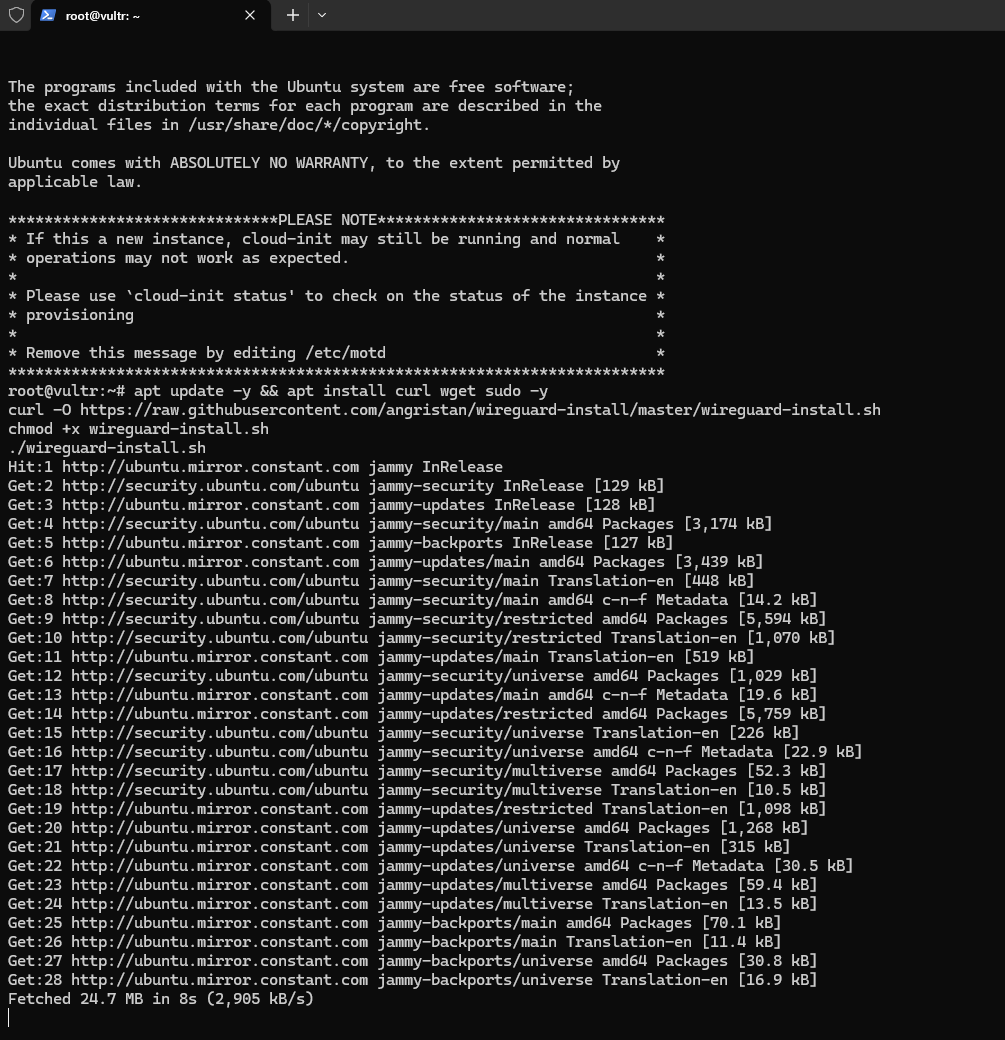
apt update -y && apt install curl wget sudo -y
curl -O https://raw.githubusercontent.com/angristan/wireguard-install/master/wireguard-install.sh
chmod +x wireguard-install.sh
./wireguard-install.sh
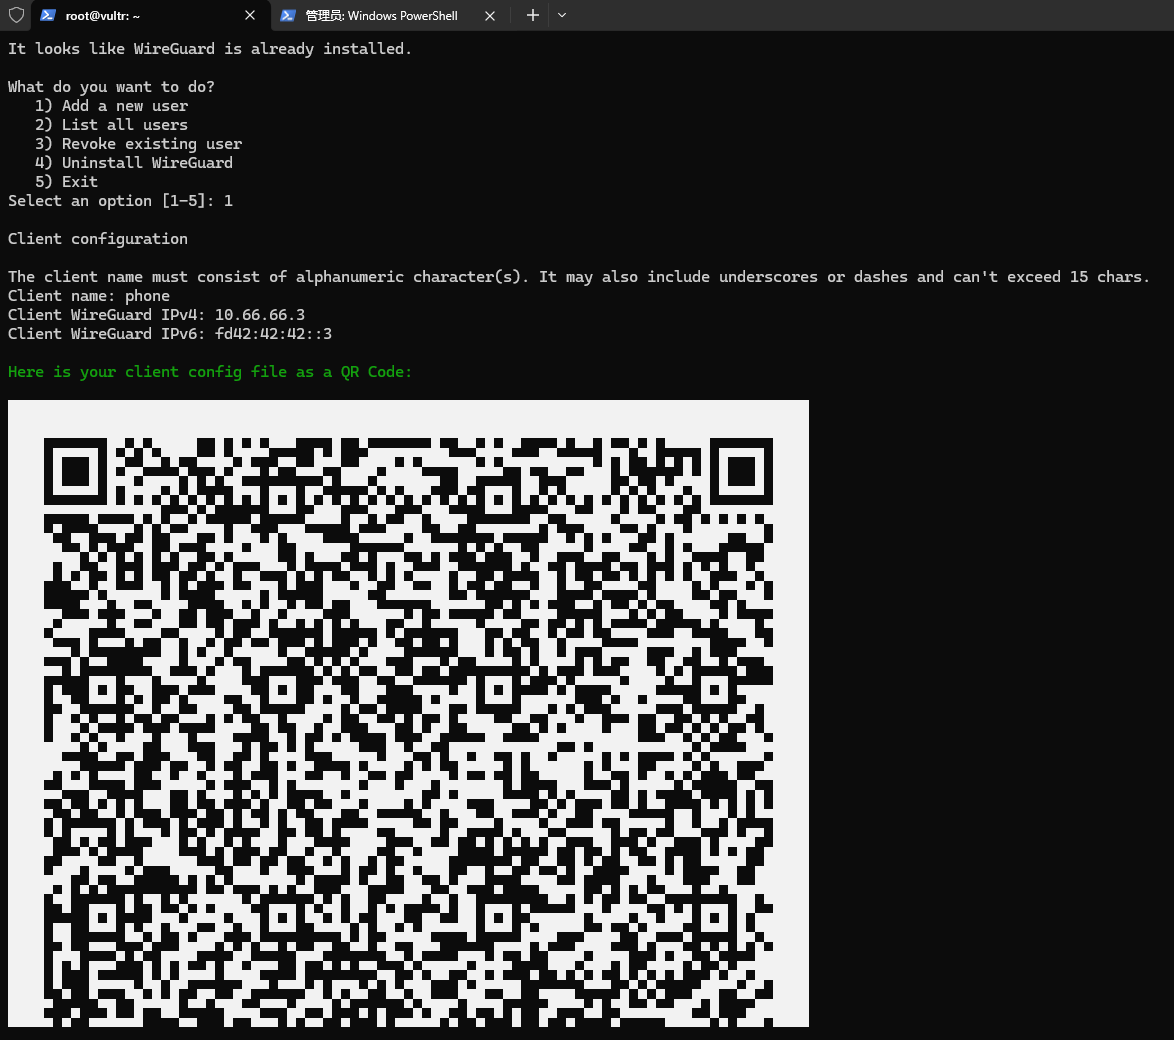
3. Configure the WireGuard service: After the script is executed, the menu will pop up, select ‘1) Add a new User’, enter the client name (such as job, for computer client), and then all follow the default configuration according to the carriage return. The script will automatically generate the client configuration file and server configuration to complete the service deployment. (As shown in Figure 9: Screenshot of client configuration generation completed)
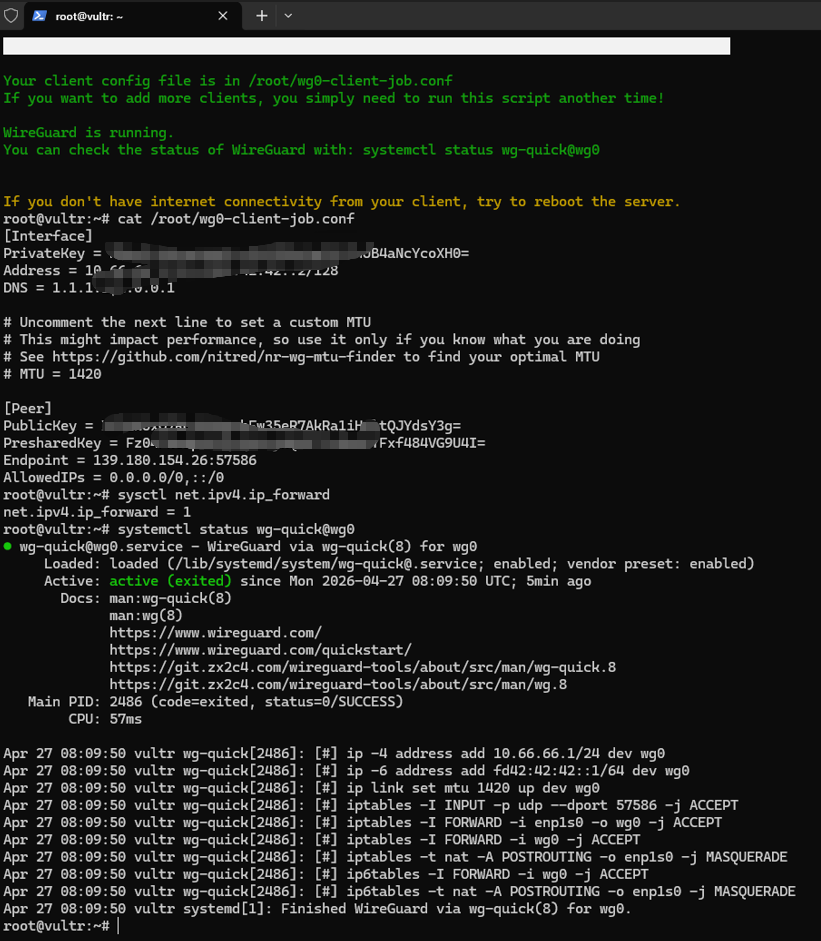
4. Rule 2: The previous 51820 needs to be deleted, and then re-added according to the actual port. Select UDP for the protocol, fill in the port 57586, and the remark is ‘WireGuard core port’
5. If the terminal connection timeout, sometimes you can connect in the Vultr web terminal. At this time, you need to manually enter the password corresponding to the root. as shown in Figure 11
4.3 Step 3: Install the client to solve the official client download problem
After the WireGuard service is deployed, you need to install the corresponding client on the computer and mobile phone, in order to successfully connect to the VPN use. But at this time, I encountered the most difficult and time-consuming problem: the local computer has not yet configured a VPN connection, and cannot access WireGuard The official website (wireguard.com), which makes it impossible to directly download the official client, all subsequent operations are stalled. For this, I have tried a variety of solutions and spent a lot of time to investigate and debug.
In response to the client download problem, three solutions have been tried successively, namely: configuring the download service on the deployed server, through base64 The encoding method transmits the installation package and finds a reliable third-party client, but the first two solutions are cumbersome and there are compatibility problems, and the third-party client has security risks, and neither has achieved the ideal effect. In the end, with the temporary status of LetsVPN that can barely connect on the mobile phone, the client download problem of all devices has been successfully solved, which is also the most time-consuming and critical step in the entire deployment process.
For different devices, the specific download and installation methods are as follows. At the same time, in order to avoid subsequent users encounter the same download problem, I will put the WireGuard corresponding to the computer (Windows system) and the mobile phone (Android system) The official client installation package, upload it to my personal blog, and provide an exclusive download link, which is convenient for everyone to obtain directly, without repeated attempts to various complex solutions.
(1) Computer client installation (Windows system)
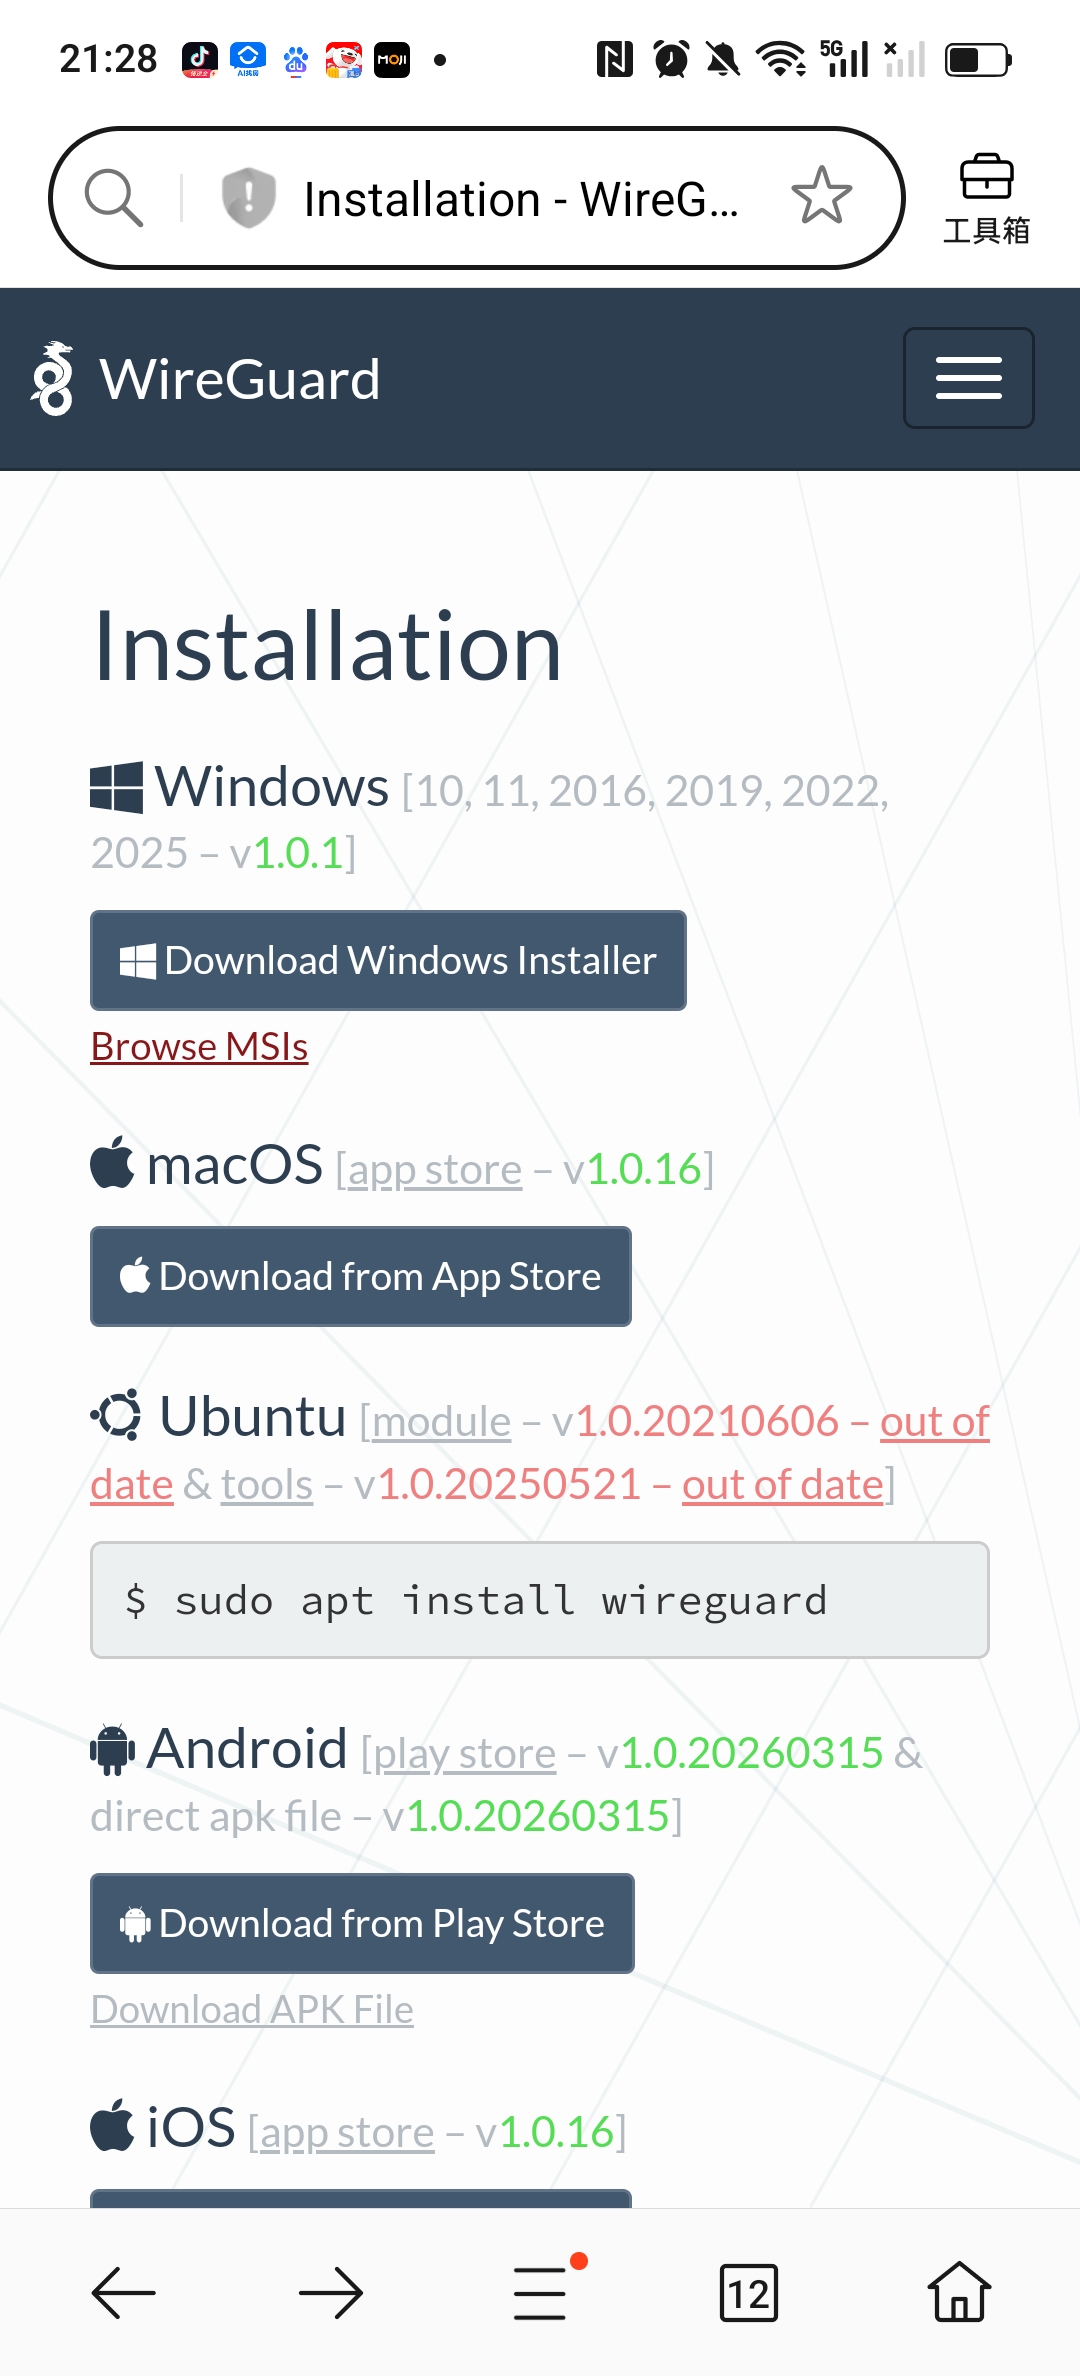
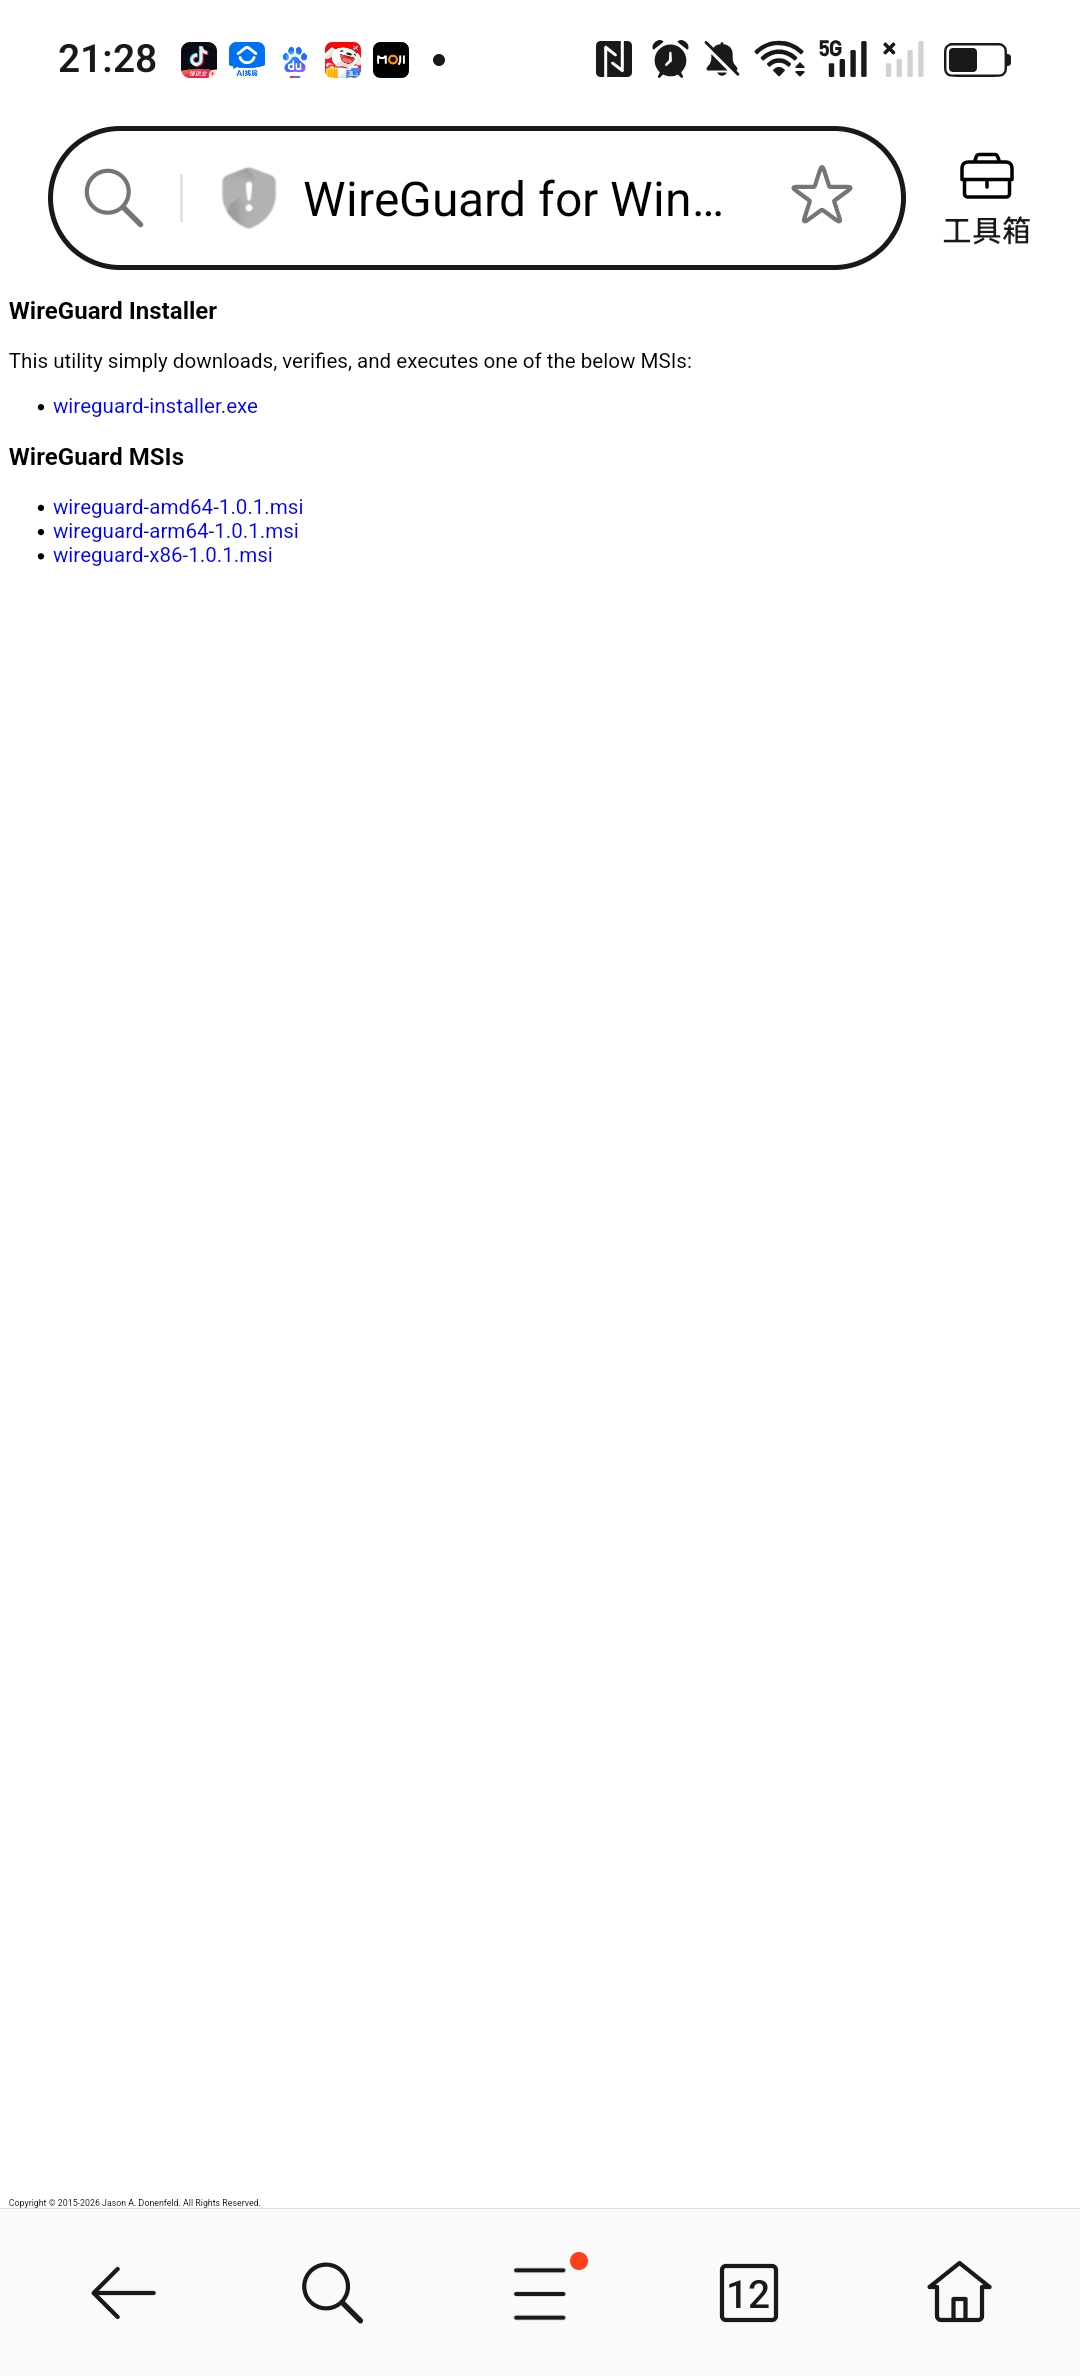
Core solution path: Access Wireguard on the mobile webpage with the network of temporary mobile connections to the mobile phone LetsVPN The official download page (as shown in Figure 13), download the Windows system client installation package (wireguard-AMD64-1.0.1.msi, as shown in Figure 1 4), and then use the file transfer function (such as WeChat, QQ, data cable) of the mobile phone and computer to transfer the installation package to the computer, avoiding the problem that the local computer cannot access the official site.
Supplemental alternatives (if the above method cannot be implemented):
- Option 1: Use the HTTP download service to build a temporary download service through the deployed WireGuard server. The specific operation steps are: execute the command python3 -m http.server on the server side 80, when the terminal displays ‘Serving HTTP on 0.0.0.0 port 80’, it means that the download service has been successfully started; then enter the link directly in the local browser http://139.180.154.26/wireguard-installer.exe, you can download the WireGuard client installation package. It should be noted that in the actual operation, it is found that in the domestic website, there is no website that can directly download wireguard-installer.exe, so the HTTP download service built by this server is the core implementation of scenario 1, avoid accessing https There is no problem with the official site and domestic available resources.
python3 -m http.server 8080
- Scenario 2: If the HTTP link (http://139.180.154.26:8080/wireguard-installer.exe) cannot be accessed, you can go through base64 In the encoding method, the client installation package is encoded and transmitted to the computer, and then decoded and installed (this method is suitable for all scenarios that cannot be downloaded directly, the operation is slightly more complicated, but the success rate is high).
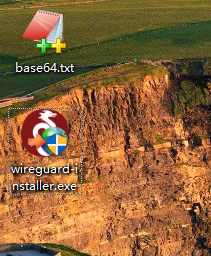
Installation process: Double-click the downloaded installation package, all the way to the next step, when the windows firewall prompt pops up, be sure to click ‘Allow access’ (otherwise, the network adapter cannot be created, which will affect subsequent connections), and the client will be automatically opened after the installation is complete. (As shown in Figure 12: computer client base64 document and screenshot of the converted installation package) Note: Wireguard-installer.exe installation package still needs to connect to the Wireguard official website during the installation process, so if you want base64 If you need to use wireguard-amd64-1.0.1.msi, you need to use it.
# 下载官方 64 位安装包
wget https://download.wireguard.com/windows-client/wireguard-installer.exe

# 校验一下文件大小,正常约 12MB 左右
ls -lh wireguard-installer.exe
# 服务器上执行
base64 wireguard-installer.exe > wg.txt
# 把 wg.txt 内容全选复制到本地
$b = Get-Content C:\Users\你的用户名\Desktop\wg.txt
[IO.File]::WriteAllBytes("C:\Users\你的用户名\Desktop\wireguard-installer.exe", [Convert]::FromBase64String($b))
(2) Mobile client installation (iOS/Android)
Download process: Use the status of LetsVPN temporarily available on the mobile phone to complete the client download. The specific steps are as follows:
1. Temporary connection LetsVPN
2. After the connection is successful, immediately visit the WireGuard official mobile download page and download the client of the corresponding system (iOS downloaded from the App Store, and Android is downloaded from Google Play or the official website);
3. After the download is complete, disconnect the LetsVPN connection in time, install the client, and wait for the subsequent configuration.
Pit details:
1. When downloading the client, be sure to choose the official version to avoid downloading the third-party modified version to prevent problems such as security risks and connection failures;
2. When the computer is installed, if it prompts ‘installation failed’, you need to turn off the computer antivirus software first, and then try to install again;
3. In order to facilitate everyone to quickly obtain the client and avoid repeated stepping on the pit, I have uploaded the official installation package corresponding to the computer and mobile phone to my personal blog, and can be downloaded directly through the blog link later;
4. When the mobile phone is connected to letsvpn download, if the connection is interrupted, you can try to reconnect multiple times, and the node with a relatively stable signal is preferred to ensure that the download is complete.
4.4 Step 4: Configure the client to realize the simultaneous connection of the computer and mobile phone
After the client is installed, you need to import the configuration file generated by the server to connect to the VPN, and the computer and mobile phone need to use an independent configuration file (avoid conflicts), the specific steps are as follows:
(1) Computer client configuration
- On the server, find the configuration file of the computer client (Job) and copy the configuration content (you can view it through the command cat /etc/wireguard/clients/job.conf);
- Open the WireGuard client on the computer, click ‘New Suidao → New Empty Road’, delete the default content, paste the copied configuration, click ‘Save’, and name it ‘Vultr-Wg’ (for easy identification);
- Click ‘Activate’ on the right side of the configuration, wait for 1 second, and display ‘Connected’, which means that the computer client configuration is complete, and you can access overseas websites normally. (Figure 15: Screenshot of computer VPN connection successfully)

(2) Mobile client configuration (solve the problem of multi-device conflict)
In the early stage, I tried to import the configuration file of the computer into the mobile phone, and found that it can be connected at the same time, but the connection is unstable (WireGuard does not allow two devices to use the same configuration, there will be problems of grabbing IP and disconnecting), so you need to generate an independent configuration file for the mobile phone:
- ssh login to the server, execute the command bash wireguard-install.sh, select ‘1) add a new user’, enter the client name (such as Phone), press Enter to default configuration, to generate mobile phone exclusive configuration file;
- You can also copy the content of the mobile phone configuration file, and transfer the configuration file to the mobile phone through WeChat file transmission, data cable, etc.
- Open the WireGuard client of the mobile phone, click ‘+’ in the upper right corner, select ‘Import Configuration or Compressed Package’, find the transferred phone.conf file, and complete the import; or scan the QR code;
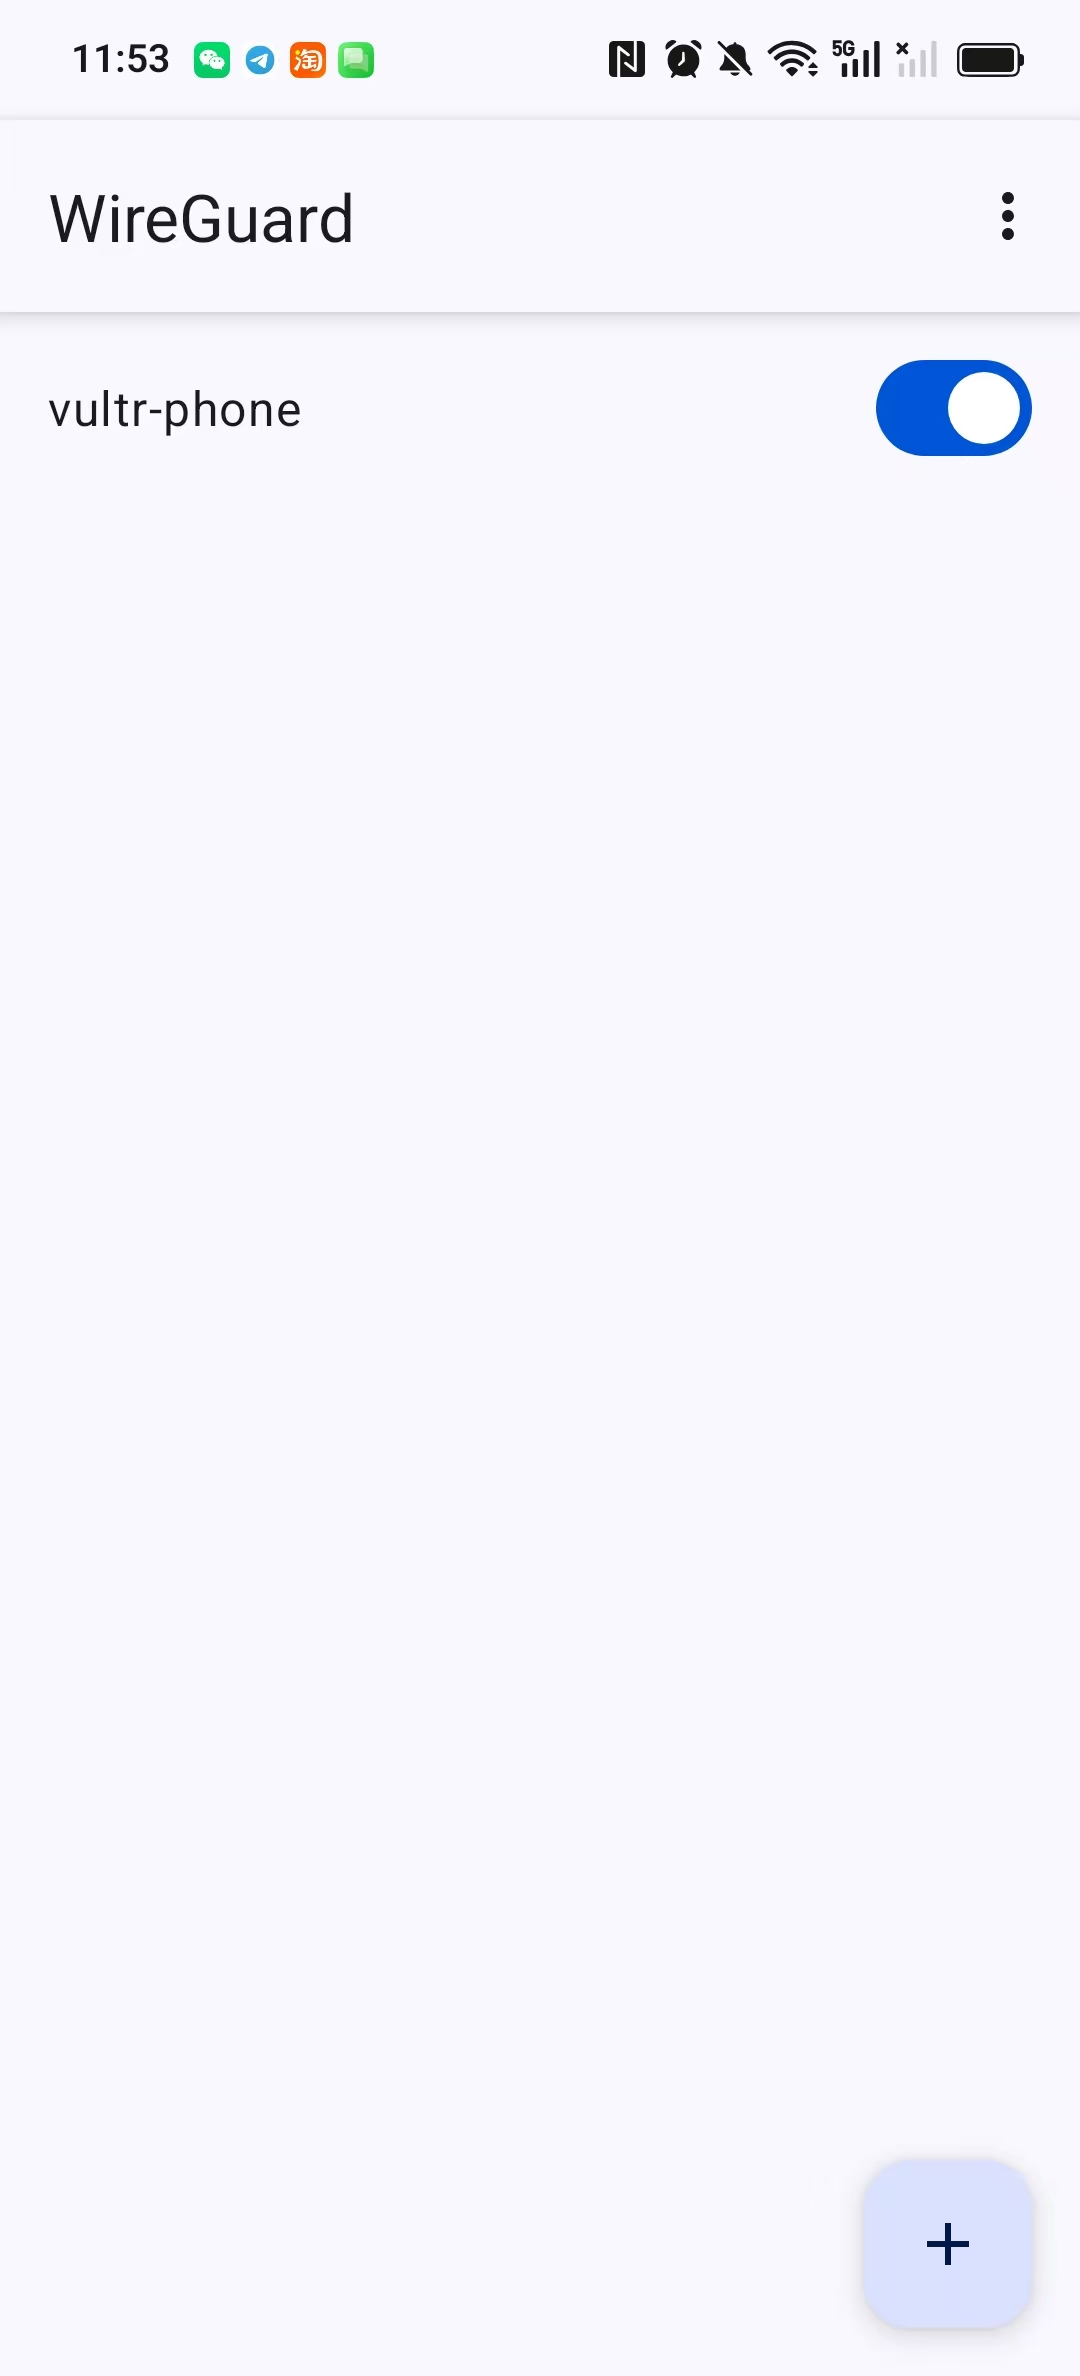
- When the VPN permission request pops up, click ‘Allow’, turn on the switch on the right side of the configuration, and display ‘Connected’, which means that the mobile client configuration is complete. (Figure 17: Screenshot of successful mobile vpn connection)
(3) Verify the connection effect
The computer and the mobile phone are connected to the VPN at the same time, open the browser to visit ip.cn, and check whether the public network IP is the same as the server public IP (the location is displayed). Singapore); access youtube, test the playback fluency of 1080p video, confirm that there is no lag, no disconnection, multiple devices are connected at the same time, and there is no conflict. (Figure 18: Screenshot of the mobile phone open Google Play Store)
5. Download link of the client installation package (for pit special)
As mentioned above, when the VPN is not connected locally, it cannot directly access the official Wireguard website to download the client, and there is no available Wireguard-AMD64-1.0.1.msi in the domestic website. Download resources, in order to completely solve everyone’s download problems and avoid repeated stepping on the pit, I have uploaded the official WireGuard client installation package corresponding to the computer and mobile phone, all of which are uploaded to the personal blog, providing exclusive download links, no need for complicated operations, just click to get it.
The specific download links are as follows (all the official original installation packages, no third-party modification, and no hidden dangers):
- Computer side (Windows system): (corresponding to the installation package:Wireguard-AMD64-1.0.1.msi)
- Mobile terminal (Android system): (Official original version, suitable for all kinds of Android models)
Supplementary note: If the link fails to access and the download fails (such as ‘web page resolution failed, it may be a web page type that is not supported, please check the webpage or try again later’ and other reports. Wrong), you can try to solve it through the alternate scheme (the server builds the HTTP download service, the base64 encoding transmission) mentioned in the previous article 4.3, or contact me to update the link.
6. Summary and follow-up optimization suggestions
5.1 The whole process review
From the deactivation of LetsVPN to the enterprise version of VPN, to the success of the self-built WireGuard VPN, although the whole process has twists and turns, it finally realizes the simultaneous stable connection of multiple devices. The core process is as follows:
LetsVPN Deactivate → Research Enterprise Version VPN WireGuard service, generate client configuration → Solve the official client download problem (http download service, base64, letsVPN temporary connection) → configure computer, mobile phone independent client → verify the connection effect, and achieve stable use.
5.2 Summary of the pits (emphasis)
- Cloud server selection: give priority to nodes with close distance and high cost performance, and the system selects Ubuntu 22.04 to reduce installation conflicts;
- Client download: When the VPN is not connected, the official site cannot be accessed, and the installation package can be obtained through HTTP download, base64, temporary VPN, etc.;
- Multi-device configuration: computer and mobile phone need to use independent configuration files to avoid conflicts and disconnection problems caused by the same configuration;
- Use the script: give priority to the one-click installation script that comes with the server. If the script fails, you can re-download the official script to avoid manual configuration errors.
5.3 Suggestions for subsequent optimization
- Optimize the MTU configuration: If the connection is stable but the speed is slow, you can use the NR-WG-MTU-Finder tool to find the optimal MTU value and increase the transmission speed;
- Regular backup configuration: back up the configuration files of the server and client to the local, to avoid the loss of configuration caused by the server failure;
- New equipment: If you need to add tablets, spare machines and other devices in the future, you can execute one-click script again, and add client configuration, without redeploying the server.
Although self-built VPNs require certain practical steps, once the deployment is completed, the overall stability and flexibility are far exceeding various commercial VPNs. Not only do you not need to worry about service providers outing, qualification control, node current limit and high subscription fees, but also fundamentally ensure the security of personal network privacy data. Note: The cost of letsVPN used before is 8 US dollars/month, and the current cost of self-built VPN is 5 US dollars/month. If the network needs to be improved in the future, the bandwidth can be increased independently.
Third-party commercial VPN service providers have the risk of user online behavior records, data collection and privacy leakage, and the self-built service is controlled by oneself in the whole process, and the traffic is self-managed throughout the whole process.
It is hoped that the complete review and pitfall experience of this article can help friends in need to avoid detours, quickly complete the WireGuard self-built VPN deployment, and stably solve the daily overseas network access needs.
Leave a Reply