Self-built WireGuard solution port is frequently blocked, the ultimate minimalist solution (nanny level can be reproduced)
Self-built WireGuard VPN The most troublesome problem:The UDP port fails every 2 days or so, the client has no last handshake time, and the ports such as 57586, 2096, and 443 are repeatedly replaced., tossing back and forth a lot of trouble.
The root cause: operator DPI deep packet detection, WireGuard native data packet features are fixed, no matter which separate UDP port to replace, it will be identified and periodically banned.
This article adopts the server-side iptables multi-port forwarding The simplest solution: do not change the native client of WireGuard, do not install confusion APP, do not toss the TCP tunnel, one configuration will take effect permanently, and only need to change the number of the client port in the future, and the novice will have zero tossing.
principle
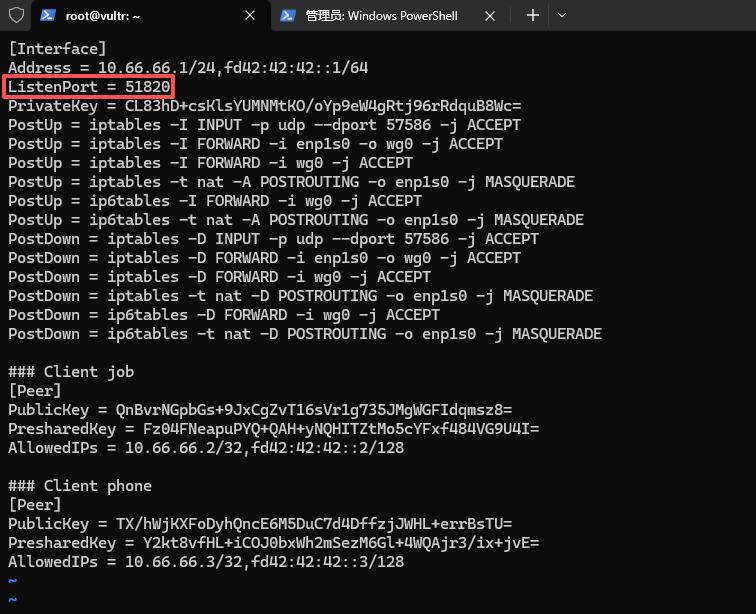
- Fix the WireGuard server listening port to 51820, never modify ;
- VPS is forwarded through iptables for port segments: 20000~60000 all UDP ports, uniformly forwarded to this machine 51820;
- The Vultr firewall only needs to release the port segment of 20000~60000, and does not need to add single-port rules one by one;
- The computer and mobile client can freely choose any port in the interval. The port failure only needs to modify the client port, and there is no need to move the server or log in the vultr background.
Step 1: Modify WireGuard configuration, fixed listening port
Log in to vultr vps and edit the wg0 configuration file:
vi /etc/wireguard/wg0.conf
Find the configuration item:
listenport = original port (such as 2096, 57586)
Modified to:
listenport = 51820
Press ESC and enter :wq to save and exit. as shown in Figure 1
Step 2: Restart the WireGuard service to take effect
root@vultr:~# wg-quick down wg0
[#] ip link delete dev wg0
[#] iptables -D INPUT -p udp --dport 57586 -j ACCEPT
[#] iptables -D FORWARD -i enp1s0 -o wg0 -j ACCEPT
[#] iptables -D FORWARD -i wg0 -j ACCEPT
[#] iptables -t nat -D POSTROUTING -o enp1s0 -j MASQUERADE
[#] ip6tables -D FORWARD -i wg0 -j ACCEPT
[#] ip6tables -t nat -D POSTROUTING -o enp1s0 -j MASQUERADE
root@vultr:~# wg-quick up wg0
[#] ip link add wg0 type wireguard
[#] wg setconf wg0 /dev/fd/63
[#] ip -4 address add 10.66.66.1/24 dev wg0
[#] ip -6 address add fd42:42:42::1/64 dev wg0
[#] ip link set mtu 1420 up dev wg0
[#] iptables -I INPUT -p udp --dport 57586 -j ACCEPT
[#] iptables -I FORWARD -i enp1s0 -o wg0 -j ACCEPT
[#] iptables -I FORWARD -i wg0 -j ACCEPT
[#] iptables -t nat -A POSTROUTING -o enp1s0 -j MASQUERADE
[#] ip6tables -I FORWARD -i wg0 -j ACCEPT
[#] ip6tables -t nat -A POSTROUTING -o enp1s0 -j MASQUERADE
Step 3: Verify that the listening port is in effect
root@vultr:~# wg show
interface: wg0
  public key: XZ2LNJxO7RqjGKHyubFw35eR7AkRa1iHqltQJYdsY3g=
  private key: (hidden)
  listening port: 51820

peer: QnBvrNGpbGs+9JxCgZvT16sVr1g735JMgWGFIdqmsz8=
  preshared key: (hidden)
  allowed ips: 10.66.66.2/32, fd42:42:42::2/128

peer: TX/hWjKXFoDyhQncE6M5DuC7d4DffzjJWHL+errBsTU=
  preshared key: (hidden)
  allowed ips: 10.66.66.3/32, fd42:42:42::3/128
Seeing the output Listening port: 51820 is the configuration success.
Step 4: VPS configuration iptables multi-port forwarding
Copy directly one by one:
# 将20000-60000所有UDP端口转发到WireGuard固定端口51820
root@vultr:~# sudo iptables -t nat -A PREROUTING -p udp --dport 20000:60000 -j REDIRECT --to-port 51820

# 安装iptables规则持久化工具
root@vultr:~# sudo apt install -y iptables-persistent
Reading package lists... Done
Building dependency tree... Done
Reading state information... Done
iptables-persistent is already the newest version (1.0.16).
0 upgraded, 0 newly installed, 0 to remove and 11 not upgraded.

# 保存规则,重启服务器不失效
root@vultr:~# sudo netfilter-persistent save
run-parts: executing /usr/share/netfilter-persistent/plugins.d/15-ip4tables save
run-parts: executing /usr/share/netfilter-persistent/plugins.d/25-ip6tables save
Step 5: vultr background firewall configuration (must do)
- Log in to the vultr background, find the corresponding vps, and enter the firewall groups on the left;
- Delete the original single UDP rules such as 57586, 2096, 443, etc.
- Add a new firewall rule:
- Protocol: UDP
- Port Type: Port Range
- Port interval: 20000 – 60000
- Remarks: WireGuard multi-port split
- Save the rules, no additional ports need to be added. as shown in Figure 2

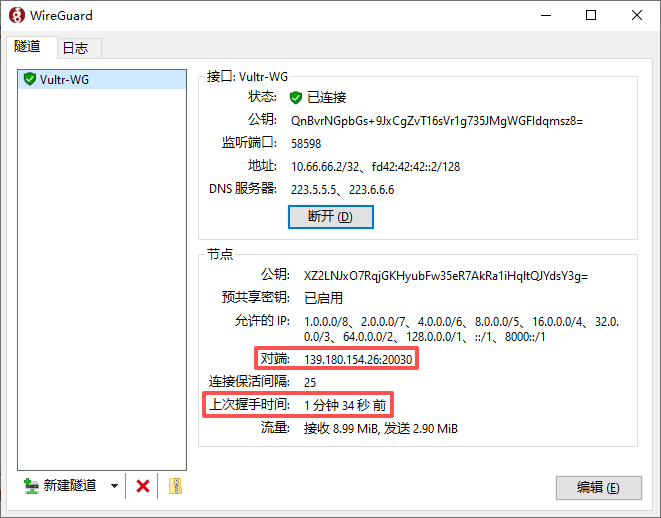
Step 6: Client Configuration Usage Rules
- The computer and mobile phone native WireGuard client do not need to reinstall, do not need to change other configurations;
- Endpoint format: your VPS IP: any port within the interval
Example:
endpoint = 1.2.3.4:32567 - Different ports can be used for multiple devices: 3xxxx for computers, 5xxxx for mobile phones, and no influence on each other online at the same time; as shown in Figure 3
- When there is no handshake for the port failure: only modify the number of the client port, you can change it between 20000~60000, and the server and firewall do not need any changes.
Pit Optimization Suggestions
- Do not use ports one by one in order (20001, 20002…), use random skip numbers to reduce the operator’s identification law;
- Avoid 7 × 24 hours resident hang-up, and manually disconnect when idle (when I go to bed at night) to reduce the probability of risk control;
- Fixed WireGuard listener port 51820, which will never be modified in the future;
- It is only suitable for users who do not want to be confused and do not want to change the client.
Program summary
This is the easiest, zero additional software, and the ultimate compromise solution that does not change the client. One configuration is permanent, and the VPS and firewall configuration are frequently modified.