

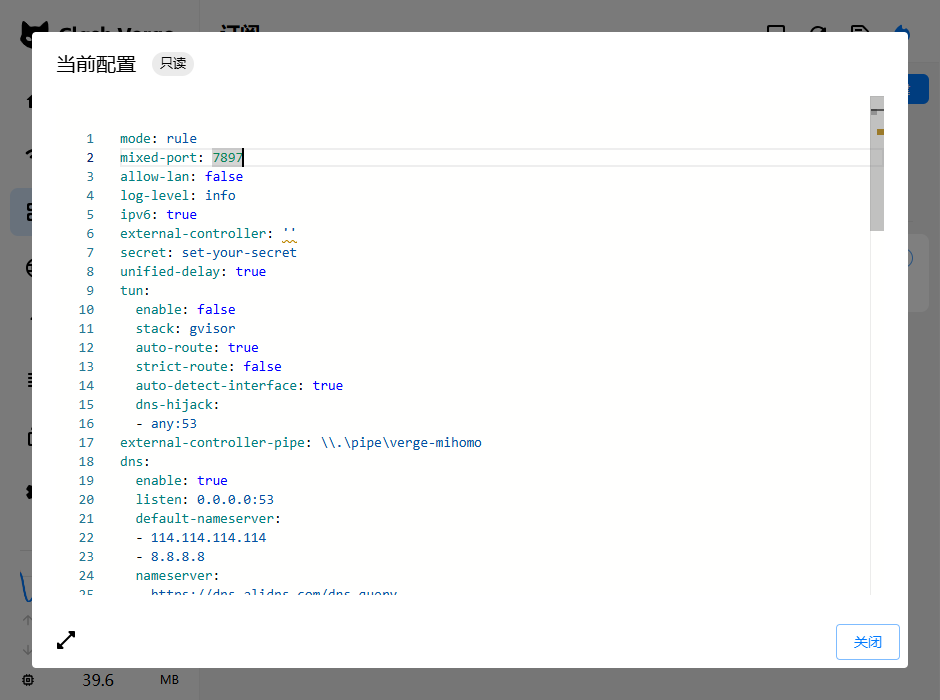
![[截图 5:Clash 规则片段,突出显示新增的两行 DST-PORT 规则]](https://www.shuijingwanwq.com/wp-content/uploads/2026/06/5-8.png)
![[截图 2:Play 商店更新界面,显示两个应用正常下载]](https://www.shuijingwanwq.com/wp-content/uploads/2026/06/2-2-465x1024.jpg)


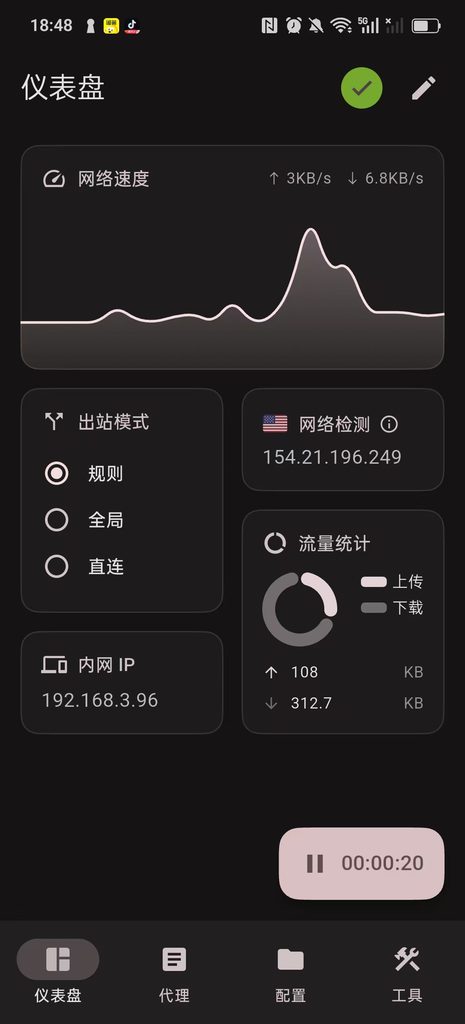
Core description: This process completely matches the operating habits of vultr and dmit before me, and focuses on the advantages of zgocloud – domestic need to circumvent the wall, support Alipay payment, and Los Angeles three network optimization (cn2 GIA+9929+Cmin2), one-click deployment of anti-sealing Wireguard, the steps are simple, the whole process is 5-10 minutes. All current packages (Starter, Standard, Pro, Premium) show out of stock (out of stock), combined with ZgoCloud Package replenishment rules, replenishment reminders and alternative optimization packages can help me complete the deployment quickly.
Recently, a VPN was deployed on the LA server of ZgoCloud, which solved the two pain points encountered by the previous Vultr Singapore node: the native Wireguard has a complex configuration, and the port has been replaced with countless or banned by the operator. In the end, I chose the WSTUnnel+Clash Meta solution, which takes into account the strongest anti-blocking ability and the convenience of automatic splitting. This article organizes the whole process and the fool-like deployment process, and you can complete it step by step.
1. Register a ZgoCloud account (direct operation in China, no need to overturn the wall, it is more convenient than vultr)
1. Directly open the ZGoCloud official website (no need to go over the wall in China, copy the link to access:https://zgovps.com).
2. After entering the homepage of ZGoCloud, click ‘Client’ on the page first Portal’ (Customer Portal), after entering the new page, click the ‘Register’ button in the upper right corner of the page to enter the registration page, no need for mobile phone numbers, just 3 steps to complete (Figure 1):
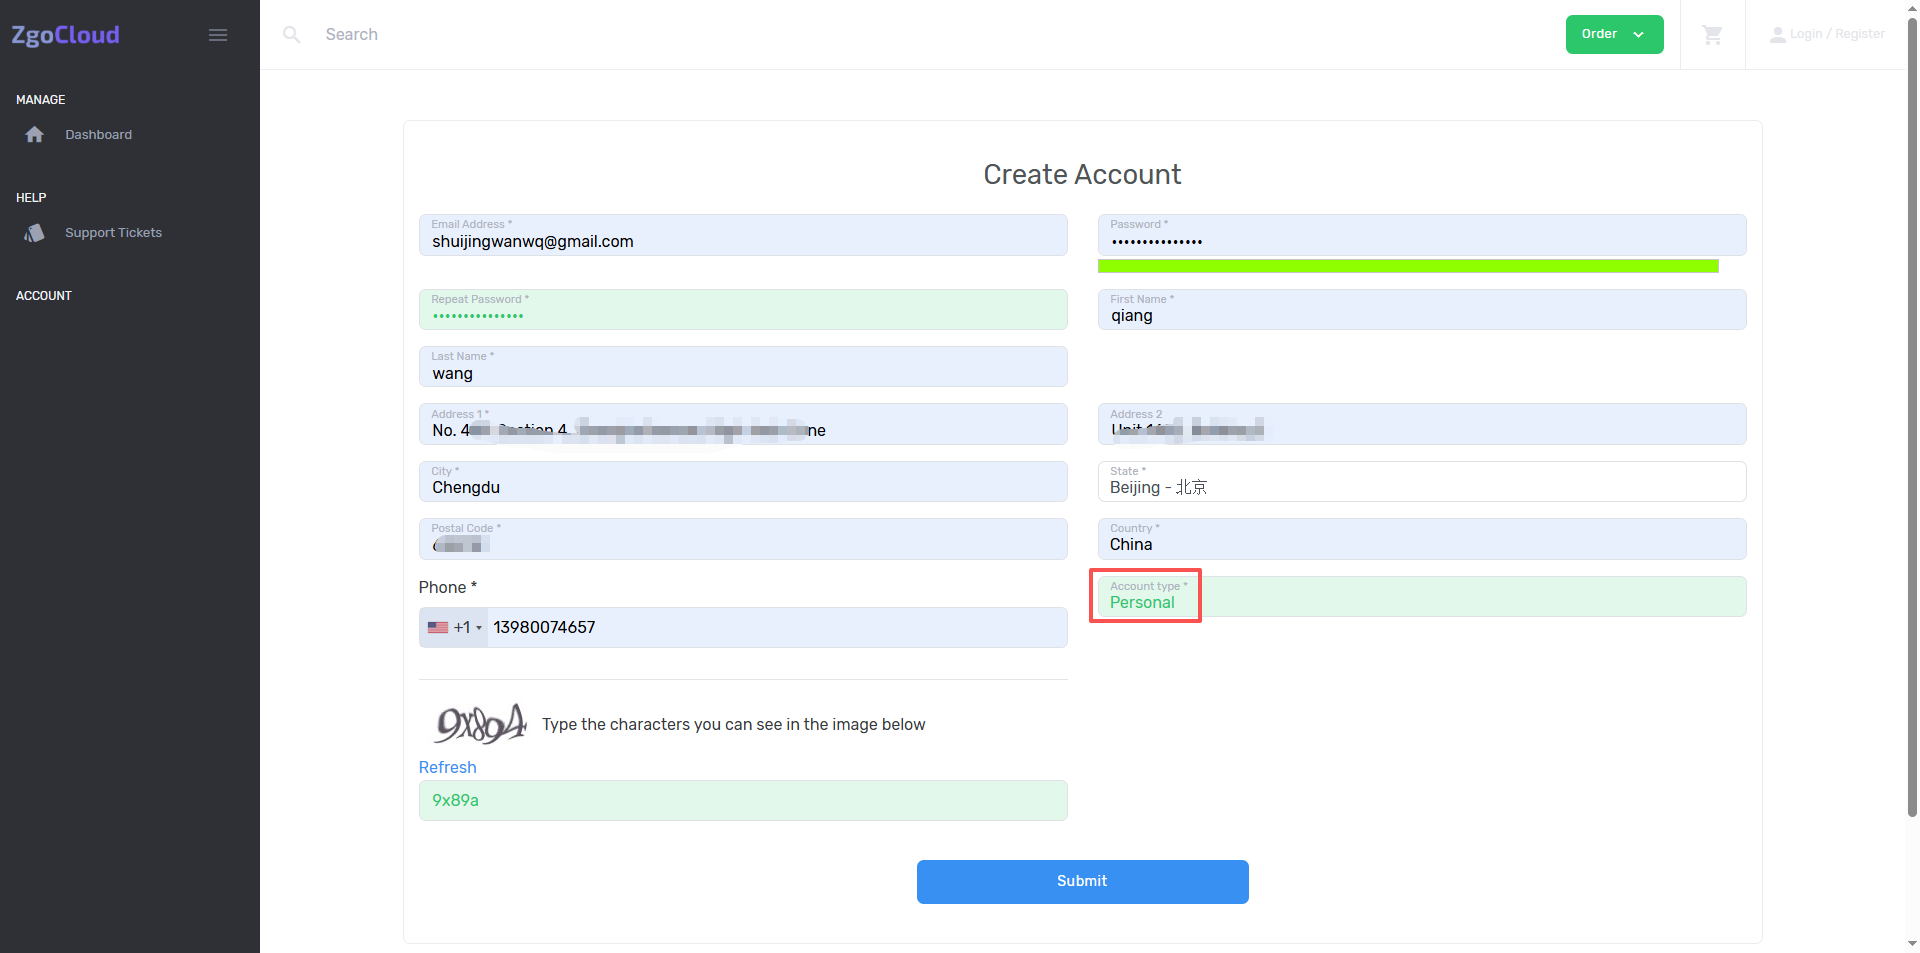
3. Enter my commonly used email address (same as the email address I registered for vultr and dmit, which is convenient for memory);
4. Set the account password (it is recommended to be the same as the previous password, require more than 8 digits, including alphabet + numbers to improve security);
5. Check ‘I Agree to the Terms of Service and Privacy Policy’ (agree with the terms of service), complete simple man-machine verification (slider verification, no complicated operations are required), click ‘Create’ account’ (create account).
6. After the registration is completed, the system will automatically log in to the background, and at the same time, it will send a verification email to my email, click the verification link in the email, and complete the email verification (only need to be used once to ensure the normal use of the account, and avoid the inability to recharge and deploy the server in the future).
7. After the verification is completed, return to the official website background, no need to log in again, go directly to the console (Dashboard) and prepare to deploy the server.
2. Deploy the Los Angeles optimization server (deploy first, then recharge, and solve the recharge prompt problem similar to DMIT)
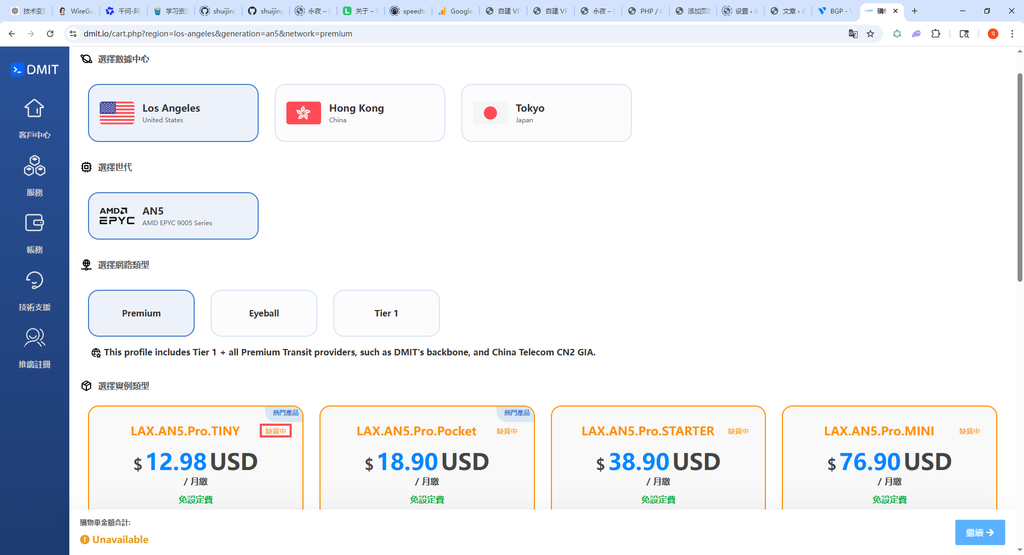
Key reminder: ZGoCloud is the same as DMIT, you need to create a ‘effective order’ (deployment server) first, and then recharge to avoid the prompt that ‘no recharge without valid orders’. Search for GIA on the Check Our Amazing Offers page, select Los Angeles AMD Optimised VPS, all current packages (Starter, Standard, Pro, Premium) are only Premium Display in stock (as shown in Figure 4),
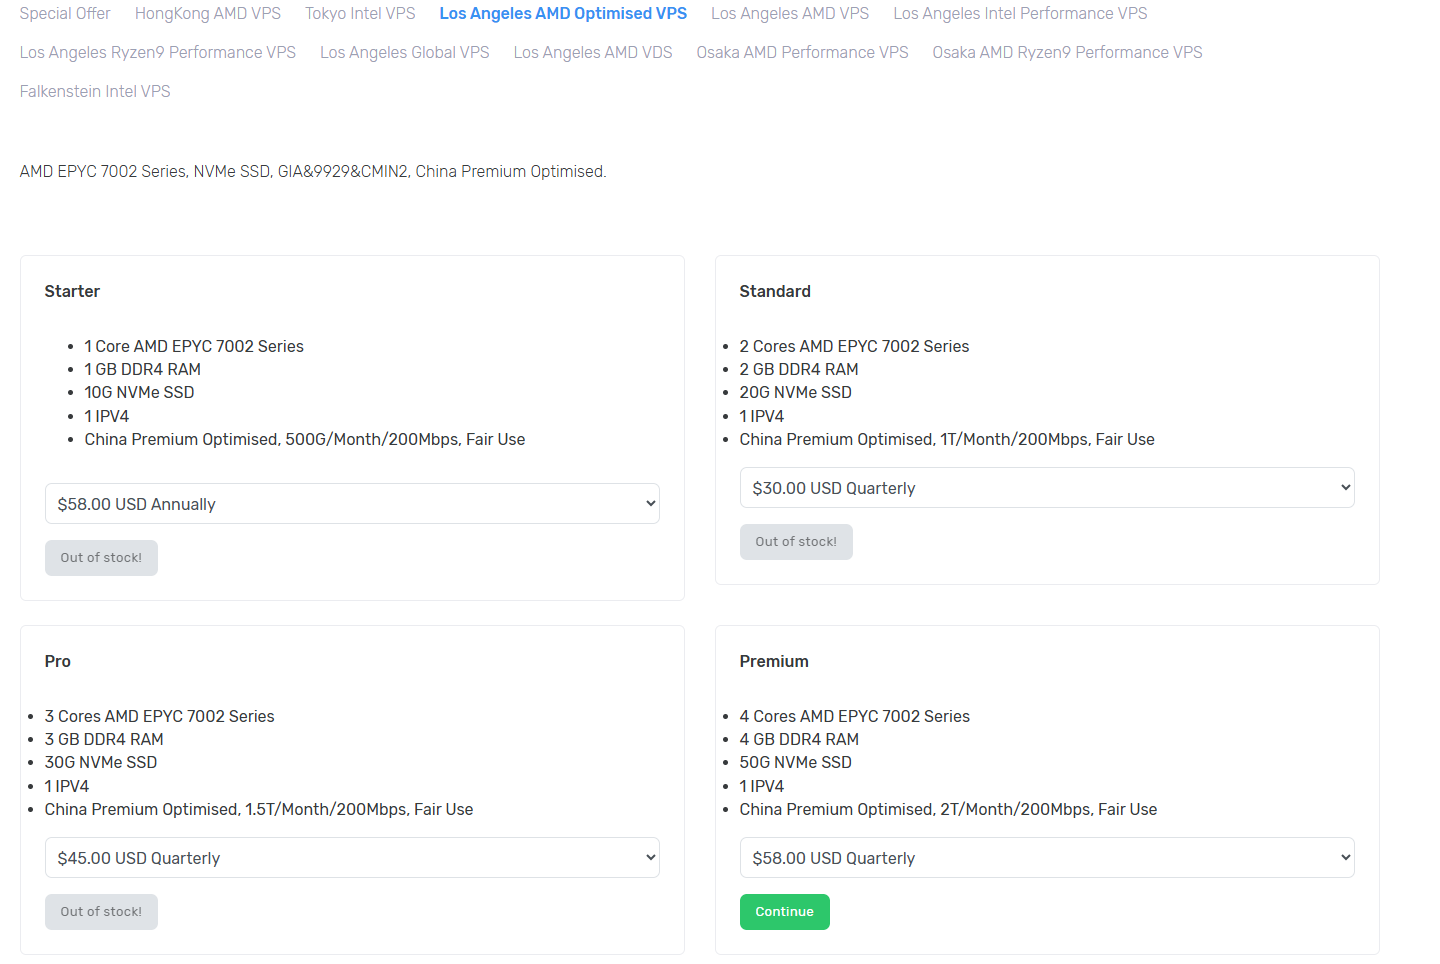
However, when I refresh the page after 2 hours, I find that all the current packages (starter, standard, pro, premium) show out of stock (out of stock) (as shown in Figure 5),
Combined with the rules of replenishment of the ZgoCloud package (special price/popular packages will be replenished from time to time, and the replenishment time is not fixed every day), the operation plan and replenishment reminder will be supplemented.
1. The first step: On the Dashboard home page, directly click the ‘Order More’ button, and then click to jump to the server plan selection and configuration page;
2. Step 2: If the entrance is still not found, go directly to the ZgoCloud plan order page (no need to overturn the wall):https://zgovps.com, click Price on the homepage of the official website, search for GIA on the Check our Amazing Offers page, and select Los Angeles AMD Optimised VPS, click ‘Select’ to directly enter the selection package page (consistent with the background deployment portal, the configuration step remains unchanged).
3. The current out of stock solution (emphasis, suitable for the actual situation):
3.1. Option 1: Waiting for replenishment (recommended): zgocloud popular optimization package (including premium and previous Starter/Standard/Pro) will replenish from time to time. According to the rules of the platform’s past replenishment, special prices and high-end optimized packages will be replenished every day at irregular periods, and after replenishment, The inventory is limited (the typical situation from in stock to out of stock within 2 hours I encountered is a typical situation), it is recommended to refresh the configuration page every 1-2 hours, pay attention to the changes in the inventory, and deploy immediately after replenishment to avoid out of stock again;
3.2. Scenario 2: Choose an alternative optimization package: if you don’t want to wait for replenishment, you can choose other Chinese optimization packages of ZgoCloud Los Angeles nodes (both are marked with China Optimised), such as Los Angeles Ryzen9 Performance VPS (AMD Ryzen9 7950X, 9929&Cmin2 optimization), Los Angeles Intel Performance VPS (Intel® Xeon® Platinum 8452y, 9929&Cmin2 optimization), although this type of package is not Premium level, but also supports domestic optimization, delay 40-80ms, can meet the daily Google search/translation, foreign browsing needs, and occasionally replenishment, The price is converted to about 16 US dollars per month, which is suitable for my budget. The configuration and operation process are exactly the same as the Premium package. It also supports one-click deployment of anti-sealing. wireguard;
3. Scenario 3: Select other optimization node packages: ZgoCloud Hong Kong, Tokyo, Osaka nodes also have China Optimised optimization packages (such as Hong Kong AMD VPS, Tokyo Intel VPS), all support domestic optimization, the delay performance is good (Hong Kong node delay is 40-60ms, Tokyo node delay is 50-70ms), and the library is delayed The storage is relatively sufficient, and it can be used as an alternative. The configuration selection and operation process are the same as that of the Los Angeles nodes. Only the node selection is different, and it supports Alipay payment and one-click deployment. WireGuard.
4. If you find a deployable package (after replenishment or alternative package), select the following configuration (to suit my budget and needs, you can choose directly, no need for extra operations):
5. Location: ‘Los Angeles, USA (CN2 GIA+9929+Cmin2)’ (Los Angeles three-network optimization node, delay 30-60ms, and DMIT Los Angeles) The Premium network experience is the same, the evening rush hour does not detour, do not lose packets, perfectly replace my previous vultr Singapore node), do not choose other nodes The high-end optimization of the level, the delay and stability are not as good as the Los Angeles three-network optimization node, and the overall experience is biased). If Los Angeles nodes are out of stock, you can choose the optimized packages of Hong Kong and Tokyo nodes as alternatives.
6. Server Type (server type): Select ‘Shared CPU’, which is consistent with the selection of vultr and dmit before me. Daily browsing and Google search/translation are sufficient. The optimization package is equipped with a high-performance CPU by default. ZgoCloud high-end hardware configuration standards, such as AMD EPYC™, AMD Ryzen9, Intel Xeon series processors).
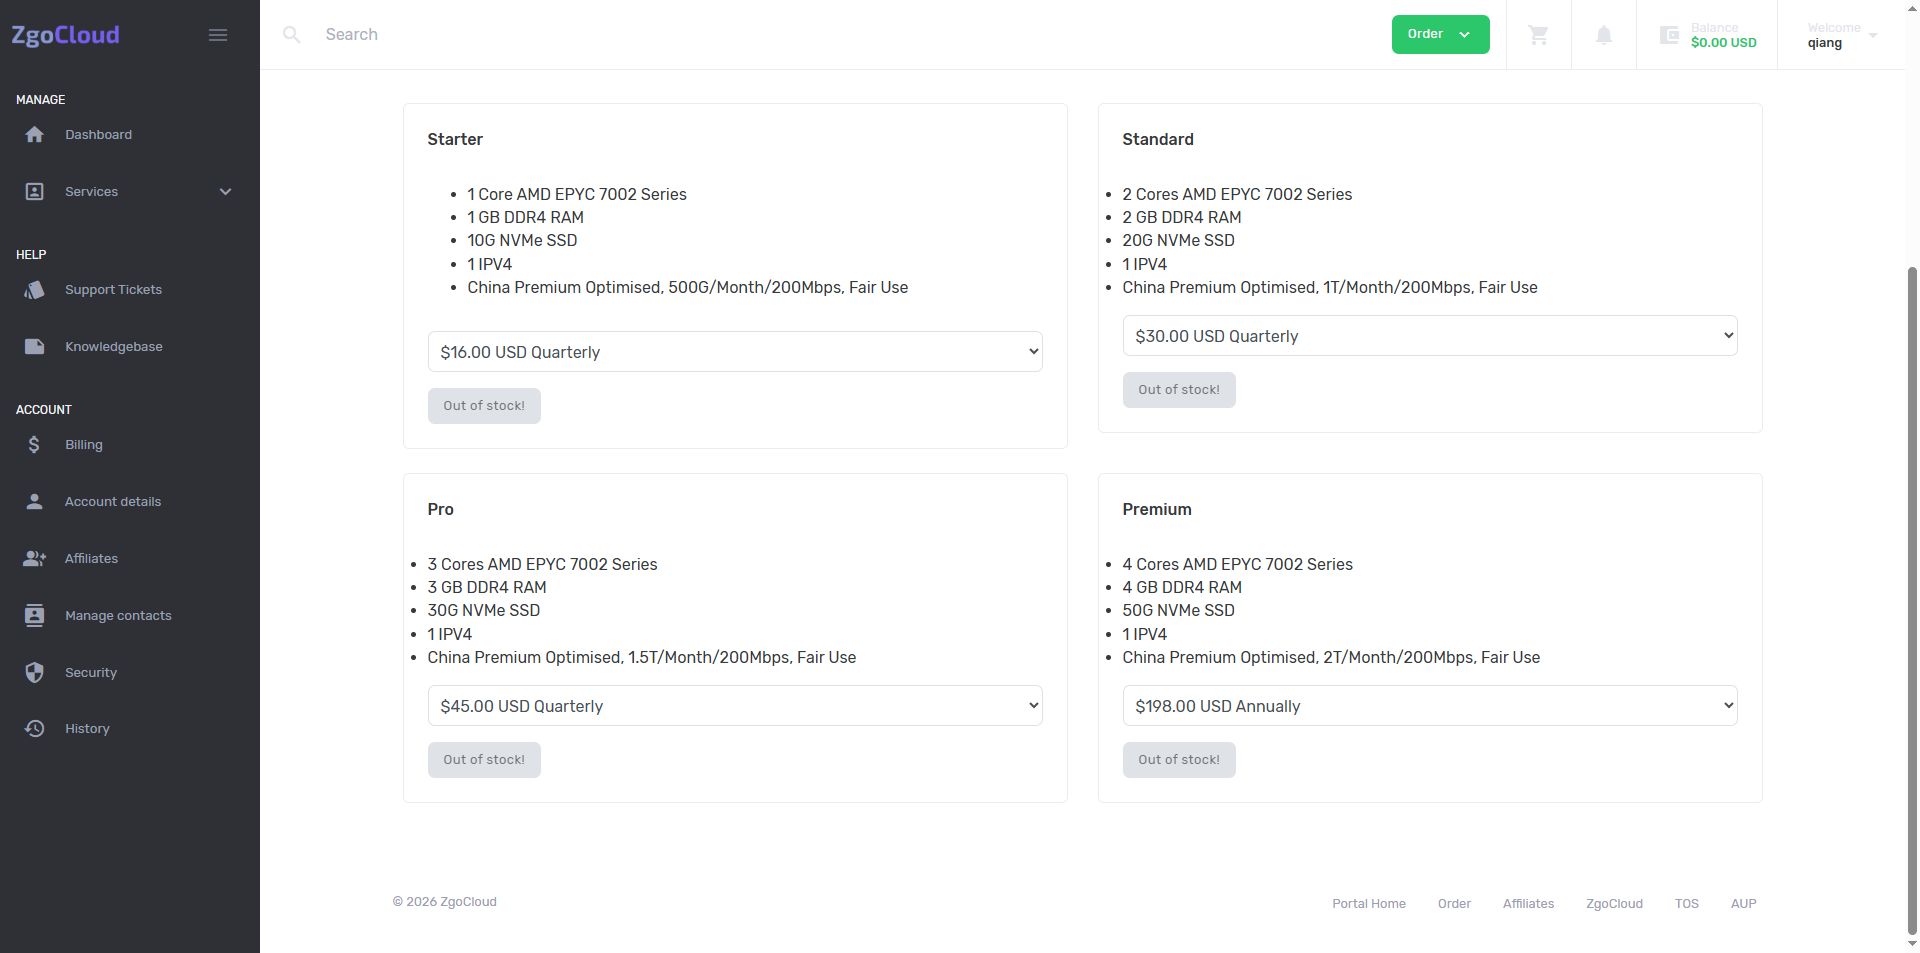
7. Plan (Pack Selection): If the Premium package is replenished, the priority is preferred (price 58.00/quarter, the monthly payment is about 16 US dollars, configuration: 1 core/2G memory/40G NVMe/200Mbps bandwidth/1.5T monthly traffic, triple play is fully optimized); if Premium is out of stock, choose other optimization packages in Los Angeles (such as Ryzen9 Performance, Intel performance) or other node optimization packages, the price is suitable for my budget, the configuration can meet the daily needs, and support one-click deployment of WireGuard. Three days later, I found that ‘Los Angeles, USA (CN2 GIA+9929+Cmin2)’ Pro is in stock, click Continue (as shown in Figure 6).
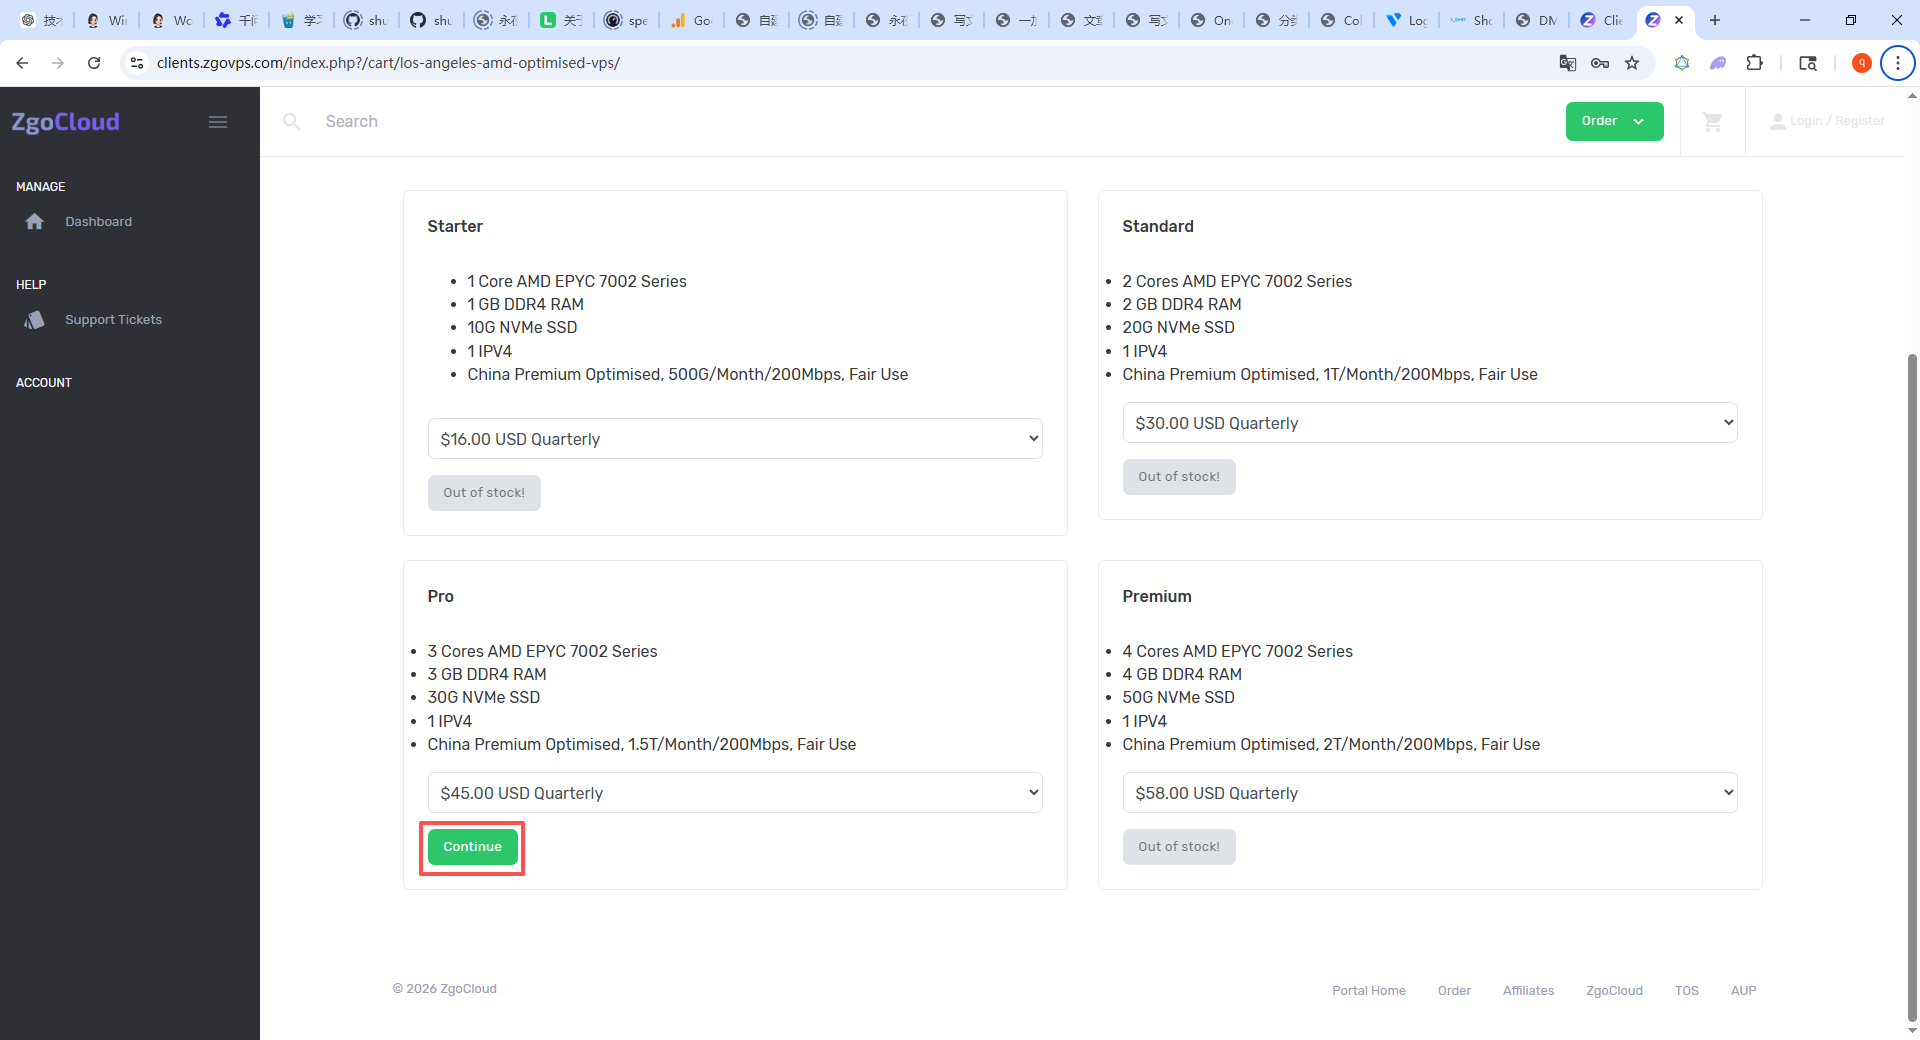
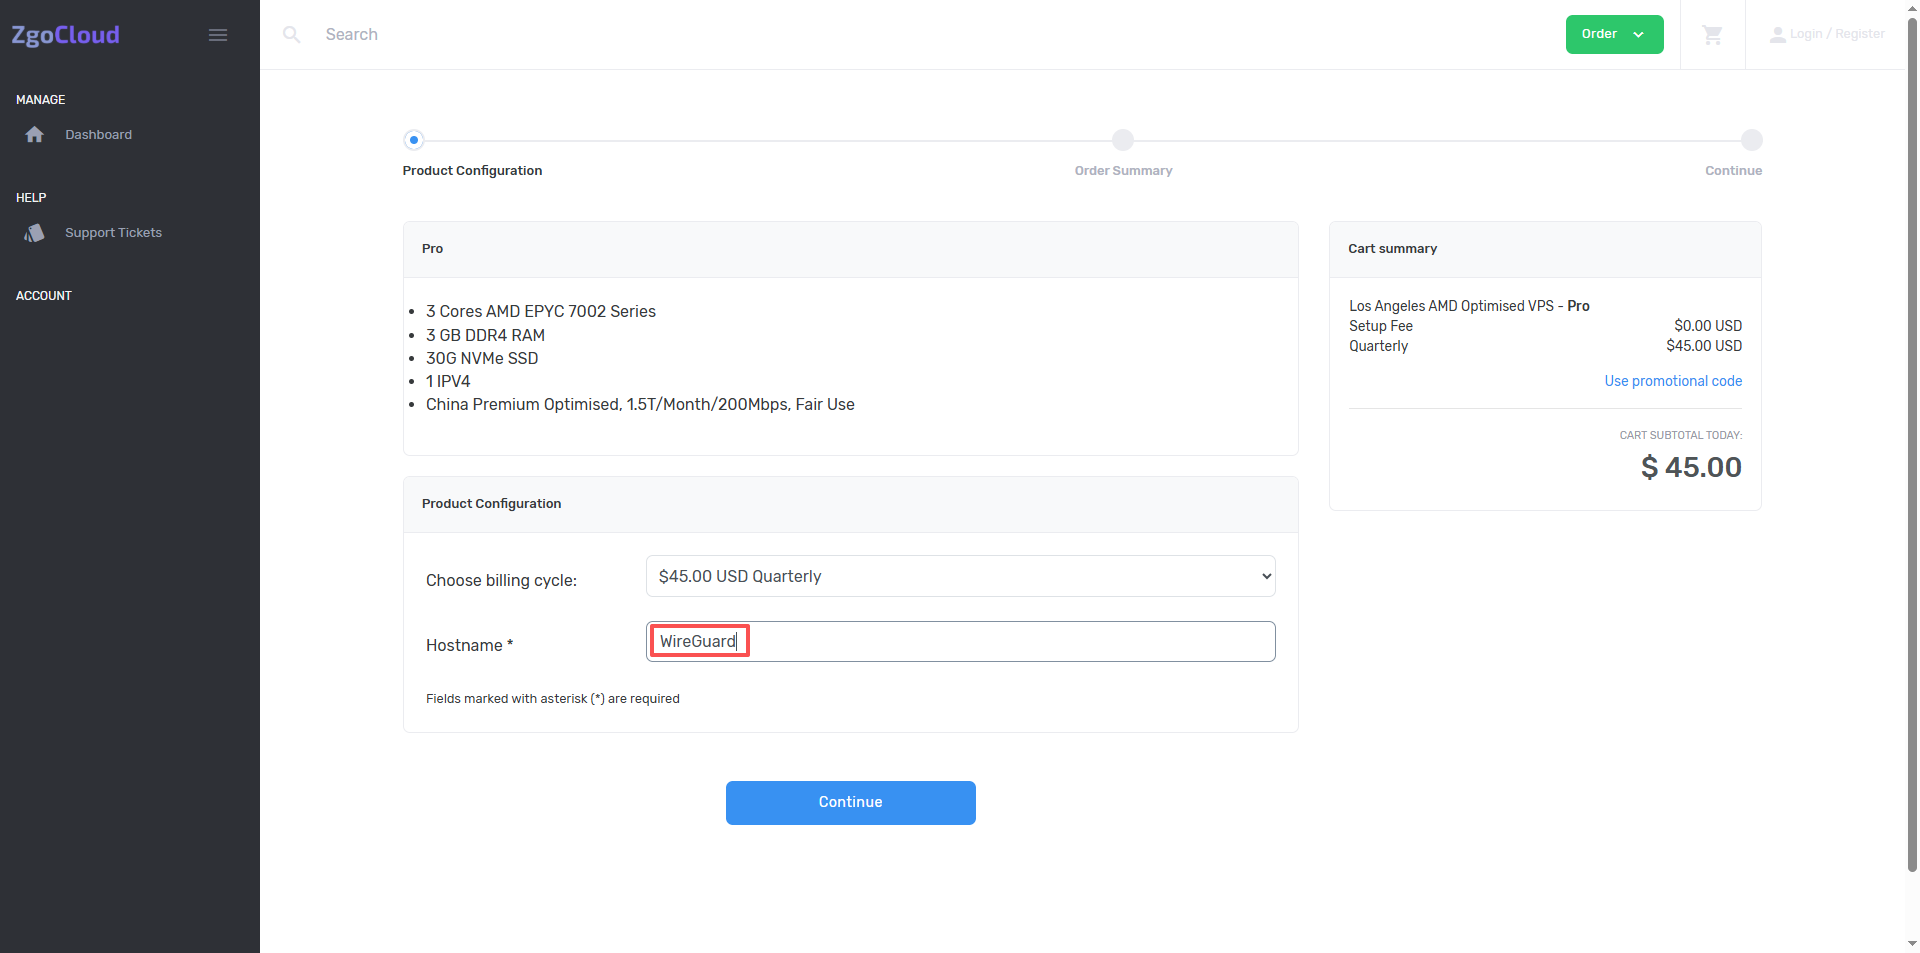
8. Enter the required-filled items and fill in the page (the core needs to be filled in Hostname), (required items, mark*, naming specifications and recommended names are as follows, simple and easy to remember and comply with the regulations, and do not affect subsequent deployment and use), name it WireGuard, click Continue (as shown in Figure 7);
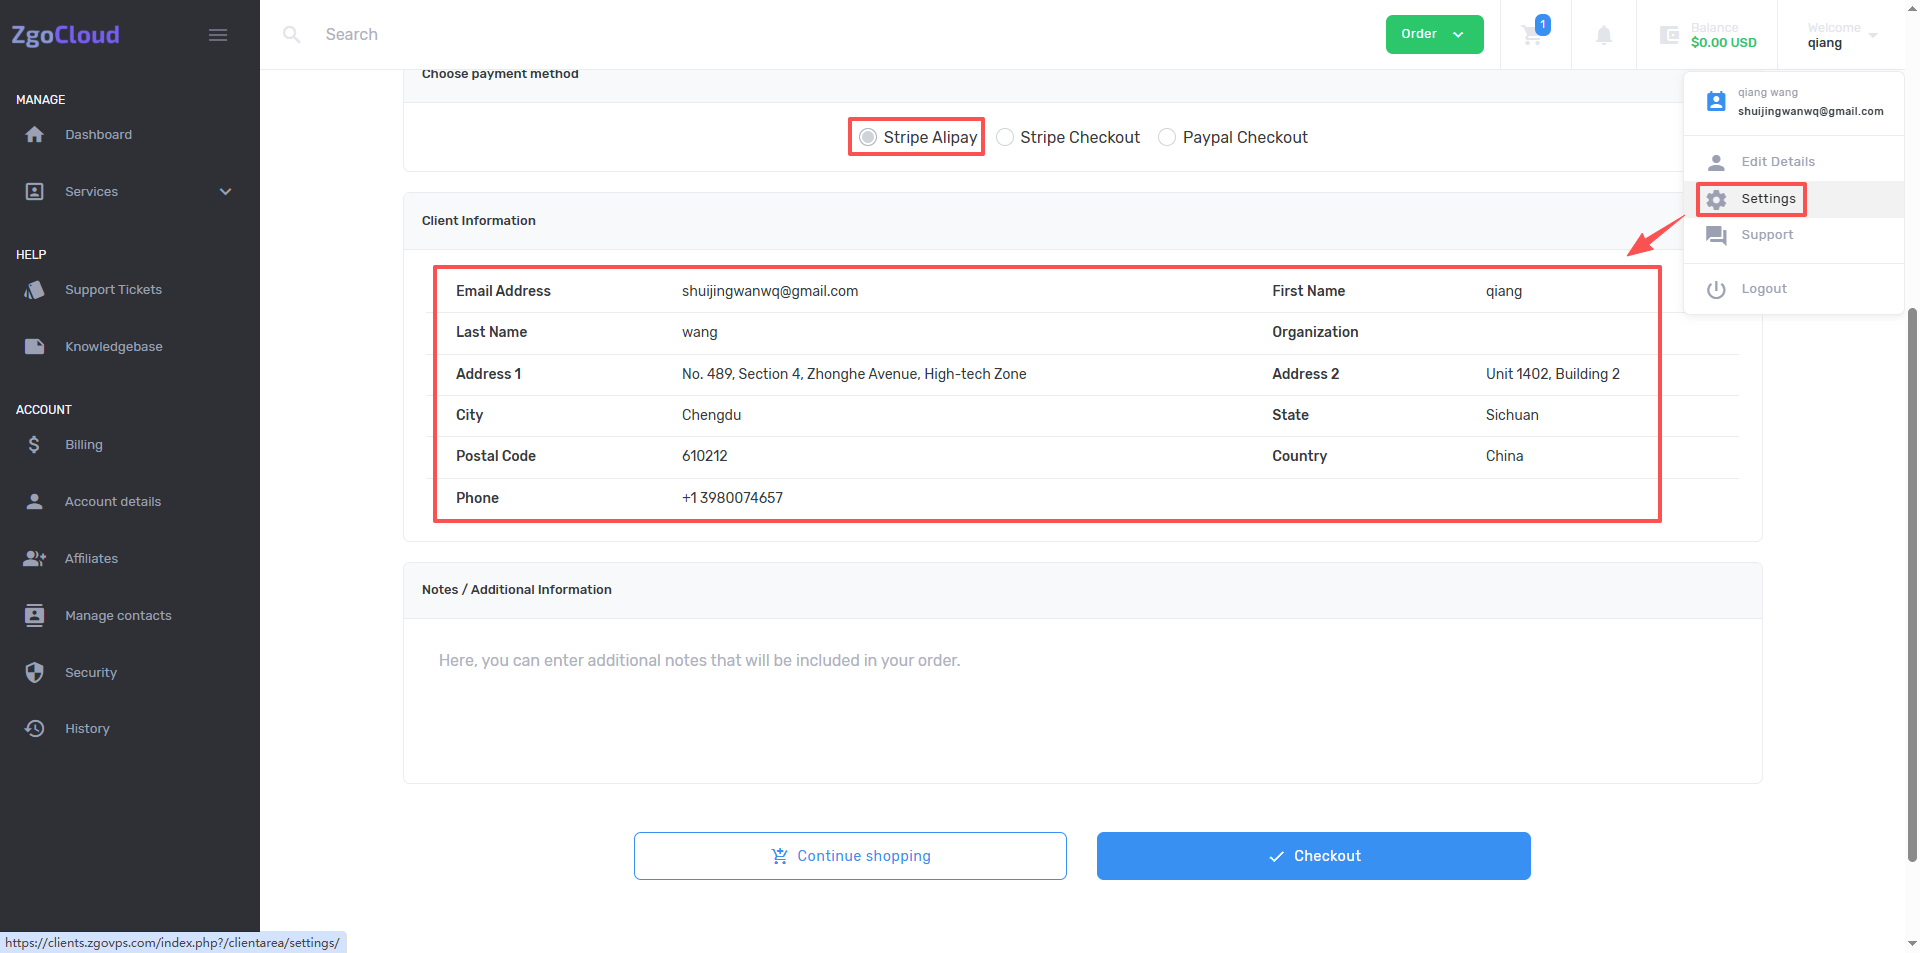
9. Go to the shopping cart page, Choose Payment Method defaults to select Stripe Alipay, and also need to fill in the customer information (you can edit it in the account details of the account), click Checkout. (As shown in Figure 8).
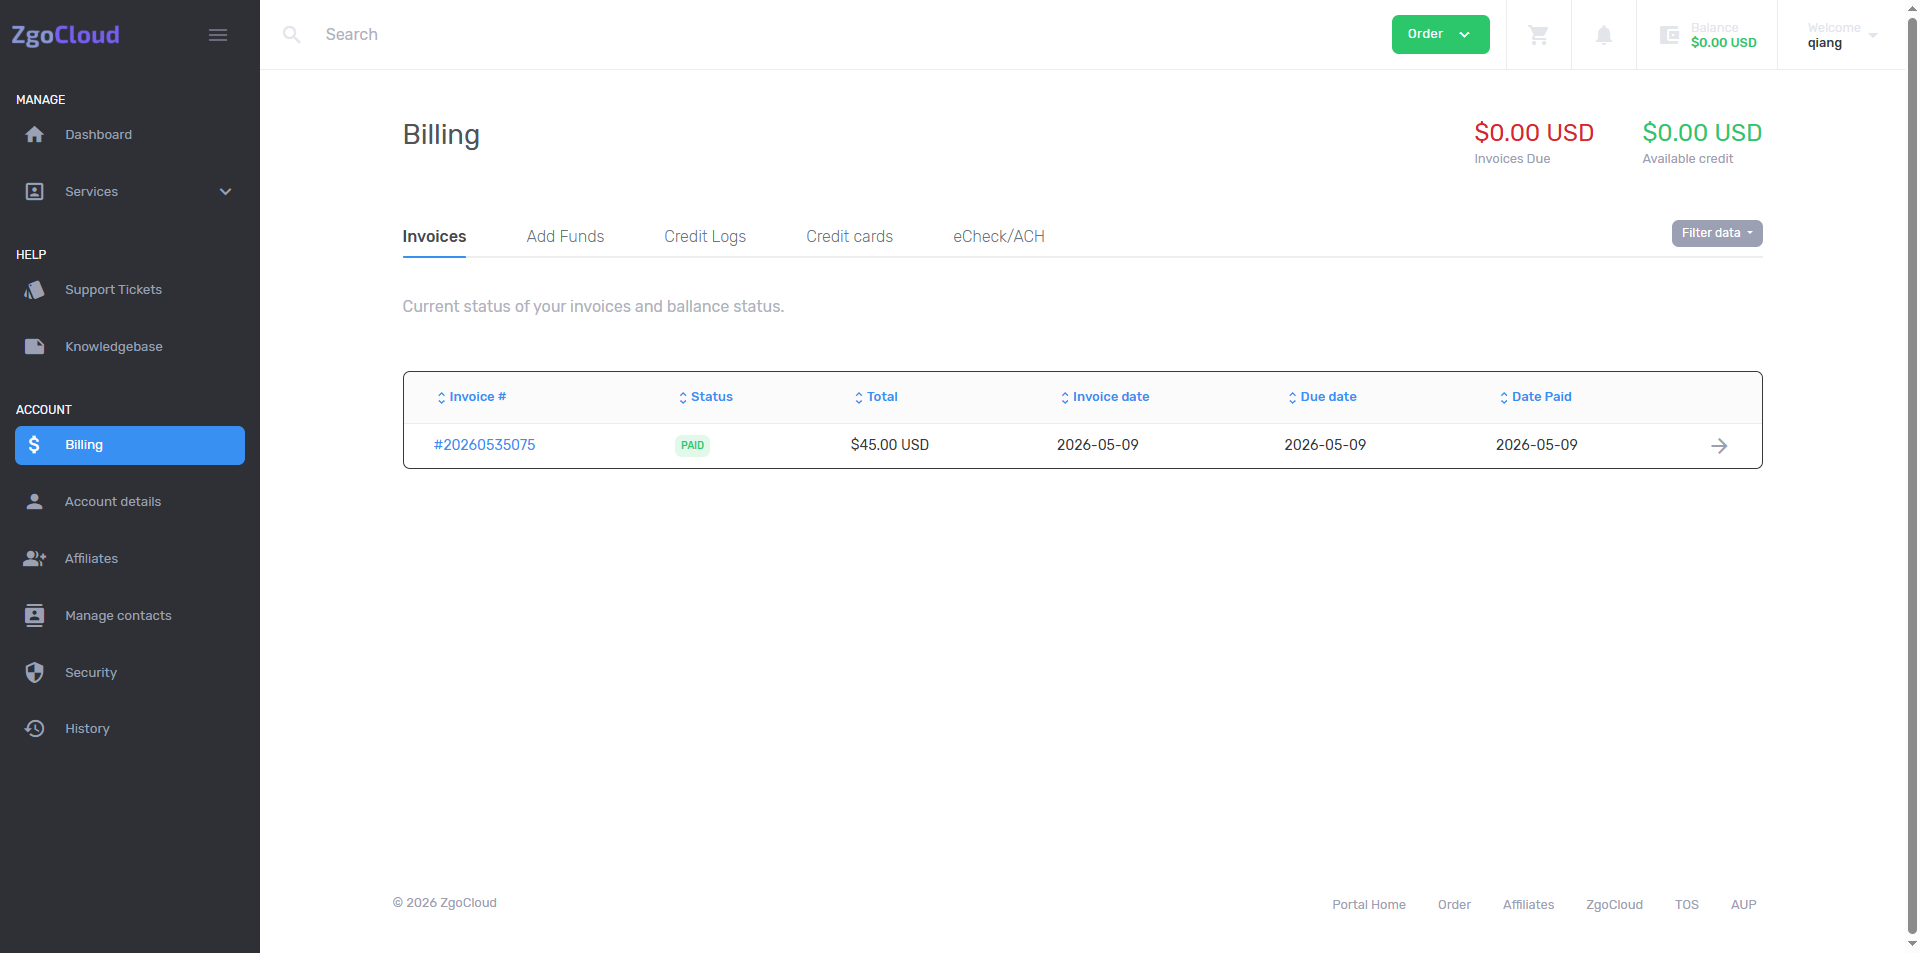
10. After the payment is successful, enter the Billing page, as shown in Figure 9
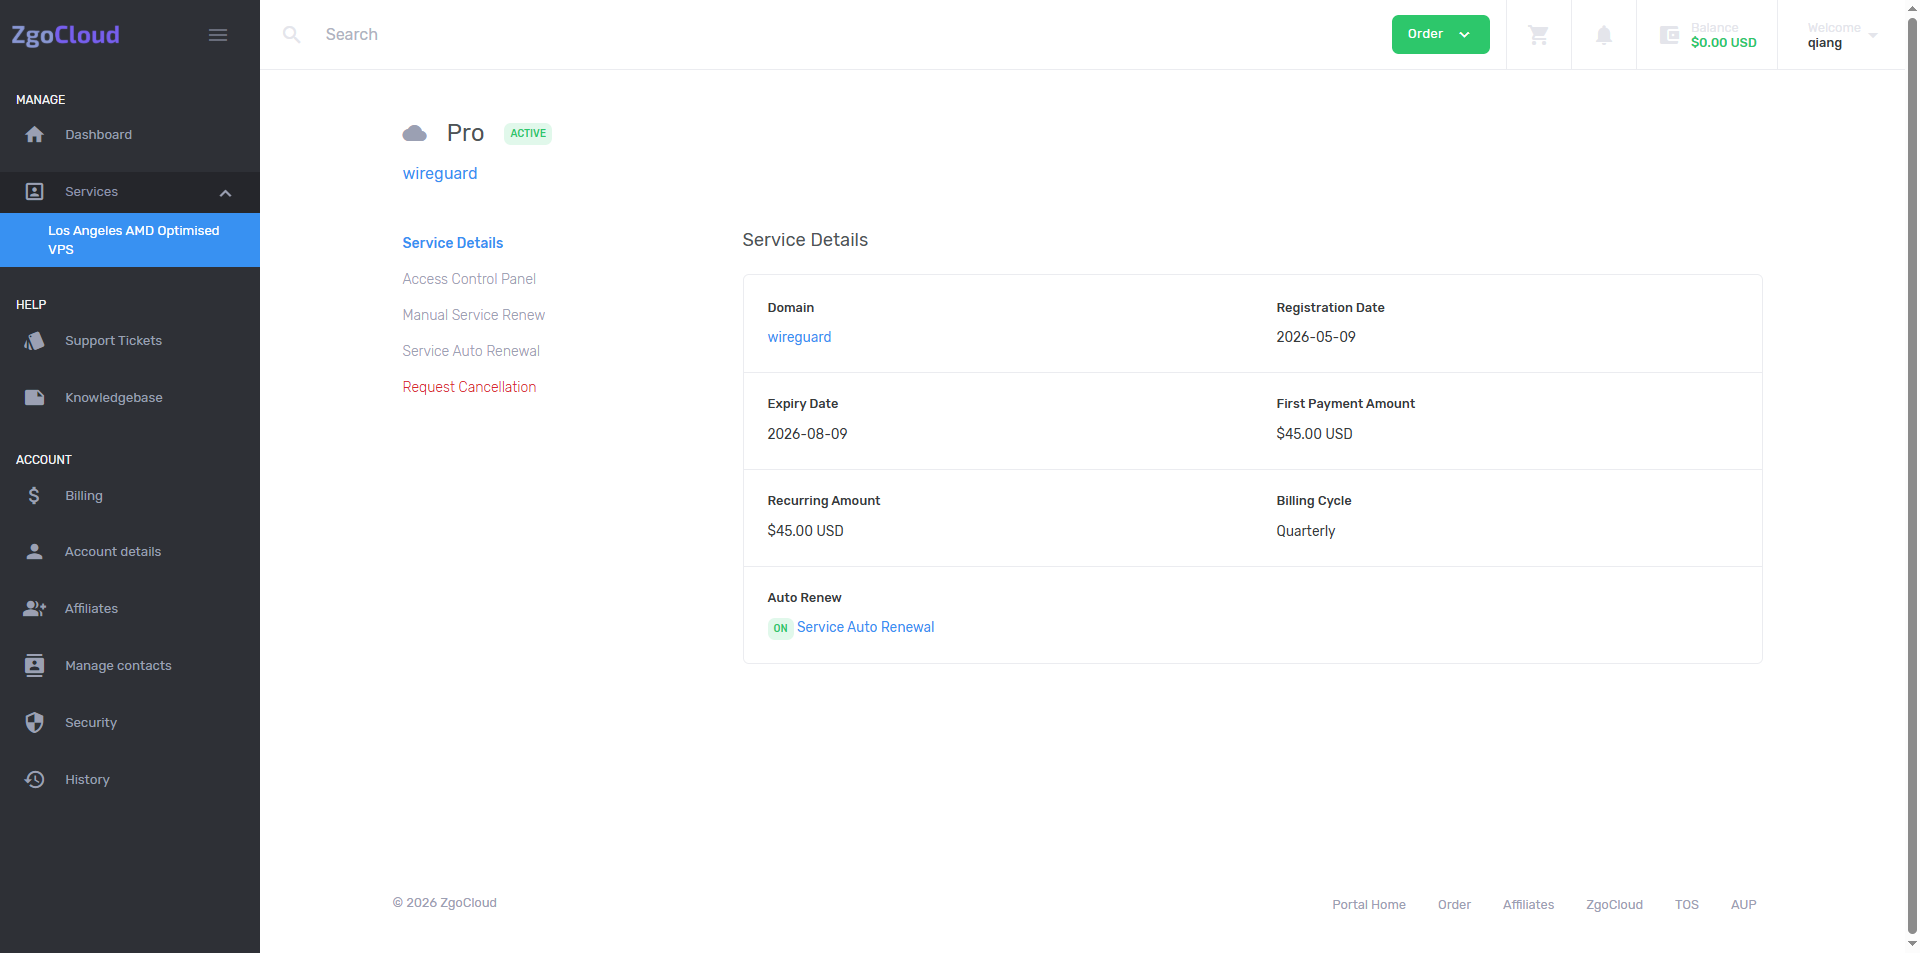
11. Click Services – Los Angeles AMD Optimised VPS to view the purchased VPS. As shown in Figure 10
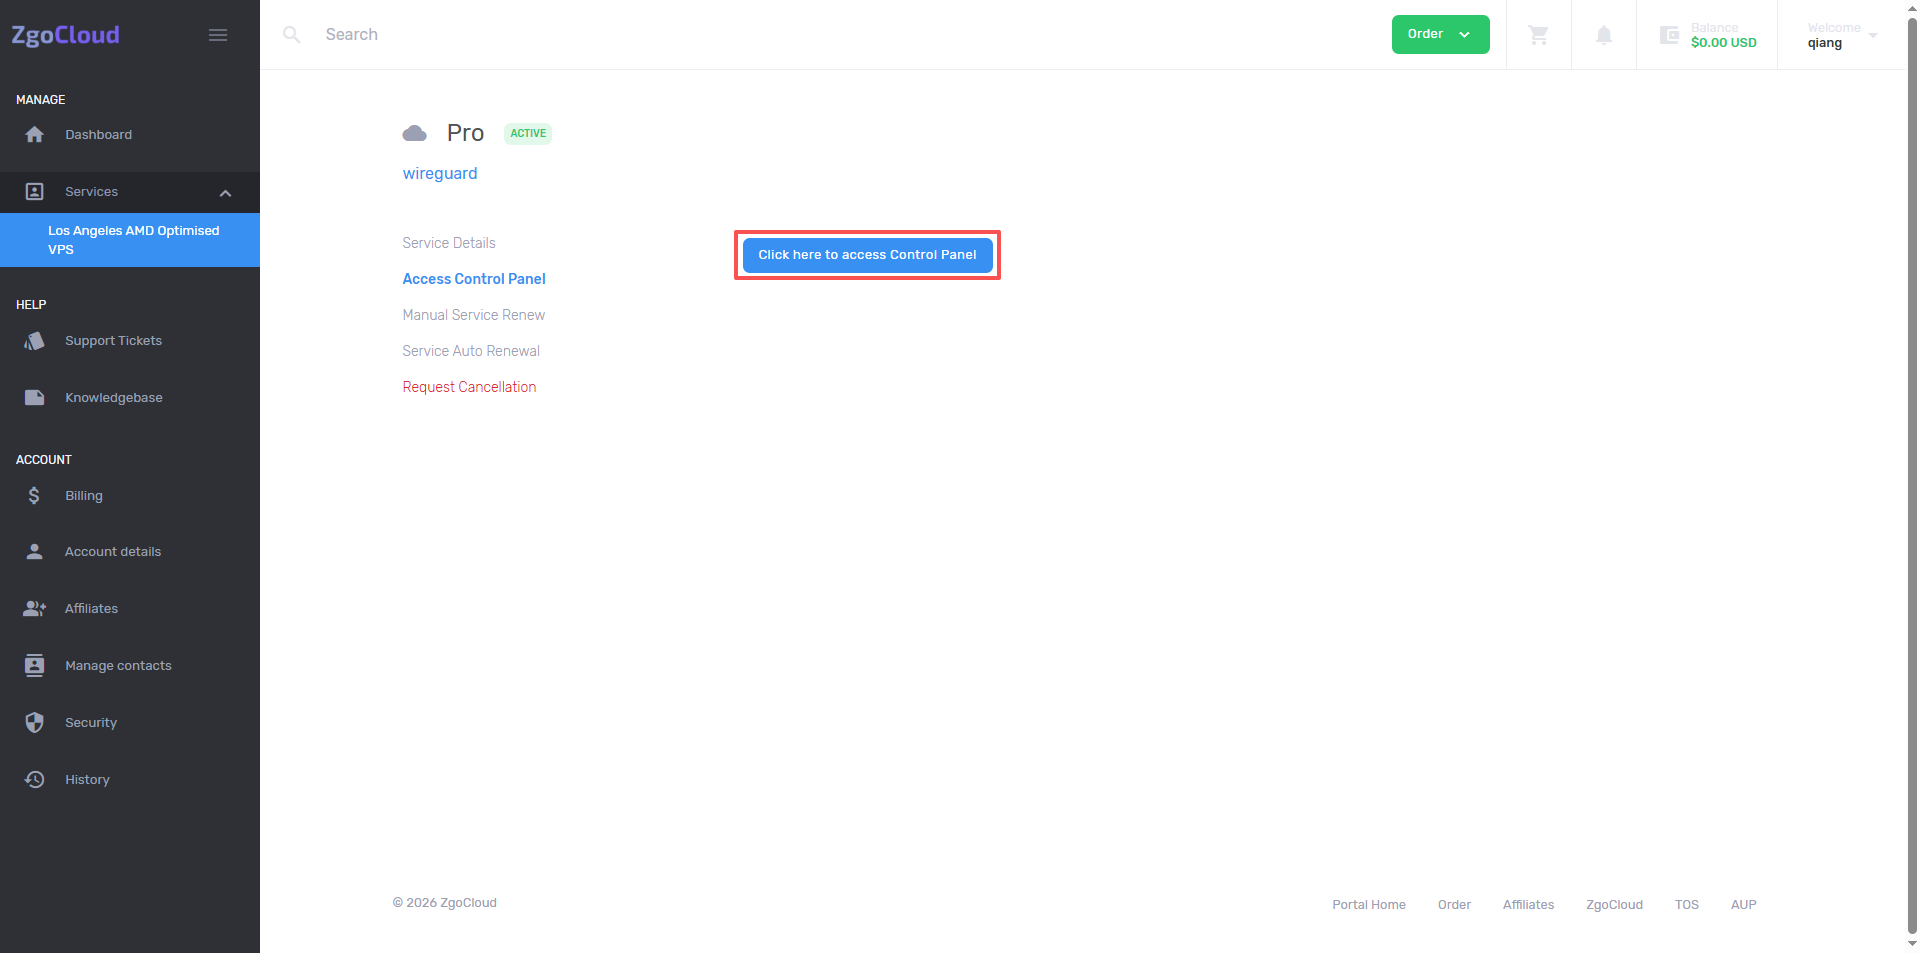
12. Go to the details page, click Access Control Panel – Click here to Access Control Panel. as shown in Figure 11
13. Enter the Server Setup… page, hostname (wireguard 2026 0509), timezone keeps the default ‘(UTC-08:00) americica/los_angeles’, the focus is on operating system, be sure to choose ‘Ubuntu 22.04 x64’ Compatibility issues with WireGuard deployment, no additional learning of new system operations.) as shown in Figure 12
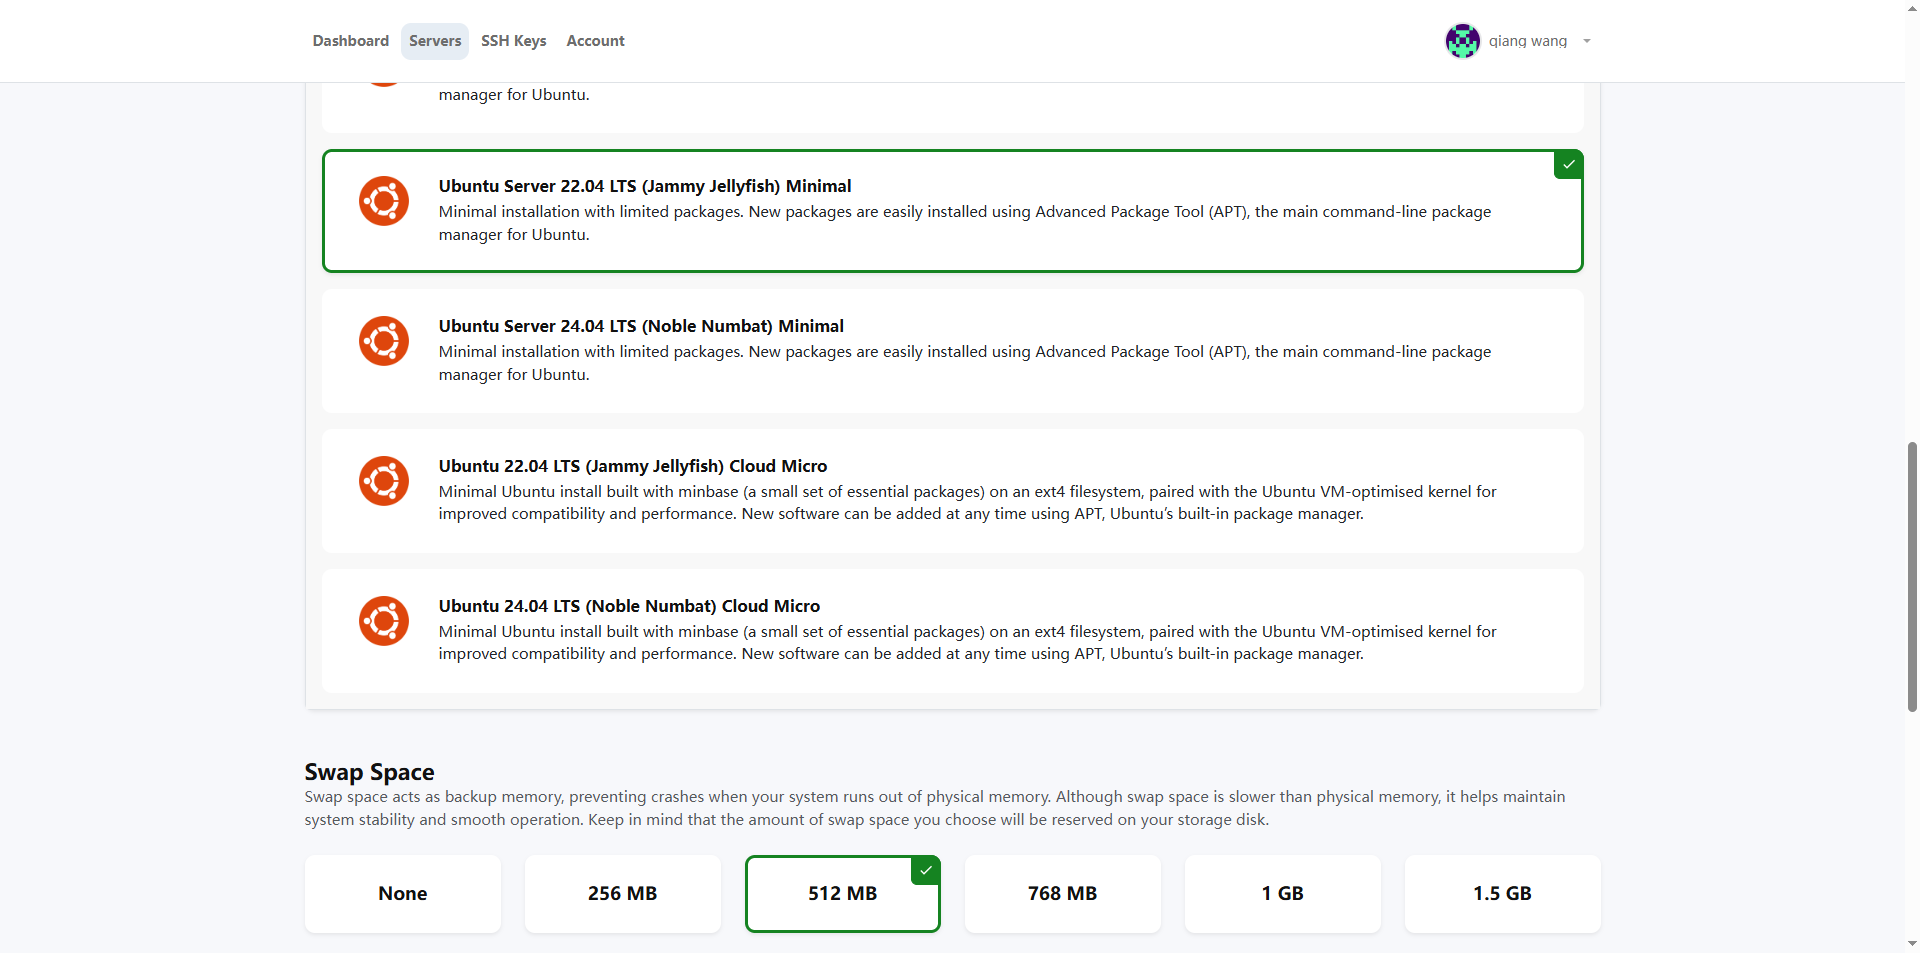
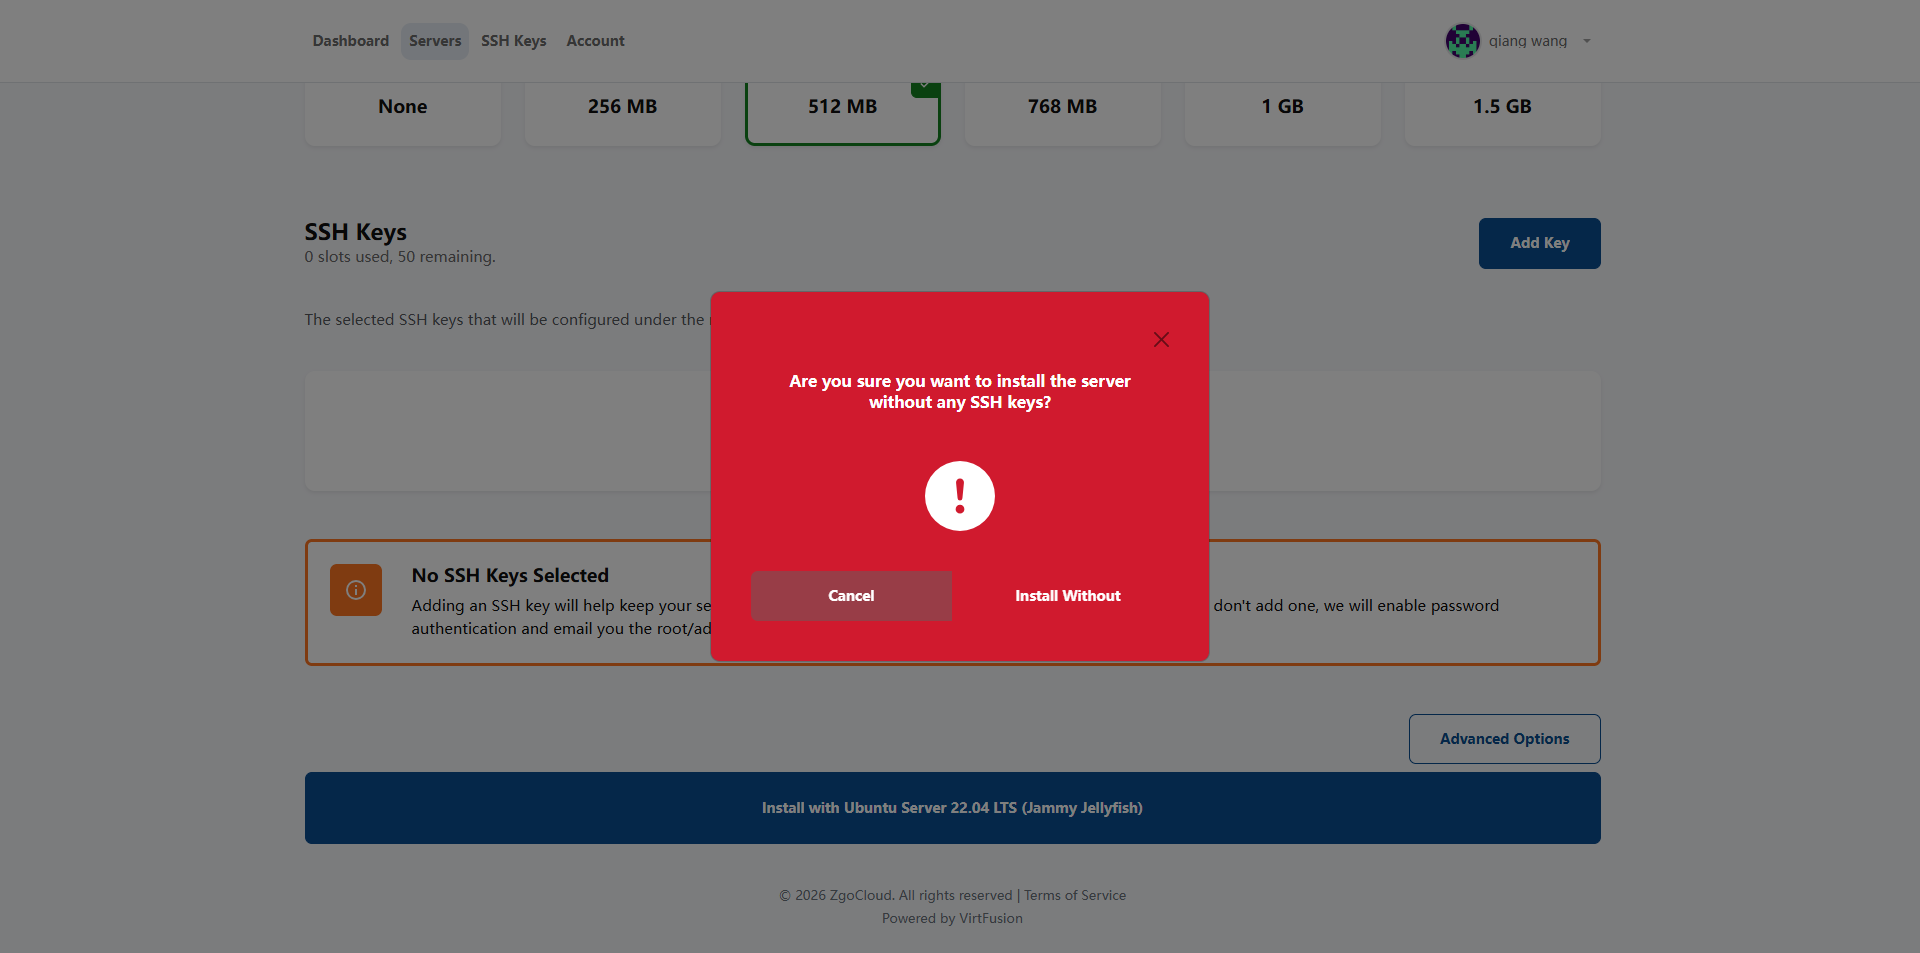
14. Click Install with Ubuntu Server 22.04 LTS (Jammy Jellyfish), and the dialog box will pop up Are you sure you want to install the server Without any ssh keys? Click Install without. as shown in Figure 13
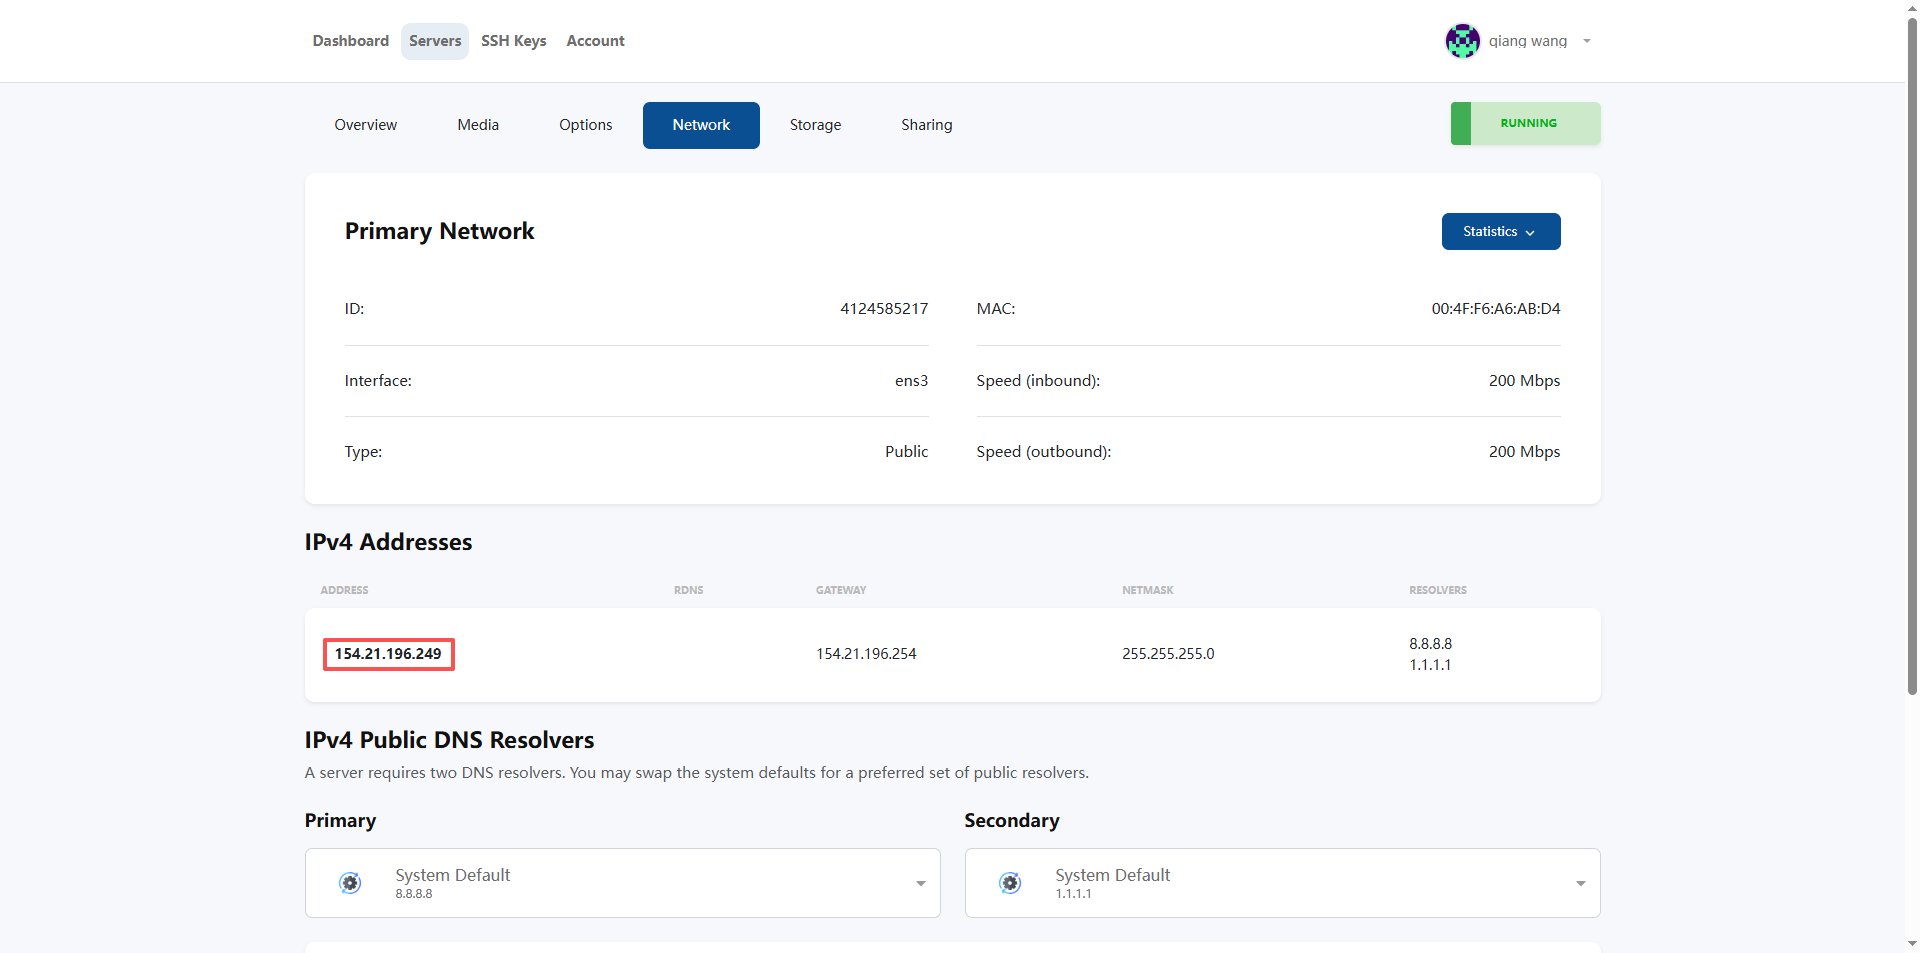
15. After the deployment is completed, find the server you just deployed; after finding it, record 3 core information (no need to use it later, only for backup):
15.1. Network – IPv4 Addresses, the public network IP: the external IP of the server (substance test speed will be used) (as shown in Figure 14);
15.2. Username: The default login account is ‘root’;
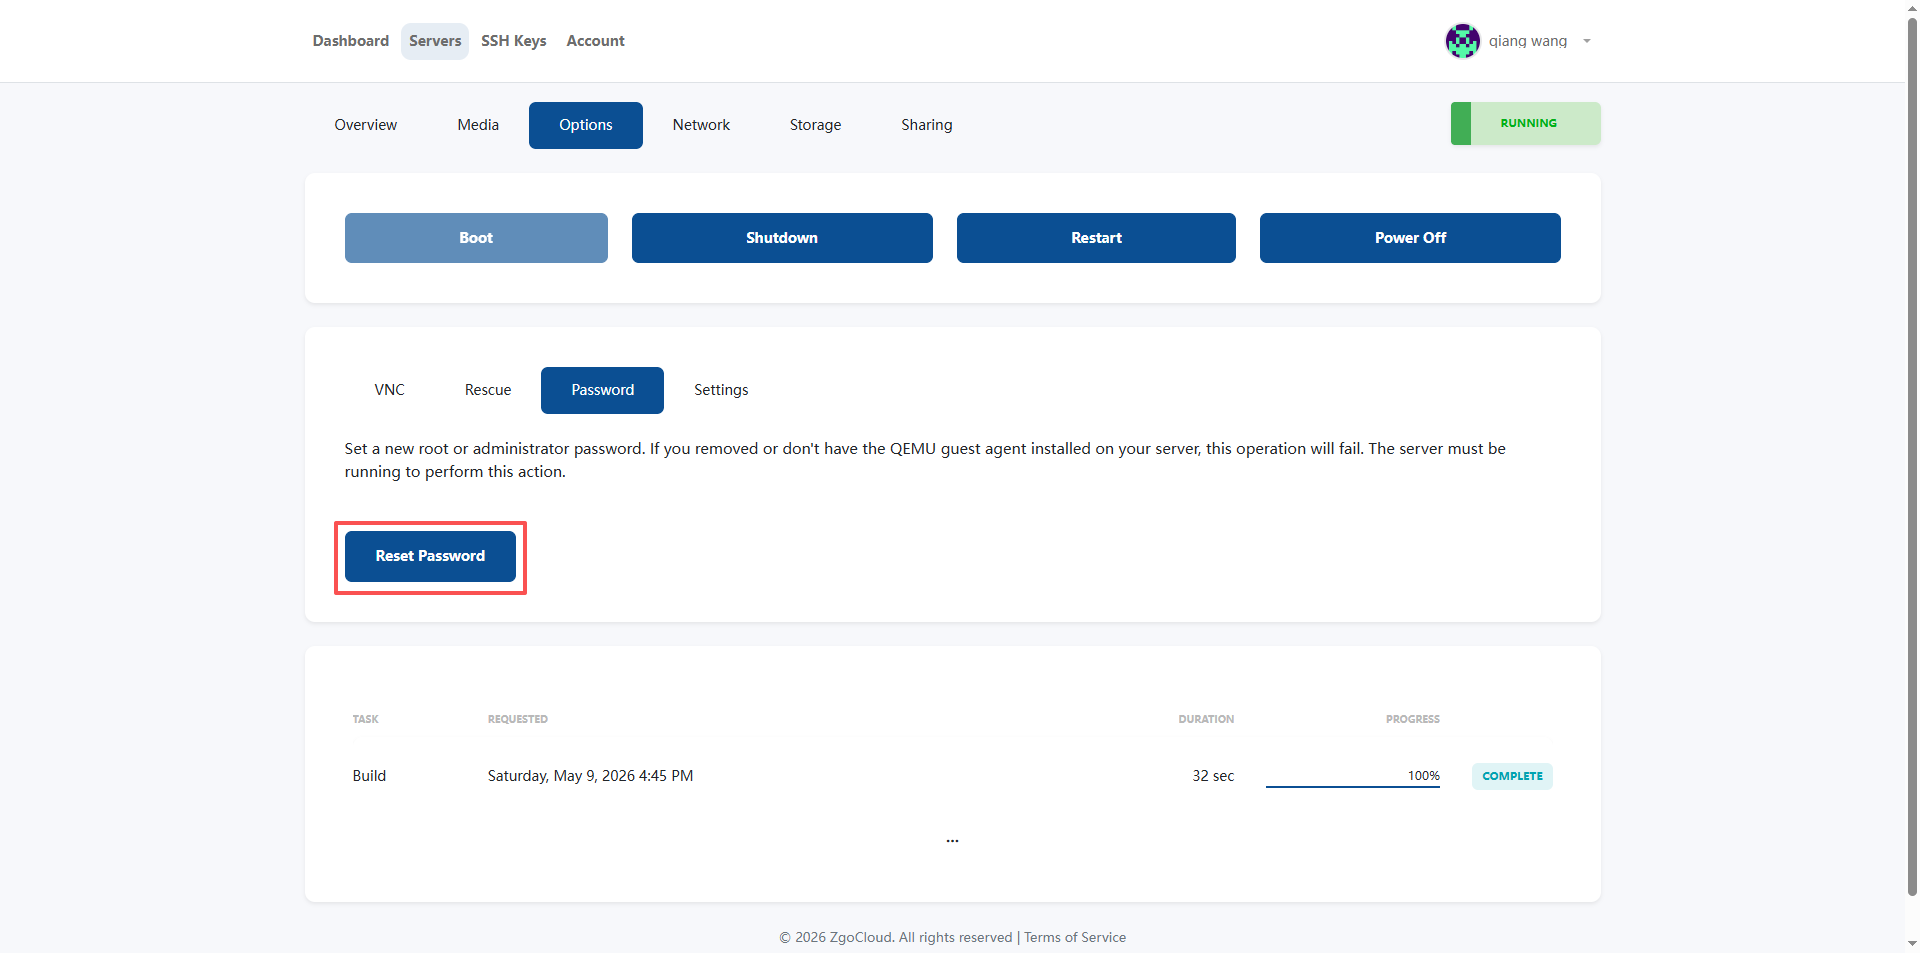
15.3. Password: After the deployment is successful, you will receive an email (Your server is ready!, which contains a password). If not received, Options – Password – Reset Password, reset the server login password (you will receive a new password in the mail) (as shown in Figure 15).
ZgoCloud Details (only for this step, supplementary deployment entrance + package out of stock to avoid pits):
1. The nodes must choose ‘Los Angeles Triple Network Optimization’ (the preferred option after replenishment), do not choose ordinary nodes in Los Angeles, otherwise the delay will be high (more than 180ms), and the optimization advantage will be lost; other node optimization packages can be used as an alternative, and also support domestic optimization;
2. The system must select ‘Ubuntu 22.04 x64’, which is consistent with my previous operation to avoid the failure of subsequent WireGuard deployment;
3. When all the current packages are out of stock, there is no need to repeatedly try to click the out-of-stock package, priority is given to ‘Waiting for replenishment’ or ‘Select an alternative package’ operation to avoid wasting time; zgocloud Special prices and optimized packages are more frequently replenished. You can focus on the inventory changes of the official website package page and configuration page, and you can also pay attention to the platform promotion activities. The replenishment volume will increase during the promotion period;
3. Problems I encountered (Vultr Singapore node deployment WireGuard)
When I used the native WireGuard before, I encountered two very troublesome problems:
1. Diversion configuration is too troublesome
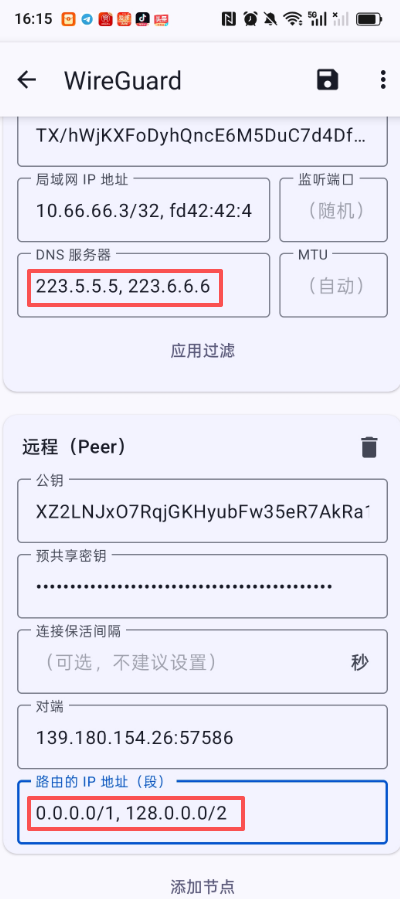
The shunt of native WireGuard can only be manually configured Allowedips, the domestic IP segment must be excluded by itself, and the foreign IP is used for VPN (foreign IP The paragraph needs to be added by yourself), and the configuration must be manually changed every time the rules are updated. It is very cumbersome, and there is no one-key switch, so it is very inconvenient to switch.
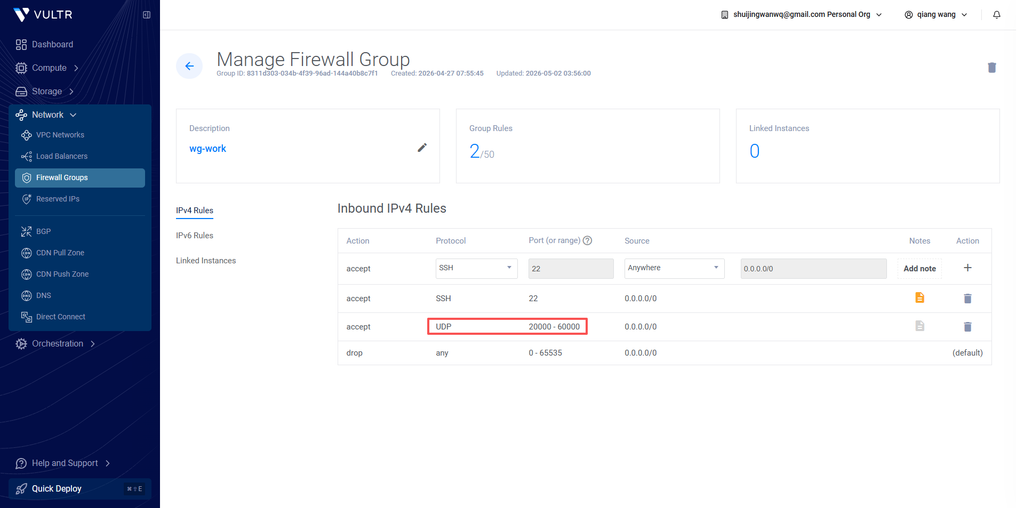
2. I have changed countless ports or is it blocked?
At first I thought it was a port problem, and I replaced the Wireguard port between 20000-60000, but it was blocked by the operator within a few days. Later, I found out that the operator is not blocking the port at all, but has identified the traffic characteristics of WireGuard through DPI (deep packet detection). And at some critical times, such as video conferences, it is suddenly blocked, which is too affecting the experience.
4. Analysis and comparison of all anti-sealing schemes
As a new generation of high-performance VPN protocol, WireGuard uses the UDP protocol transmission by default, and may be blocked by the operator or firewall through port blocking and DPI (deep packet detection) in some network environments. The following is a detailed comparison of the current mainstream WireGuard anti-sealing scheme to help you choose the right solution according to your network environment:
| Program name | core principle | transport layer protocol | Anti-DPI ability | speed loss | Configuration difficulty | Extra dependence | Applicable scenarios |
| Native WireGuard (non-standard port) | Modify the default port 51820 to a random high port, avoid port blacklist | udp | Weak (only block blocking, not against DPI detection) | Very low (almost no performance loss) | Extremely low | No | ISP only has a simple port blocking and a loose environment without depth traffic detection |
| Port Jump/Auto Port Switch | Configure multi-port forwarding rules, the client automatically detects connectivity, and automatically switches when the port is blocked | udp | Weak (only single port blocking, not against DPI) | Extremely low | Medium | Router port forwarding + connectivity detection script | ISP blocks a single UDP port but does not detect traffic characteristics |
| WG-Obfuscator + Wireguard | Make lightweight obfuscation of WireGuard original data packets, modify protocol fingerprints, and avoid feature recognition | udp | Medium (fighting against the underlying DPI, unable to deal with advanced feature detection) | Low | Medium | WG-Obfuscator Independent Tool | There is a basic DPI detection that needs to simply modify the scenario of traffic characteristics |
| AMNEZIAWG (modified version of Wireguard) | Based on WireGuard modification, the randomized handshake size, modify the data packet header, and fill the random data feature | udp | Medium and high | Low | Medium | AMNEZIAWG Kernel Module / Standalone Tool | Medium blocking environment, scenarios that require lightweight confusion |
| udp2raw + wireguard | Encapsulate UDP traffic as RAW packets, which can be disguised as TCP/UDP/ICMP normal traffic, support encryption and confusion | Customizable camouflage protocol | Medium and high (can resist most conventional DPIs, support traffic fingerprint camouflage) | Low | Medium | udp2raw independent tool | UDP traffic is limited by the operator’s speed limit/blocking, and scenarios that need to camouflage UDP traffic |
| Phantun + Wireguard | Transparently converts WireGuard’s UDP traffic to TCP traffic, masquerading as a normal TCP connection | tcp | Medium (by bypass UDP’s completely disabled policy, only against the underlying DPI) | Medium | Medium | Phantun independent tool | The network environment completely disables the UDP protocol, only scenarios where TCP communication is allowed |
| WSTUnnel + Wireguard | Encapsulate Wireguard UDP traffic as WebSocket over TLS traffic, disguised as normal HTTPS web traffic | TCP(WebSocket/TLS) | High (perfectly disguised as standard HTTPS traffic, can resist most DPIs, and have strong stability in strong blockade environments) | Medium | Medium | WSTUnnel independent tool | There is a scenario where there is a strict DPI detection, and the traffic needs to be disguised as a normal web page access scenario |
| Shadowsocks + WireGuard | Forward WireGuard traffic through the ShadowSocks proxy, reuse SS mature traffic confusion ability | Configurable (TCP/UDP support) | High (St Mature Confused Scheme, which can fight against most advanced DPIs) | Medium | Medium | Shadowsocks server + client | Strong blocking environment, scenarios that require mature and stable obfuscation schemes |
| Stunnel + Wireguard | Encapsulate WireGuard traffic as a standard SSL/TLS tunnel, disguised as HTTPS encrypted traffic | TCP(SSL/TLS) | High (disguised as standard HTTPS traffic, avoid DPI feature recognition) | Medium | Medium | Stunnel standalone tool | Scenarios of DPI detection need to be converted to standard TLS traffic |
| Anti-sealing CDN transit + Wireguard | Through the professional anti-blocking CDN node transfer traffic, hide the real IP of the source station, support multi-entry rotation, SNI confusion and other capabilities | TCP(WebSocket/TLS) | Extremely high (can against IP blockade, SNI blocking, advanced DPI, hidden source station) | Medium high | High | Professional anti-sealing CDN service | National-level strong blocking environment, scenarios where the source station IP is easily blocked in batches |
Program selection recommendations
- Relaxation: If your network is just a simple port blocking, no in-depth detection, use it directlyNative WireGuard for non-standard portsYes, the performance is the best, and the configuration is the easiest.
- Base Blocking Environment: If the ISP will block a single port, or have basic DPI detection, you can chooseport jumpOrWG-Obfuscator + Wireguard, the configuration is simple, and the performance loss is small.
- UDP disabled environment: If your network has completely disabled the UDP protocol and can only use TCP, then you can choosePhantun + WireguardOrStunnel + Wireguard, convert the UDP to TCP transmission.
- Strict DPI environment: If the network has strict depth packet detection, it needs to be disguised as normal web traffic, and it is recommended to useWSTUnnel + WireguardOrShadowsocks + WireGuard, which can bypass DPI detection very well.
- Strong blocked environment: If it is a national-level strong blockade, the source station IP is easily banned, then it is recommended to useAnti-sealing CDN transit + Wireguard, can hide the source station, automatically rotate the entrance, and avoid being blocked to the greatest extent.
Final Scheme Selection: Wstunnel + Wireguard + Clash Meta
For the current network environment in mainland China, the DPI detection intensity of operators has been continuously improved, and ordinary light-weight obfuscation solutions (such as Phantun + Wireguard, AMNEZIAWG) can no longer cope with the traffic characteristics of this type of scheme. It will still be identified, and it will usually be blocked after a few days of use.
And WSTUnnel + Wireguard The solution can completely disguise the VPN traffic as a normal HTTPS web page access traffic, and the operator cannot recognize that this is a VPN traffic.
At the same time, this solution is perfectly compatible with Clash Meta, you can continue to use the automatic splitting function of Clash, no need to manually configure WireGuard’s allowedips, and you can also use the one-key switch such as Clash, which perfectly solves the traditional The diversion configuration of the WireGuard scheme is complex pain points.
5. Fool’s deployment process
You follow the steps below, and you can copy and paste commands to complete, without knowing any complicated principles.
Preparation
1. You need to have your own domain name (used to apply for an SSL certificate, and a free domain name can also be used, such as freeenom’s)
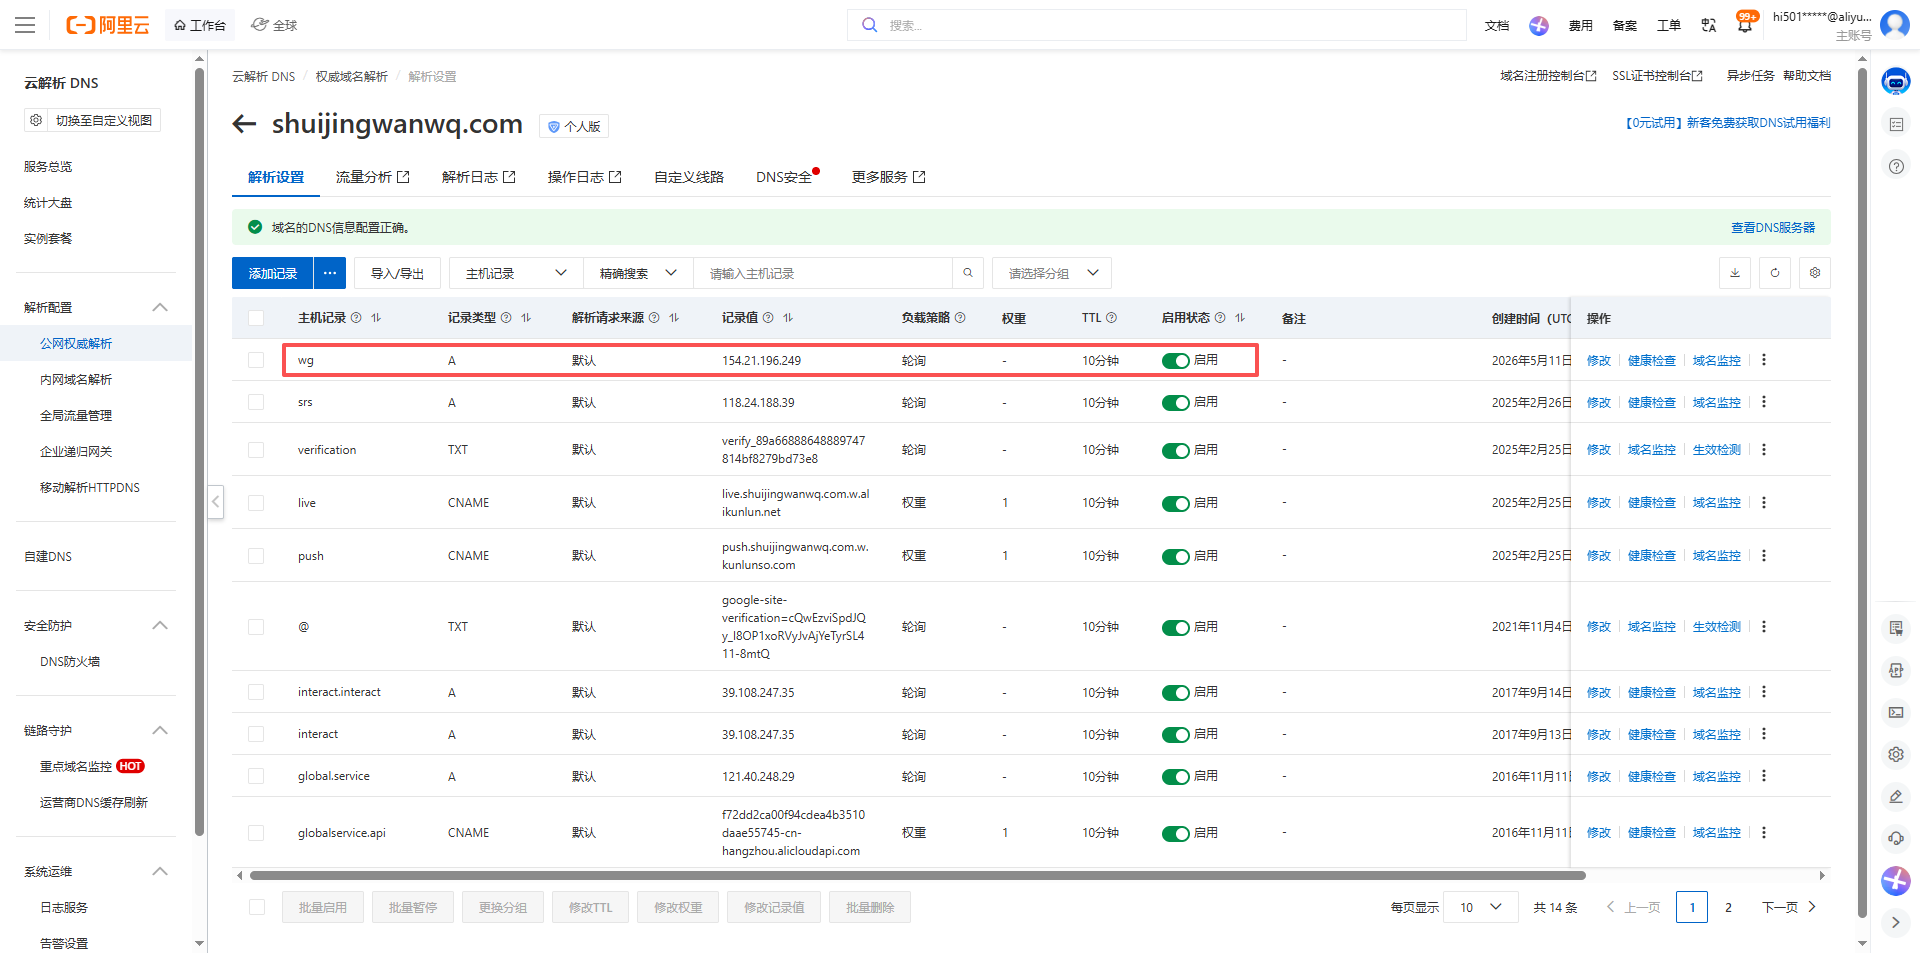
2. Resolve your domain name to the public IP of the ZgoCloud Los Angeles server, and wait for 10 minutes to take effect (Figure 16)
3. Log in to your ZgoCloud server with ssh, log in with root user (if it is not root, just add sudo in front)
Part 1: Server Side Deployment (Operation on ZGoCloud Server)
Step 1: Update the system
Update the system first to avoid the problem of old dependencies:
apt update && apt upgrade -y
Step 2: Install Wireguard in one click
Use the official one-click script to automatically install Wireguard, without you manually configuring:
wget -O wireguard.sh https://get.vpnsetup.net/wg
bash wireguard.sh --auto
This script will automatically install WireGuard for you, configure the server, and generate the key. You don’t need to do any operations, you can wait for it to run.
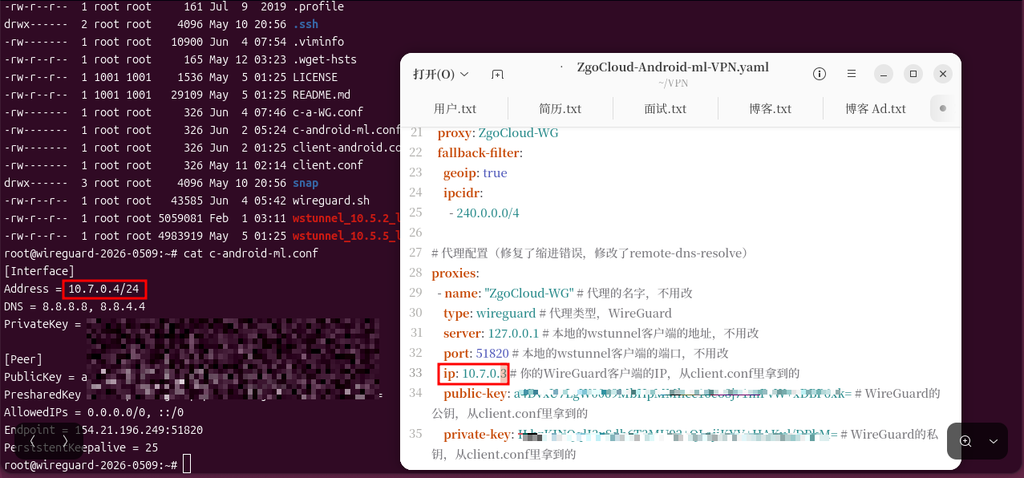
After running, it will output the configuration information of Wireguard, you write down this information (client configuration file path: /root/client.conf), and then the client uses:
– The public key of the server: the string of characters after public-key
– Client’s private key: the string after private-key
– Client’s IP: 10.7.0.2 This (if yours is different, use it to output)
root@wireguard-2026-0509:~# cat client.conf
[Interface]
Address = 10.7.0.2/24
DNS = 8.8.8.8, 8.8.4.4
PrivateKey = yBdtV4+0CxvTFvXWrPS+sMaWD...

[Peer]
PublicKey = a4DvxU7LgW0069MbHpMMhcc16e...
PresharedKey = 3glNI413OnTF2mAJLo9JSFG/Hb/jZpgEqR5z9Gc8x9g=
AllowedIPs = 0.0.0.0/0, ::/0
Endpoint = 154.21.196.249:51820
PersistentKeepalive = 25
Step 3: Install[acme.sh](acme.sh), apply for an SSL certificate
We need a legal SSL certificate to disguise as HTTPS, use[acme.sh](acme.sh) One-click application for a free lets encrypt certificate:
# 安装acme.sh(shuijingwanwq@gmail.com 需要换为你自己的邮箱地址)
curl https://get.acme.sh | sh -s email=shuijingwanwq@gmail.com
# 把acme.sh加入环境变量
source ~/.bashrc
Then apply for a certificate, replace the following your domain name (wg.shuijingwanwq.com) with your own domain name (the one you previously resolved to the server IP):
acme.sh --issue -d wg.shuijingwanwq.com --standalone
This command will automatically apply for a certificate for you. When it runs, the certificate will be generated. The default exists to /root/.acme.sh/ your domain name/below (as shown in Figure 17).
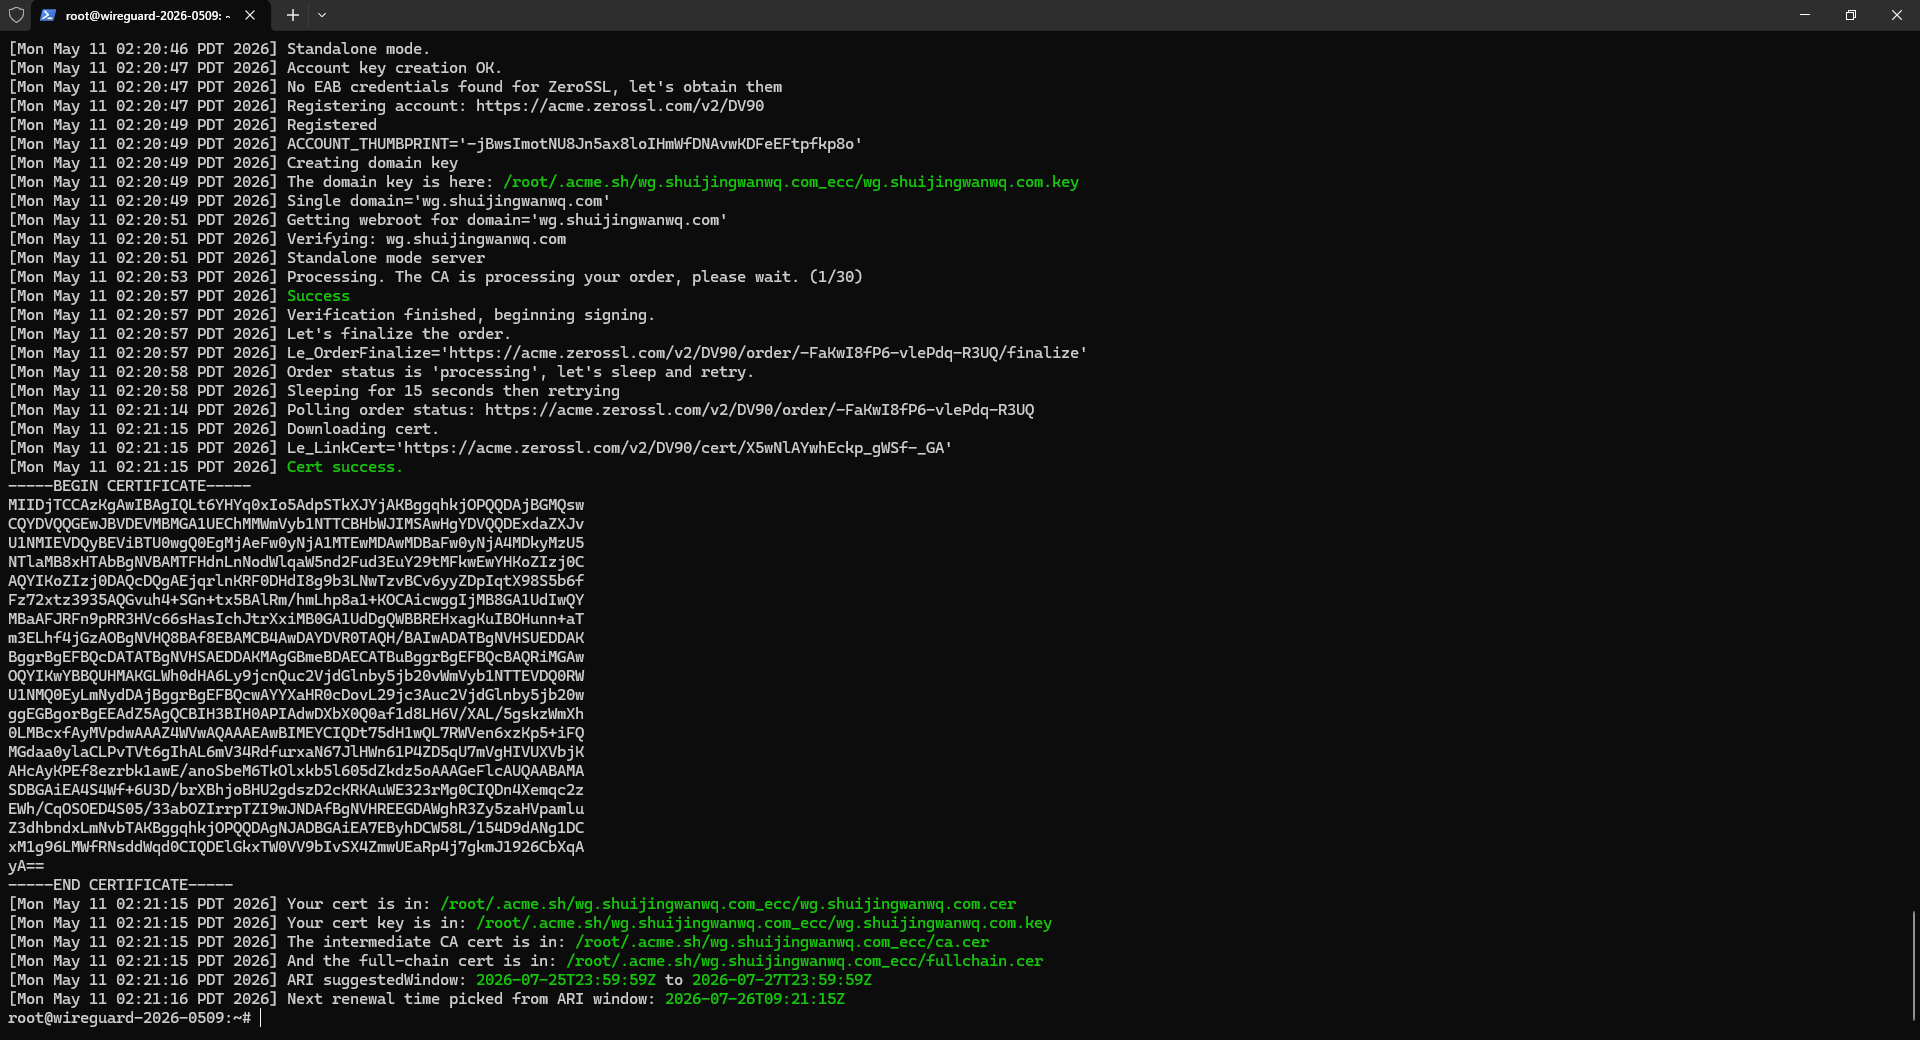
[Mon May 11 02:21:15 PDT 2026] Your cert is in: /root/.acme.sh/wg.shuijingwanwq.com_ecc/wg.shuijingwanwq.com.cer
[Mon May 11 02:21:15 PDT 2026] Your cert key is in: /root/.acme.sh/wg.shuijingwanwq.com_ecc/wg.shuijingwanwq.com.key
[Mon May 11 02:21:15 PDT 2026] The intermediate CA cert is in: /root/.acme.sh/wg.shuijingwanwq.com_ecc/ca.cer
[Mon May 11 02:21:15 PDT 2026] And the full-chain cert is in: /root/.acme.sh/wg.shuijingwanwq.com_ecc/fullchain.cer
[Mon May 11 02:21:16 PDT 2026] ARI suggestedWindow: 2026-07-25T23:59:59Z to 2026-07-27T23:59:59Z
[Mon May 11 02:21:16 PDT 2026] Next renewal time picked from ARI window: 2026-07-26T09:21:15Z
Step 4: Install WSTUnnel
wstunnel is a tool used to encapsulate UDP traffic into https, we download its binary version:
# 下载wstunnel
wget https://github.com/erebe/wstunnel/releases/download/v10.5.2/wstunnel_10.5.2_linux_amd64.tar.gz
# 解压
tar xzf wstunnel_10.5.2_linux_amd64.tar.gz
# 把它放到系统路径,方便运行
mv wstunnel /usr/local/bin/
# 加执行权限
chmod +x /usr/local/bin/wstunnel
Upgrade to v10.5.5
# 先停掉wstunnel
systemctl stop wstunnel
# 下载v10.5.5的压缩包,和你之前的格式一样
wget https://github.com/erebe/wstunnel/releases/download/v10.5.5/wstunnel_10.5.5_linux_amd64.tar.gz
# 解压
tar xzf wstunnel_10.5.5_linux_amd64.tar.gz
# 放到系统路径
mv wstunnel /usr/local/bin/
# 加执行权限
chmod +x /usr/local/bin/wstunnel
# 启动wstunnel
systemctl start wstunnel
Step 5: Configure WSTUNnel to boot from boot
We need to configure wstunnel as a system service, and it will start automatically at boot, without you needing to manually start it every time:
# 创建systemd服务文件
vi /etc/systemd/system/wstunnel.service
Press i key, then paste the following content, and replace my domain name (wg.shuijingwanwq.com) with your own:
[Unit]
Description=Wstunnel service
After=network.target

[Service]
Type=simple
User=root
ExecStart=/usr/local/bin/wstunnel server --tls-certificate /root/.acme.sh/wg.shuijingwanwq.com_ecc/fullchain.cer --tls-private-key /root/.acme.sh/wg.shuijingwanwq.com_ecc/wg.shuijingwanwq.com.key --restrict-to 127.0.0.1:51820 wss://0.0.0.0:443
Restart=always
RestartSec=5

[Install]
WantedBy=multi-user.target
After pasting, press the ESC key, then enter :wq, and press Enter to save and exit.
Then start the service and set the self-start boot:
# 重新加载systemd配置
systemctl daemon-reload
# 启动wstunnel
systemctl start wstunnel
# 设置开机自启
systemctl enable wstunnel
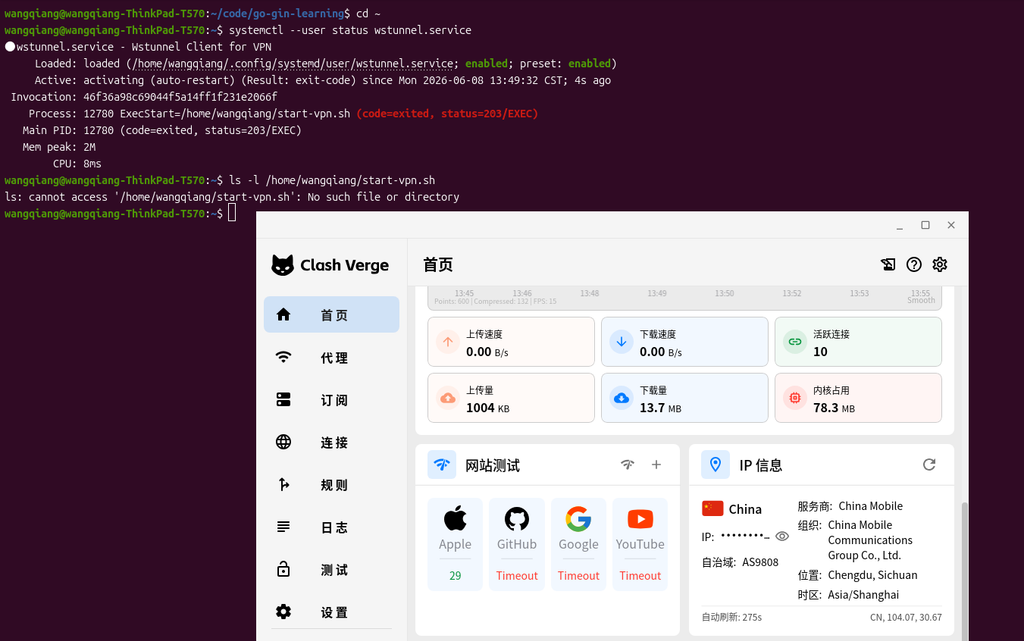
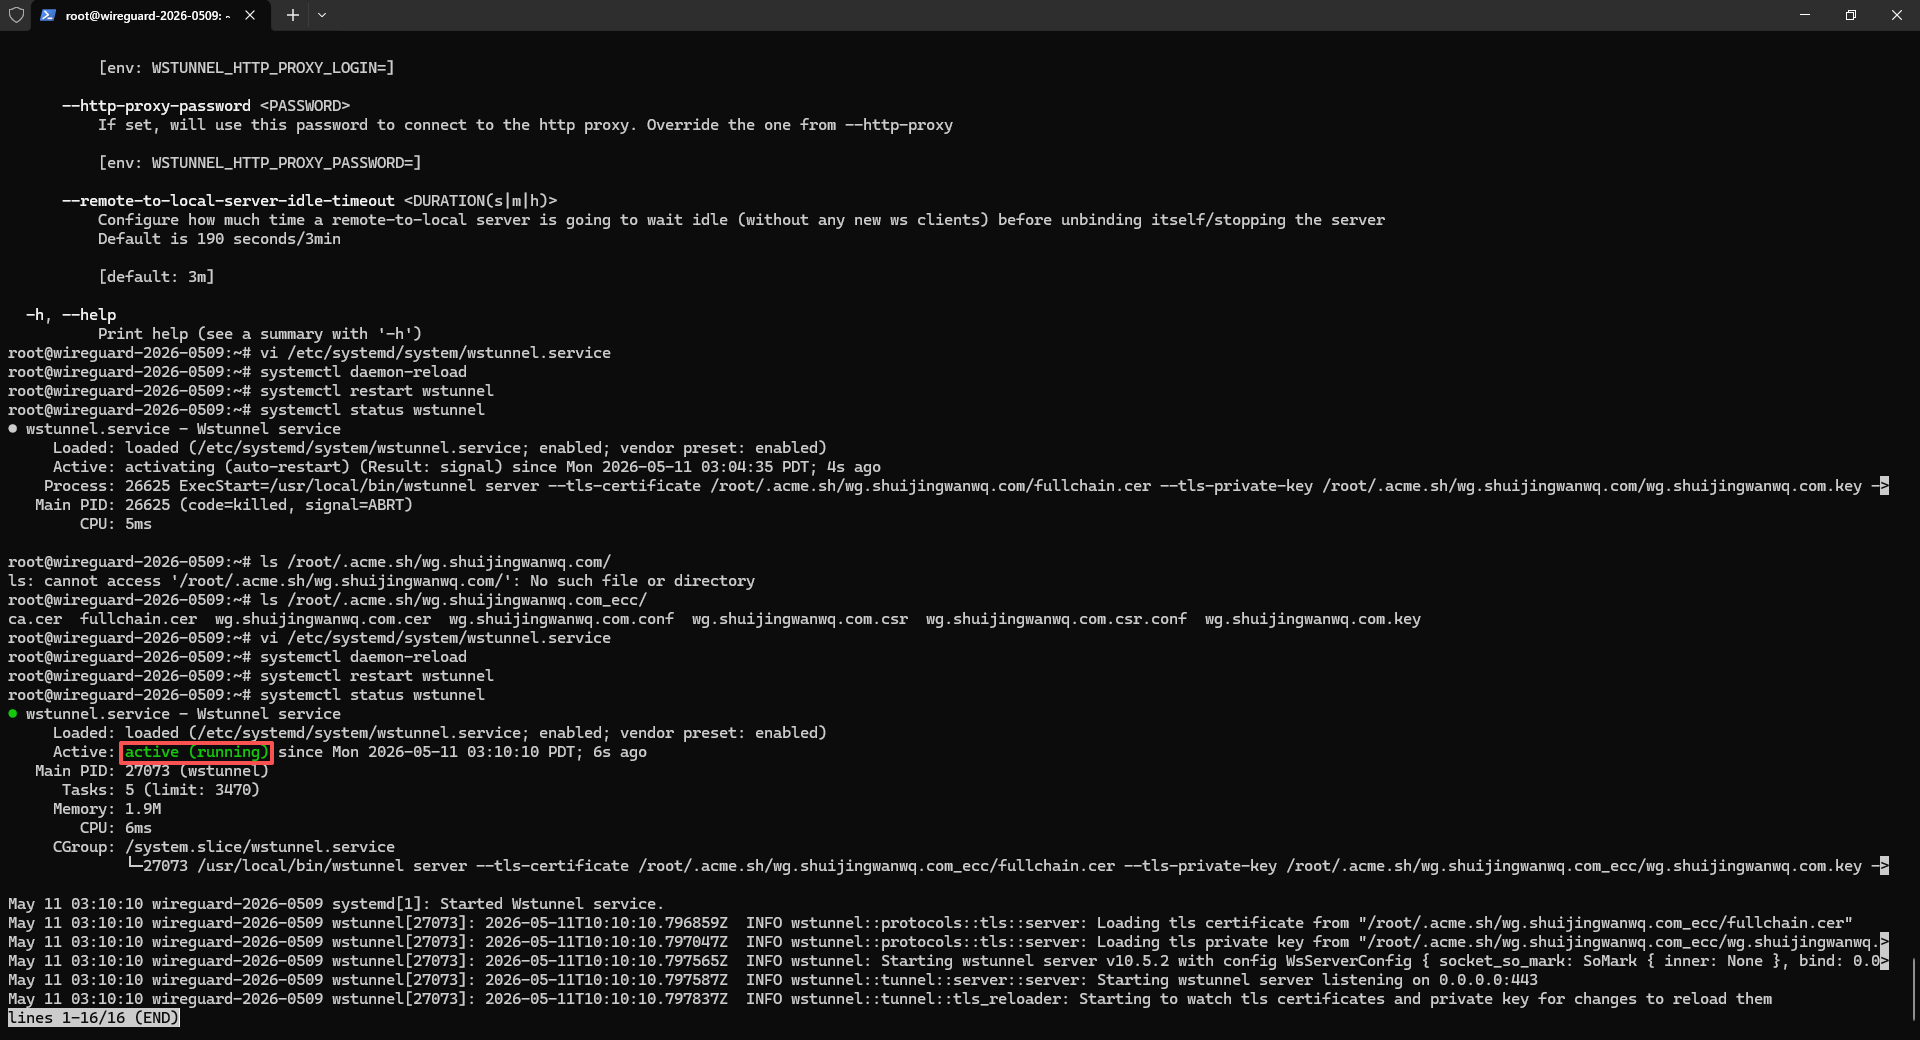
Then check if the service is working properly:
systemctl status wstunnel
If you see active (running), it means that there is no problem (as shown in Figure 18).
Step 6: Configure the Firewall
Release port 443, because wstunnel uses port 443:
# 检查ufw是否在运行
root@wireguard-2026-0509:~# ufw status
Status: inactive
The server does not have firewall enabled! UFW is inactive, indicating that all ports of the server are open by default, no need to configure the firewall, you can use it directly, just skip the configuration steps of the firewall.
Part 2: Client Deployment (Operation on your own computer)
Step 1: Install the Clash Verge client
The original Clash Verge original author has been archived and stopped, but now the community has taken over and made Clash Verge Rev. Meta (now renamed Mihomo), windows, mac, linux have both:
https://github.com/clash-verge-rev/clash-verge-rev/releases
Download the version corresponding to your system, Windows will download win (clash.verge_2.5.0-rc_x64-setup.exe), mac will download the mac, and open it after installation.
Now Android’s latest Clash Meta client is Tabby, go here to download the latest version:https://github.com/Goooler/Tabby/releases(tabby-3.0.0-arm64-v8a-release.apk)
Step 2: Install the WSTunnel client
Similarly, you have to install the WSTUnnel client locally, which is used to forward the local WireGuard traffic to the server:
Download this:https://github.com/erebe/wstunnel/releases
Just download the corresponding version according to the operating system. WSTUNNEL_10.5.5_windows_amd64.tar.gz for windows. android download wstunnel_10.5.5_android_arm64.tar.gz. Note: Version 10.5.5 must be downloaded here to be consistent with the server version.
After decompression, put wstunnel in a place you can find, such as windows, put it under c:\wstunnel\.
Then, create a startup script, if Windows, create a new text file, paste the following content into it, and replace your zgocloud server IP with your own (i.e. 154.21.196.249), replace your domain name with your own (i.e. wg.shuijingwanwq.com), and then change the file suffix to .bat (as shown in Figure 19):

@echo off
taskkill /f /im wstunnel.exe >nul 2>&1
C:\wstunnel\wstunnel.exe client -L udp://127.0.0.1:51820:127.0.0.1:51820?timeout_sec=0 --tls-sni-override wg.shuijingwanwq.com wss://154.21.196.249:443
pause
For Mac/Linux, create a new shell script:
#!/bin/bash
./wstunnel client -L udp://127.0.0.1:51820:127.0.0.1:51820?timeout_sec=0 --tls-sni-override wg.shuijingwanwq.com wss://154.21.196.249:443
Then add it to the execution permission. In the future, you only need to double-click this script to start the wstunnel client. After the startup is successful, the window cannot be closed, and it can be minimized to the background. If it is closed, the VPN will be disconnected.
The output shows:
wstunnel client v10.5.5 started normally
udp server has been monitored normally at 127.0.0.1:51820
There is no error, which means that wstunnel has been connected to your server normally. Now you can start Clash verge, and then open the system proxy, and you can surf the Internet normally. All the functions of automatic shunting and preventing sealing have taken effect!
Step 3: Configure the split of Clash Meta
Create a new configuration file, zgocloud-vpn.yaml, the content is as follows:
# ==============================================
# 你的自定义订阅配置,会和Clash Verge自带的基础配置自动合并
# ==============================================

# 新增:配置持久化(保存你手动选择的代理组,重启后不会重置)
profile:
  store-selected: true

# DNS配置(自带config没有DNS部分,保留你的原有配置)
dns:
  enable: false # 【关键修复】关闭内核DNS,避免解析死循环,使用系统DNS
  listen: 0.0.0.0:53
  default-nameserver:
    - 114.114.114.114 # 国内默认DNS
    - 8.8.8.8 # 谷歌备用DNS
  nameserver:
    - https://dns.alidns.com/dns-query # 阿里国内DNS,用来解析国内域名
  fallback:
    - https://dns.google/dns-query # 谷歌国外DNS,用来解析国外域名
  fallback-filter:
    geoip: true
    ipcidr:
      - 240.0.0.0/4

# 代理配置(修复了缩进错误,修改了remote-dns-resolve)
proxies:
  - name: "ZgoCloud-WG" # 代理的名字,不用改
    type: wireguard # 代理类型,WireGuard
    server: 127.0.0.1 # 本地的wstunnel客户端的地址,不用改
    port: 51820 # 本地的wstunnel客户端的端口,不用改
    ip: 10.7.0.2 # 你的WireGuard客户端的IP,从client.conf里拿到的
    public-key: a4DvxU7LgW0069MbHpMMhcc16e... # WireGuard的公钥,从client.conf里拿到的
    private-key: yBdtV4+0CxvTFvXWrPS+sMaWD... # WireGuard的私钥,从client.conf里拿到的
    pre-shared-key: 3glNI413OnTF2mAJLo9JSFG/Hb/jZpgEqR5z9Gc8x9g= # WireGuard的预共享密钥,从client.conf里拿到的
    remote-dns-resolve: false # 关闭远程解析:server是本地IP,不需要远程解析
    udp: true # 开启UDP转发,支持游戏之类的UDP流量
    mtu: 1100 # 调整MTU,适配wstunnel的封装,避免分片丢包

# 代理分组(保留你的原有配置)
proxy-groups:
  - name: "Proxy" # 手动选择的分组,你可以手动切换直连还是VPN
    type: select
    proxies:
      - ZgoCloud-WG # 走VPN
      - DIRECT # 直连

  - name: "Auto" # 自动选择的分组,自动判断国内国外
    type: url-test
    proxies:
      - ZgoCloud-WG
      - DIRECT
    url: http://www.gstatic.com/generate_204
    interval: 300

# 完善后的分流规则(补充了缺失的规则,所有缩进都改成了空格)
rules:
  # 1. 最高优先级:Wstunnel 服务器直连(解决代理循环)
  - IP-CIDR,154.21.196.249/32,DIRECT

  # 2. DNS 域名必须直连(解决你现在的 DNS 解析失败)
  - DOMAIN,dns.alidns.com,DIRECT
  - DOMAIN,dns.google,DIRECT

  # 3. 本地局域网直连
  - IP-CIDR,127.0.0.1/8,DIRECT
  - IP-CIDR,10.0.0.0/8,DIRECT
  - IP-CIDR,172.16.0.0/12,DIRECT
  - IP-CIDR,192.168.0.0/16,DIRECT

  # 4. 国内流量直连
  - DOMAIN-SUFFIX,cn,DIRECT
  - GEOIP,CN,DIRECT

  # 5. 其他全部走代理
  - MATCH,Proxy
Then in Subscribe – New, select the local type, and then:
Fill in the name: zgocloud-vpn
describing
Then click on the select file, select the zgocloud-vpn.yaml you just saved to the desktop
Then click Save and import it!
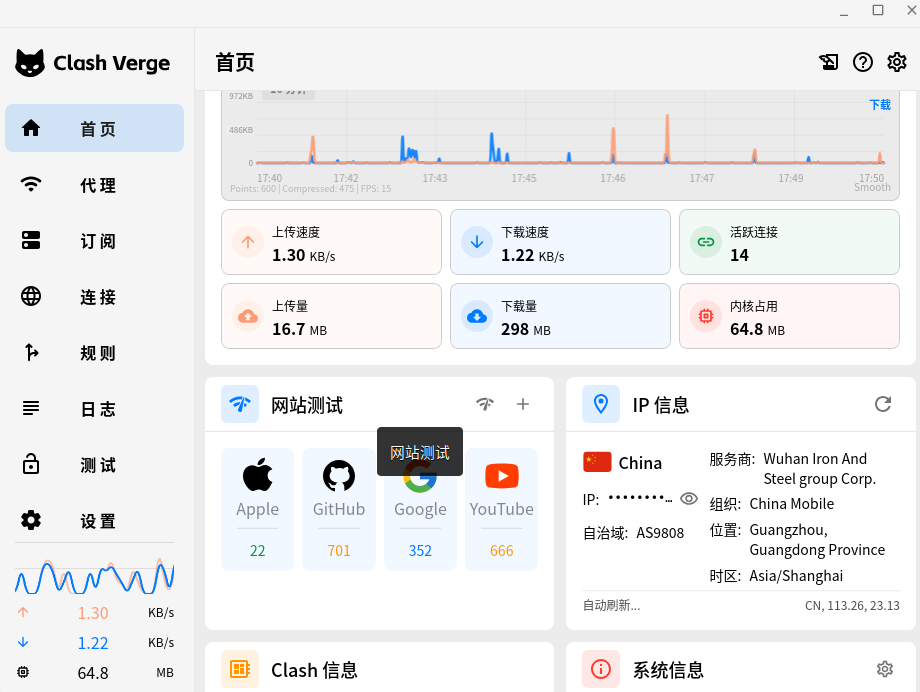
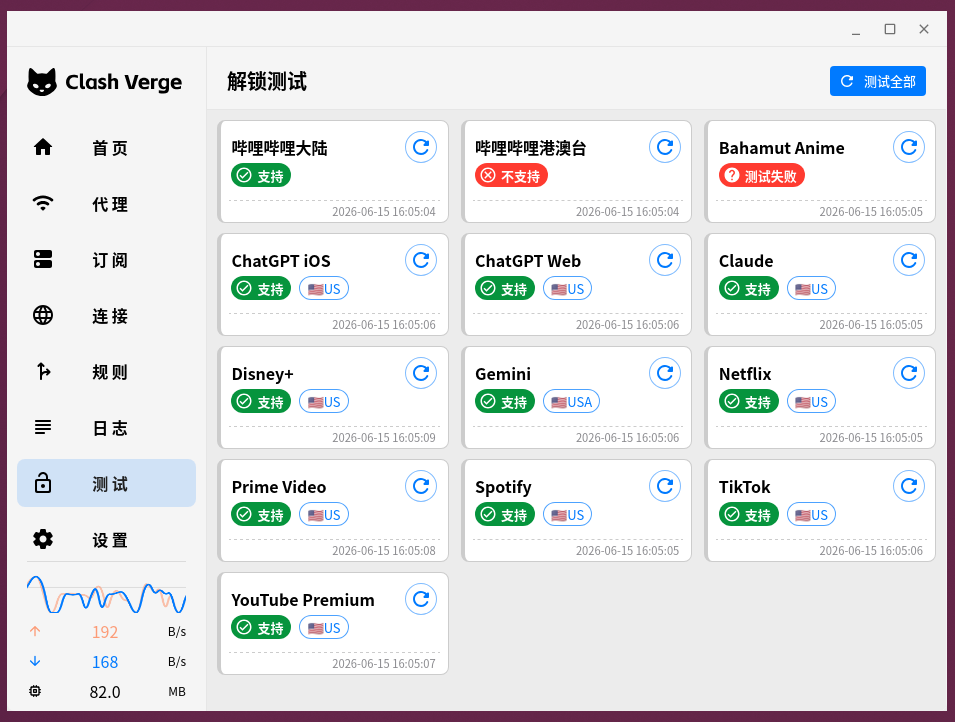
After importing, you will see the configuration of zgocloud-vpn in the subscription list, right-click – use, the zgocloud-wg proxy will appear in the proxy page, and then enable the system proxy, the browser can open normally google.com!
Make sure the home page – current node – zgocloud-vpn is green status (Figure 25).

(This profile Windows and Android can share the same copy):
Part 3: How to use
I will organize the complete use steps for you, and you can follow it step by step:
3.1. Steps to use Windows computer
3.1.1. Start the wstunnel client first (this is the core of the anti-sealing, you must open it first) double-click the wstunnel.bat script to start the wstunnel client
3.1.2. Then start Clash Verge
– Open Clash Verge from the start menu
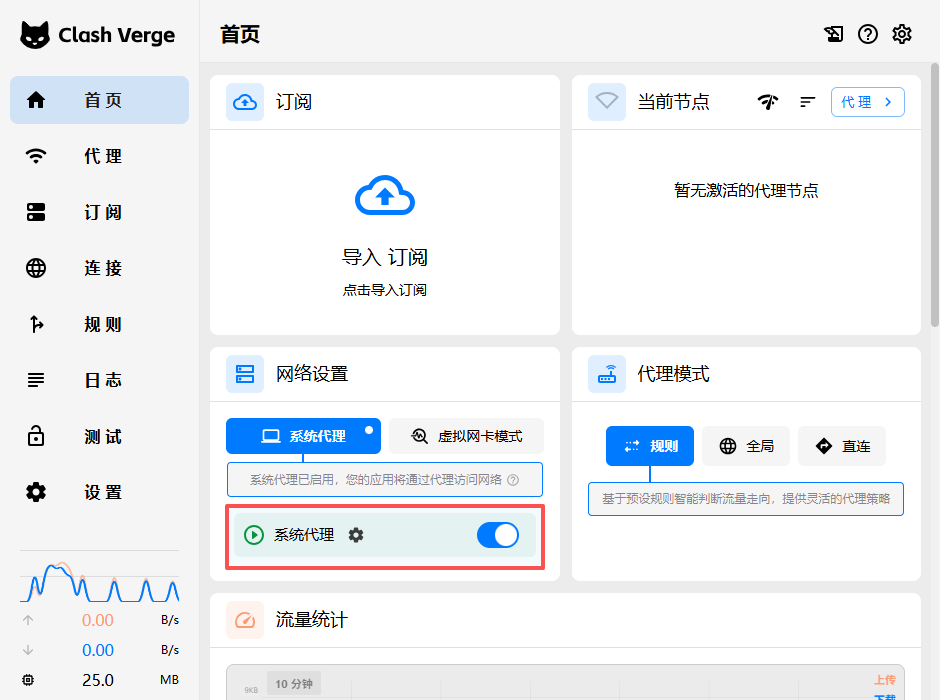
– Click the home page on the left, and then turn on the switch agent switch (as shown in Figure 22)
– Done! Now you can go online normally:
– Domestic websites and apps will be automatically connected directly, and the speed is the same as your usual
– Foreign websites and apps will automatically go to VPN, without you manually switching
– If you want to turn off the VPN, just turn off the system agent switch on the home page. One-key switch is very convenient.
3.2. Steps to use Android phone
3.2.1. Install the `tabby-3.0.0-arm64-v8a-release.apk` you downloaded first, and open it after installation
3.2.2. Save our configuration file (that is, the commented paragraph) as `config.yaml` and transfer it to your mobile phone
3.2.3. Open Tabby, click Import Configuration, and select the `config.yaml` you uploaded to your phone
3.2.4. Then start the Android version of the WSTUnnel client, connect your server with the same command
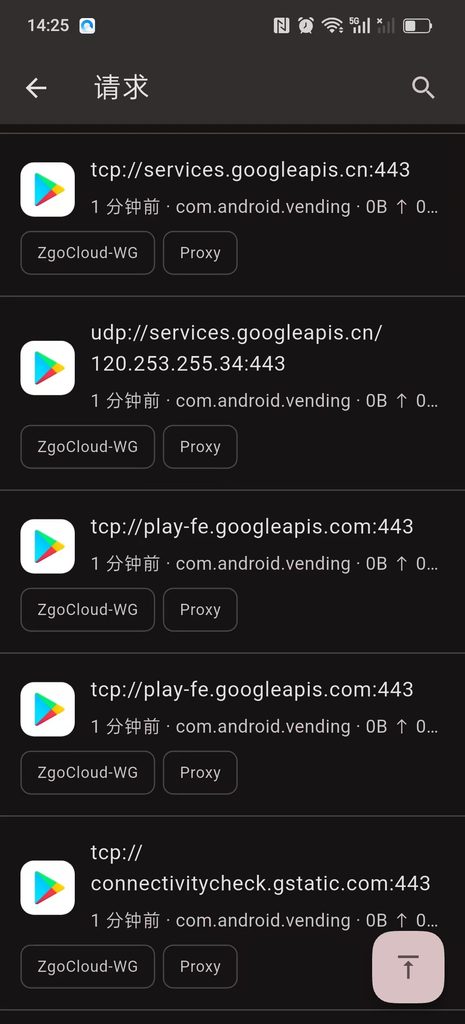
3.2.5. Then open the system agent switch of Tabby, and you can use it. Like the computer, it is automatically diverted and one-key switch.
The whole process is like this, you only need to open wstunnel first, then open the Clash, and open the system agent, and you will all get it all done. All the functions of automatic shunting and preventing sealing take effect.
Part 4: Notes
4.1. If you find the home page – the current node zgocloud-vpn displays timeout, google.com cannot be opened, subscribe – view runtime subscription (as shown in Figure 24). The content of this subscription is the content that comes with the configuration items added by myself, the combined content. The configuration items need to be carefully checked.
4.2. Self-start settings
The startup sequence must be: start wstunnel first, and then start clash verge, because the clash needs to use the wstunnel port 51820. The connection will fail (the startup sequence does not need to be strictly observed, because I have solved it).
The boot self-setting method of Windows is very simple:
4.2.1. Right-click the bat file of the wstunnel you changed, and select Create a shortcut
4.2.2. Press `Win+R` of the keyboard, enter `shell:startup`, press Enter, and the folder that starts at startup will be opened
4.2.3. Drag the shortcut to wstunnel you just created to this startup folder, so that wstunnel will automatically start when booting
4.2.4. Then open the settings of Clash Verge, find the self-start switch, and turn it on, so that the Clash will also start automatically at boot
After setting in this way, when booting, the system will automatically start wstunnel first, wait for wstunnel to be ready, and then start the clash, both will automatically run in the background, you don’t need to manually turn it on, you can use vpn directly when you boot.
MAC/Linux boot self-start
You can use systemd or launchd to configure, and add wstunnel and clash to the self-starter, and the order is to start wstunnel first, and then start clash.
4. Frequently asked questions
1. What should I do if the certificate expires?
[acme.sh](acme.sh) will automatically update the certificate for you, don’t worry about it, it will automatically update 30 days before the certificate expires, and wstunnel will automatically load a new certificate.
2. What should I do if the wstunnel client cannot be started?
Check if your server IP is wrong, and whether the server port 443 is open and whether it is blocked by the firewall.
3. What should I do if the diversion is wrong?
Clash rules are automatically updated, you can click Update Rules in Clash Verge, and the latest rules will be pulled.
After this deployment, you will have a VPN with the strongest anti-blocking ability, and it is automatically shunted, without manual configuration, one-key switch, perfectly solve all your previous problems.
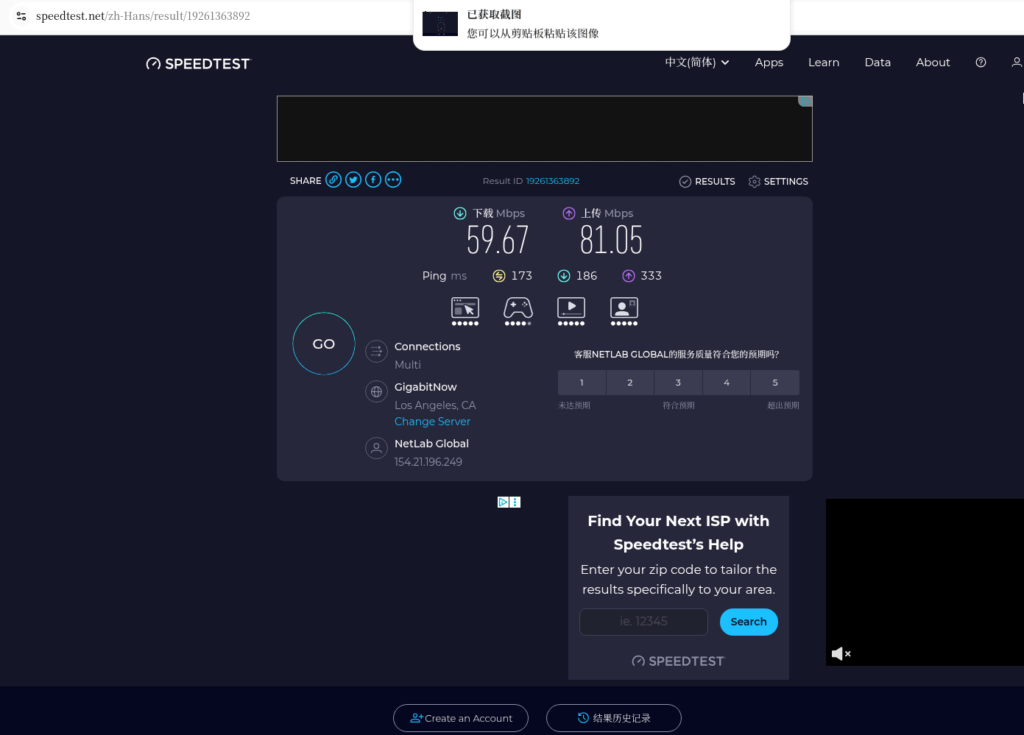
5. Test effect (command line quantification speed measurement · objective verification of pure data)
Pre-instruction: Speed selection logic
1. Give up pingwww.google.comspeed measurement
The whole site of Google bans ICMP ping requests by default. Even if the tunnel is completely normal, the ping will directly time out, which cannot reflect the real quality of the line, and has no reference value.
2. Select a standard speed target machinewww.gstatic.com
This domain name is Google’s official static resource node, which is designed for connectivity and TCP delay detection; does not block port 443 port detection, global node coverage is exactly the same as the Google master, and it is also Clash Kernel official default speed measurement address (Generate_204 lightweight interface), suitable for all tunnel architectures, native Wireguard / Wstunnel encapsulation Wireguard can be fairly compared.
3. Test unified standards
Node native delay with ICMP ping to test the VPS computer room direct delay; external network service delay with HTTP 204 Interface requests are time-consuming and quantitative, and are not affected by domain name bans and protocol differences. The two sets of nodes share a set of test rules, and the data is comparable.
1. Test environment and test object
Test Terminal: Windows PowerShell
Optimization node: 154.21.196.249 ZgoCloud Los Angeles (CN2 GIA+9929+Cmin2 Triple Network Elite Line)
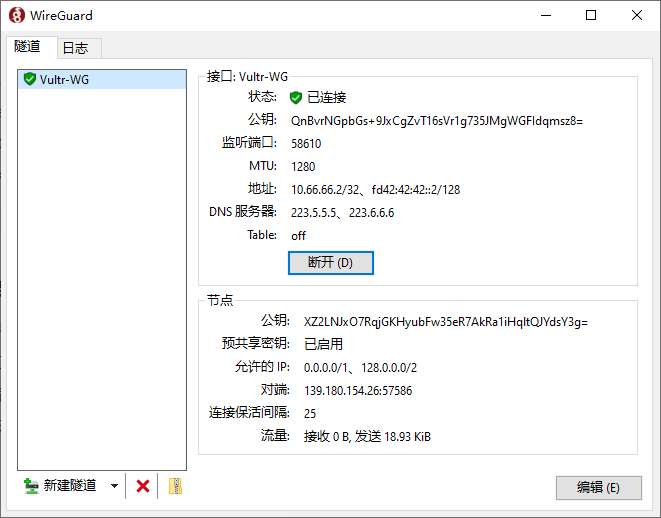
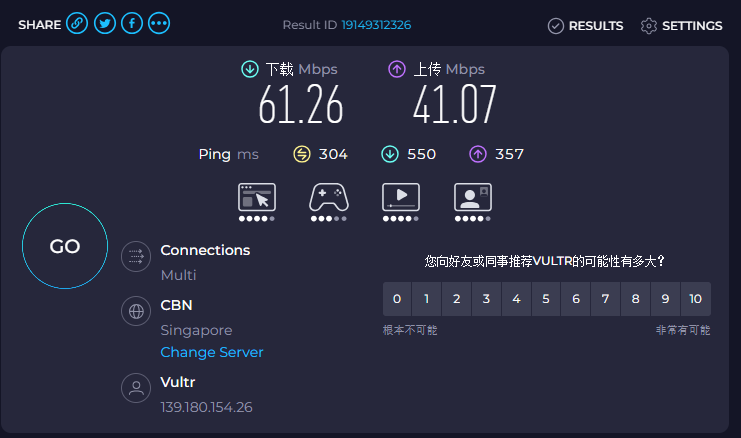
Contrast node: 139.180.154.26 Vultr Singapore regular international route
Fixed test target: foreign standard speed measurement domain name:www.gstatic.com
2. The node native direct connection delay comparison test
Test time: 23:00 Beijing time, the same network environment and no bandwidth preemption at the same time period (Chengdu, Sichuan moved to broadband).
2.1 VULTR Singapore Regular Node
Pinging 139.180.154.26 with 32 bytes of data:
Reply from 139.180.154.26: bytes=32 time=281ms TTL=44
Reply from 139.180.154.26: bytes=32 time=251ms TTL=44
Reply from 139.180.154.26: bytes=32 time=274ms TTL=44
Reply from 139.180.154.26: bytes=32 time=257ms TTL=44
Reply from 139.180.154.26: bytes=32 time=253ms TTL=44
Reply from 139.180.154.26: bytes=32 time=253ms TTL=44
Reply from 139.180.154.26: bytes=32 time=252ms TTL=44
Reply from 139.180.154.26: bytes=32 time=247ms TTL=44
Reply from 139.180.154.26: bytes=32 time=260ms TTL=44
Reply from 139.180.154.26: bytes=32 time=258ms TTL=44

Ping statistics for 139.180.154.26:
    Packets: Sent = 10, Received = 10, Lost = 0 (0% loss),
Approximate round trip times in milli-seconds:
    Minimum = 247ms, Maximum = 281ms, Average = 258ms
Measured data and analysis
– Delay interval: 247ms–281ms, average delay 258ms
– Packet loss rate: 0% no packet loss, basic link connectivity is normal
– Jitter performance: Extreme fluctuation 34ms, more jitter than the optimized node
– Line evaluation: Although there is no packet loss, the baseline delay is too high, the link is redundant, and the delay is prone to be high during peak hours, and the web page loading slows down.
2.2 ZGoCloud Optimization Nodes in Los Angeles
Pinging 154.21.196.249 with 32 bytes of data:
Reply from 154.21.196.249: bytes=32 time=174ms TTL=42
Reply from 154.21.196.249: bytes=32 time=174ms TTL=42
Reply from 154.21.196.249: bytes=32 time=174ms TTL=42
Reply from 154.21.196.249: bytes=32 time=176ms TTL=42
Reply from 154.21.196.249: bytes=32 time=176ms TTL=42
Reply from 154.21.196.249: bytes=32 time=175ms TTL=42
Reply from 154.21.196.249: bytes=32 time=198ms TTL=42
Reply from 154.21.196.249: bytes=32 time=177ms TTL=42
Reply from 154.21.196.249: bytes=32 time=179ms TTL=42
Reply from 154.21.196.249: bytes=32 time=192ms TTL=42

Ping statistics for 154.21.196.249:
    Packets: Sent = 10, Received = 10, Lost = 0 (0% loss),
Approximate round trip times in milli-seconds:
    Minimum = 174ms, Maximum = 198ms, Average = 179ms
Measured data and analysis
– Delay interval: 174ms–198ms, average delay 179ms
– Packet loss rate: 0% full reception, no packet loss
– Jitter performance: the extreme value fluctuation is only 24ms, most requests are stable in the 174–179ms range, and the jitter is extremely small
– Line evaluation: The three-network optimization dedicated line has obvious advantages, low-latency, low jitter, zero packet loss, and strong link stability.
2.3 Node native latency horizontal comparison conclusion
ZGoCloud Los Angeles triple network optimization node average is 179ms, compared with VULTR Singapore regular node 258ms, the baseline delay is reduced by about 79ms, and the delay optimization range is 30.6%;
In addition, the jitter is smaller and the trend is more stable, and the low latency and high stability advantages brought by the dedicated line optimization are very intuitive.
3. Time-consuming test for the connection of external network services in different time periods
Use a unified command: request Google GENERATE_204 lightweight interface to simulate real web page access delays with complete requests, and is compatible with Vultr native Wireguard, ZgoCloud wstunnel + WireGuard dual architecture, to achieve complete fair comparison.
This time, it covers three typical periods, and the performance difference between peaks and peaks is fully presented:
3.1 Evening rush hour (23:00 Beijing time)
Vultr native WireGuard: External network standard interface complete request time time: 1352ms
PS C:\Users\Thinkpad> Measure-Command { Invoke-WebRequest -Uri https://www.gstatic.com/generate_204 -UseBasicParsing }


Days              : 0
Hours             : 0
Minutes           : 0
Seconds           : 1
Milliseconds      : 352
Ticks             : 13521147
TotalDays         : 1.56494756944444E-05
TotalHours        : 0.000375587416666667
TotalMinutes      : 0.022535245
TotalSeconds      : 1.3521147
TotalMilliseconds : 1352.1147
ZgoCloud WSTUnnel + Wireguard: External network standard interface complete request time consumption: 348ms
PS C:\Users\Thinkpad> Measure-Command { Invoke-WebRequest -Uri https://www.gstatic.com/generate_204 -UseBasicParsing }


Days              : 0
Hours             : 0
Minutes           : 0
Seconds           : 0
Milliseconds      : 348
Ticks             : 3480620
TotalDays         : 4.02849537037037E-06
TotalHours        : 9.66838888888889E-05
TotalMinutes      : 0.00580103333333333
TotalSeconds      : 0.348062
TotalMilliseconds : 348.062
Contrast: ZgoCloud requests are only 1/4 of Vultr, and the access efficiency is nearly 4 times higher.
3.2 Afternoon Pingfeng Hours (14:30 Beijing time)
Vultr native WireGuard: time-consuming single request: 1526ms
PS C:\Users\Thinkpad> Measure-Command { Invoke-WebRequest -Uri https://www.gstatic.com/generate_204 -UseBasicParsing }


Days              : 0
Hours             : 0
Minutes           : 0
Seconds           : 1
Milliseconds      : 526
Ticks             : 15267882
TotalDays         : 1.76711597222222E-05
TotalHours        : 0.000424107833333333
TotalMinutes      : 0.02544647
TotalSeconds      : 1.5267882
TotalMilliseconds : 1526.7882
zgoCloud wstunnel+wireguard: time-consuming single request: 446ms
PS C:\Users\Thinkpad> Measure-Command { Invoke-WebRequest -Uri https://www.gstatic.com/generate_204 -UseBasicParsing }


Days              : 0
Hours             : 0
Minutes           : 0
Seconds           : 0
Milliseconds      : 446
Ticks             : 4460668
TotalDays         : 5.16281018518519E-06
TotalHours        : 0.000123907444444444
TotalMinutes      : 0.00743444666666667
TotalSeconds      : 0.4460668
TotalMilliseconds : 446.0668
Compare: Compare: ZGoCloud requests are only 1/3 of Vultr, and the access efficiency is nearly 3 times higher. With the gradual congestion of international exports, the Vultr delay has begun to float, and ZgoCloud remains stable.
3.3 Business time-consuming overall comparison conclusion
In the real business scenario of the external network, the ZgoCloud line has an extremely obvious advantage in peak periods. The request time is only 1/4 of Vultr, and the access efficiency has been improved by nearly 4 times; although the gap during the peak period has narrowed (3 times), ZGoCloud still maintains better stability, and there will be no latency problem of Vultr.
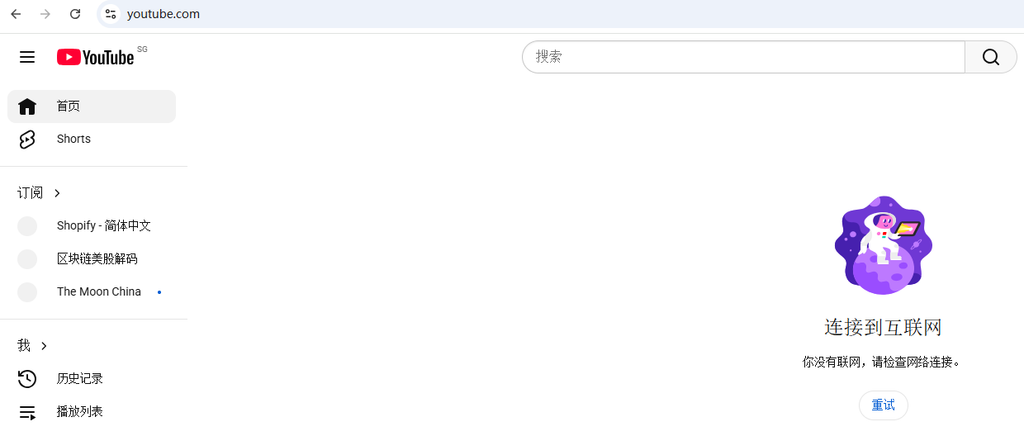
It is reflected in actual use: Google search, Gmail, YouTube and other overseas sites are loaded faster, the switching page is free of lag, and the latency perception is extremely low.
4. Tunnel Connectivity Judgment Criteria
4.1. Both WireGuard tunnels can resolve foreign domain names normally.www.gstatic.comThe request has no timeout and no failure;
4.2. The routing link is forwarded through the exit of the VPS tunnel, and the whole process is on the agent line, and there is no direct traffic leakage in the local area;
4.3. The delayed trend is stable and no sudden rise, which meets the needs of daily web browsing, search, graphic/short video access;
6. Verification of the diversion effect of vpn directly connected to domestic direct and foreign travel
The core goal of this test is to verify whether the two sets of solutions can realize ‘local traffic local direct connection, foreign traffic through VPN tunnel’, and solve the native WireGuard by manual maintenance. Make up for the pain points of foreign IP segments, permanent incomplete, and manslaughter services.
This test only selects domestic personal siteswww.shuijingwanwq.comAs the only target machine, it is time-consuming to visit at different times to visually verify whether the domestic traffic is forcibly detoured overseas tunnels.
Test method: Noon Pingfeng uses the method of taking 10 batches of batch requests to filter a single fluctuation; the afternoon period is a single accurate test to ensure that the data is objective and accurate.
1. Batch request + automatic average delay (direct copy operation) (13:00 Beijing time)
function Test-AvgSpeed {
    param(
        [string]$url,
        [int]$times = 10
    )

    $total = 0
    $success = 0

    Write-Host "`n正在测试: $url" -ForegroundColor Cyan
    Write-Host "请求次数: $times`n" -ForegroundColor Gray

    for ($i = 1; $i -le $times; $i++) {
        try {
            $time = Measure-Command {
                Invoke-WebRequest -Uri $url -UseBasicParsing -TimeoutSec 10
            }
            $ms = [math]::Round($time.TotalMilliseconds)
            Write-Host "第 $i 次: $ms ms"
            $total += $ms
            $success++
        }
        catch {
            Write-Host "第 $i 次: 失败/超时" -ForegroundColor Red
        }
    }

    if ($success -gt 0) {
        $avg = [math]::Round($total / $success)
        Write-Host "`n✅ 成功 $success 次 | 平均延迟: $avg ms`n" -ForegroundColor Green
    }
    else {
        Write-Host "`n❌ 全部超时/无法访问`n" -ForegroundColor Red
    }
}
2. Open PowerShell, paste the entire script above, and test with the following command:
# 测试国内域名
Test-AvgSpeed "https://www.shuijingwanwq.com"
3. Noon Pingfeng (13:00 Beijing time)
Vultr native WireGuard: 10 batches of average request time consumption: 7377ms
PS C:\Users\Thinkpad> Test-AvgSpeed "https://www.shuijingwanwq.com"

正在测试: https://www.shuijingwanwq.com
请求次数: 10

第 1 次: 6325 ms
第 2 次: 4815 ms
第 3 次: 6633 ms
第 4 次: 6894 ms
第 5 次: 8680 ms
第 6 次: 7461 ms
第 7 次: 7995 ms
第 8 次: 7548 ms
第 9 次: 9210 ms
第 10 次: 8205 ms

✅ 成功 10 次 | 平均延迟: 7377 ms
zgocloud wstunnel+wireguard+clash: 10 batches of average request time consumption: 1998ms
PS C:\Users\Thinkpad> Test-AvgSpeed "https://www.shuijingwanwq.com"

正在测试: https://www.shuijingwanwq.com

第 1 次: 2784 ms
第 2 次: 1768 ms
第 3 次: 1866 ms
第 4 次: 1884 ms
第 5 次: 1993 ms
第 6 次: 1955 ms
第 7 次: 1800 ms
第 8 次: 1775 ms
第 9 次: 2001 ms
第 10 次: 2151 ms

✅ 成功 10 次 | 平均延迟: 1998 ms
Comparison: ZgoCloud has 3.7 times the domestic access speed of Vultr, and the domestic traffic does not need to be fully orbited overseas tunnels.
4. Afternoon Pingfeng (14:30 Beijing time)
Vultr native WireGuard: single request time consumption: 20231ms (more than 20 seconds)
PS C:\Users\Thinkpad> Measure-Command { Invoke-WebRequest -Uri https://www.shuijingwanwq.com -UseBasicParsing }


Days              : 0
Hours             : 0
Minutes           : 0
Seconds           : 20
Milliseconds      : 231
Ticks             : 202312869
TotalDays         : 0.000234158413194444
TotalHours        : 0.00561980191666667
TotalMinutes      : 0.337188115
TotalSeconds      : 20.2312869
TotalMilliseconds : 20231.2869
zgocloud wstunnel+wireguard+clash: time-consuming single request: 2646ms
PS C:\Users\Thinkpad> Measure-Command { Invoke-WebRequest -Uri https://www.shuijingwanwq.com -UseBasicParsing }


Days              : 0
Hours             : 0
Minutes           : 0
Seconds           : 2
Milliseconds      : 646
Ticks             : 26466631
TotalDays         : 3.06326747685185E-05
TotalHours        : 0.000735184194444444
TotalMinutes      : 0.0441110516666667
TotalSeconds      : 2.6466631
TotalMilliseconds : 2646.6631
Contrast: With the intensification of international export congestion, the domestic access delay of Vultr directly explodes, more than 20 seconds, and it is completely impossible to use; while the domestic access of ZgoCloud remains at a usable level of 2.6 seconds, and the speed is Vultr’s 7.6 times.
5. Core conclusion
5.1. Essential Problems of Vultr Native WireGuard
The native Wireguard has no intelligent splitting capability, and can only rely on allowedips to control the routing. Manually make up for the foreign IP section is always incomplete, and finally forced all domestic and foreign traffic to go through overseas tunnels.
During the peak period, the domestic access delay is as high as 7 seconds. Once the international exit starts to be congested, the delay will directly reach more than 20 seconds. The domestic website cannot be opened at all, and the experience is extremely poor.
5.2. Advantages of ZGoCloud + Clash Diversion Scheme
Relying on Clash’s domain name/geoIP rules to achieve intelligent shunt, domestic traffic is priority direct local direct scheduling, without all over overseas tunnels, which perfectly avoids the pain points of manual maintenance of massive foreign IP segments, IP overlap, and manslaughter services.
During the peak period, the domestic access delay is 3.7 times faster than that of Vultr, and the gap between the congestion periods has directly widened to more than 7.6 times.
7. Overall test summary
- Baseline Delay: ZGOCloud Los Angeles CN2 GIA+9929+Cmin2 Optimized node average 179ms, compared to Vultr Singapore regular 258ms The delay is greatly optimized, zero packet loss, low jitter, and the line stability crushes the conventional public network line;
- External network service: time-consuming overseas standard interface requests, ZgoCloud is only 348ms during peak hours, far lower than Vultr’s 1352ms, and the access speed has increased by nearly 3 times; during the peak period ZgoCloud It still maintains better stability, and there will be no delay and sudden increase;
- Domestic shunt: ZgoCloud + Clash’s intelligent shunt solution, perfectly solve the problem of the detour of the native WireGuard domestic traffic, the highest domestic access speed is higher than that of Vultr It is 7.6 times faster, which has completely solved the pain points of manual replenishment of foreign IP sections and manslaughter services;
- Testing standardization: The whole process adopts fixed test goals and unified command line quantification standards, which is not affected by ICMP bans and tunnel architecture differences.
- Cost-effective: ZgoCloud Los Angeles optimized nodes have an external network access speed of about 3-4 times that of Vultr Singapore’s regular nodes, and the domestic access speed can reach more than 7.6 times; in terms of price, the monthly fee of ZgoCloud is about Vultr It is 3.2 times that is a typical optimization line pricing of ‘speeding up and increasing prices, and can be used as the main overseas tunnel node for a long time.
Eight, follow-up maintenance (lightweight operation, no learning cost)
- Server Renewal Management
All the LA optimized line packages in ZGOCloud support quarterly/half-year payment/yearly payment multi-cycle options, suitable for personal long-term self-use rhythm. Before the server expires, the platform will voluntarily send an expiration reminder through the registered email address to avoid negligent downtime.
The renewal operation process is concise and easy to understand: log in to the member background, enter the ‘Billing’ account section and select ‘Add Funds’ recharge the balance, and then enter the ‘services’ my service list, select the corresponding cloud host and click ‘renew’ to complete the renewal fee with one click. The platform natively supports Alipay and PayPal mainstream payment methods, no need to go over the wall or foreign currency credit cards, which is completely in line with the payment habits of domestic users.
The platform will launch limited-time promotions from time to time. During the event, there will not only be discounts on packages and renewals, but also replenish popular Premium optimized models. You can pay more attention to the platform announcement on a daily basis, and reasonably choose to pay for annual stocking and activity renewal, so as to save the cost of use for a long time.
- WireGuard profile reset
If the client configuration and keys are in security risks are accidentally disclosed, there is no need to manually reinstall the system or complex command line operations. Go directly to the server details management page, re-deploy and install the WireGuard service, the platform will automatically generate new keys and configuration files, the old configuration and old keys will expire immediately, prevent the account from taking risks, and visualize the whole process, and Xiaobai can also complete it independently. - Daily troubleshooting and technical support
When there is a connection exception in daily use, follow the simple troubleshooting logic: first check the running status of the local Clash and Wireguard client, and confirm whether the handshake connection is normal; if it is not connected, restart the client and reactivate the tunnel to restore.
In case of difficult problems such as link lag and tunnel failure, you can directly submit the questions through the ‘Support’ work order entrance in the background.
In terms of hardware and underlying stability, ZgoCloud enterprise room adopts 1+1 redundant power supply, RAID1 The disk array architecture, with a remote disaster recovery backup mechanism, avoids single-point failures from the hardware level, and ensures that the server is stable online for a long time.
- Popular package replenishment and purchase suggestions
At present, the Los Angeles Premium three-net optimization package is out of stock all year round, which is the normal supply and demand situation of the just-needed models in the market. With reference to the replenishment rules of the platform, it can be fixed at 10:00 am, 3:00 pm, and more than 8:00 pm. The configuration purchase page is limited. The number of popular replenishment inventory is limited.
If you are unwilling to squat for replenishment for a long time, you can choose the same line instead of the optimization package. The version is completely the same, which can fully meet the daily needs of daily external network access, web browsing, and light-weight streaming media, without tangled up with specific models.
Overall maintenance summary
The whole set of background operation logic, renewal process, and service management methods of ZgoCloud are highly compatible with the operating habits of the Vultr and DMIT platforms that I have used for a long time, and there is no need to re-study the new process, and there is no need to adapt to the unfamiliar background.
At the same time, it accurately avoids the core concerns of domestic users: no need to go over the wall to visit the background, native support Alipay convenient payment, package pricing is suitable for personal budget, one-click deployment of anti-sealing WireGuard saves worry and effort. Whether it is daily renewal, configuration reset, troubleshooting, or package replenishment, the process is simple and lightweight, taking into account stability, convenience and cost performance, it can completely replace traditional international cloud manufacturers, and use it as a long-term main optimization node.
🚀 Recommended VPS (WireGuard / Clash / Self-hosted VPN)
For this series, we recommend using Vultr VPS as the base infrastructure:
✔ Supports WireGuard / Clash / VPS deployment
✔ Multiple global data center locations
✔ Stable and suitable for long-term networking setups
👉 Visit Vultr (Recommended Sign-up Link)
💡 New User Promotion Info
Vultr may offer promotional credits for new users, such as:
– Up to $300 in trial credits
– For VPS deployment and testing purposes
– Availability depends on Vultr’s official campaign and account eligibility
⚠️ Offers may vary by region, time, or account type.
⚠️ Disclaimer
This page contains affiliate links to Vultr. We may earn a commission if you purchase through these links.
All promotions are provided and managed by Vultr. We do not guarantee that all users will receive the same promotional benefits.
Stop the Hassle | Dedicated WireGuard VPN Deployment Service
I continuously test and evaluate various network optimization solutions. My personal setup has been running stably for over a month with zero downtime. If you are tired of troubleshooting, experimenting with different protocols, or managing complex server configurations, feel free to contact me for a dedicated solution.
Ideal For:
✅ Users of AI tools such as ChatGPT, Claude, and Gemini
✅ Remote workers who rely on stable international connectivity
✅ Developers and technical learners who need access to global resources
✅ Users who do not want to spend time managing VPS and proxy configurations
✅ Anyone who prefers a private VPN server instead of shared public services
What I Offer:
✅ Remote Deployment: Deploy a dedicated WireGuard VPN on your own server with full control over your data.
✅ Free Trial: Apply for a one-month free trial of my self-hosted VPN node before making a decision.
✅ Traffic Routing Optimization: Fine-tuned routing rules optimized for AI tools, development environments, and everyday browsing.
✅ Post-Deployment Support: Assistance with setup, client configuration, and troubleshooting after deployment.
If you would like to learn more or apply for a free trial, please contact me directly and mention: VPN Consultation.
Contact Me:
Telegram: @shuijingwan
WeChat: 13980074657
Email: shuijingwanwq@gmail.com
Leave a Reply