
![[Figure 1: Tencent Cloud EdgeOne product page, selecting “Start Now”]](https://www.shuijingwanwq.com/wp-content/uploads/2026/07/1-13.png)
1. Background: Why I Moved Away from Cloudflare Free
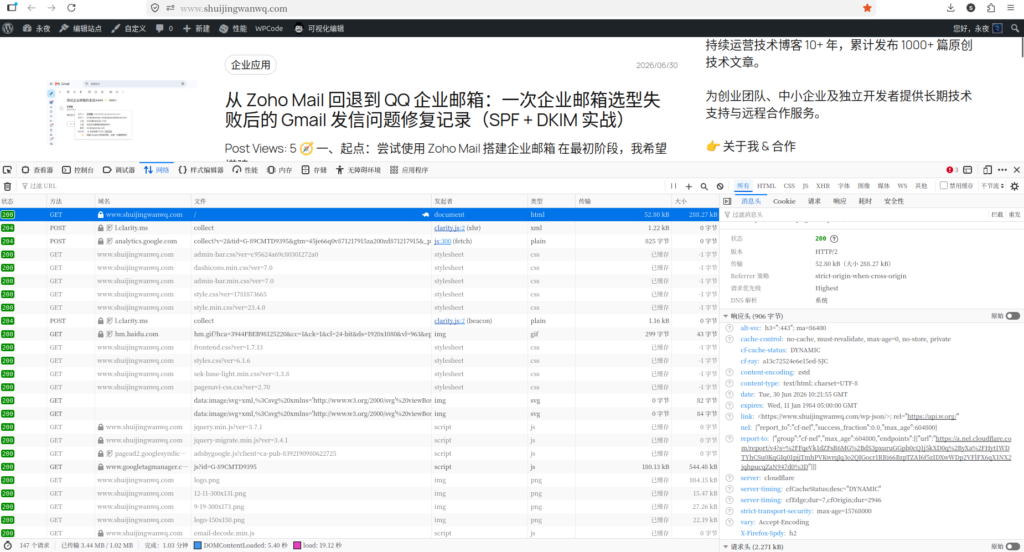
A few days ago, I ran a series of tests on how Cloudflare Free performed when accessing my main WordPress site from mainland China.
Based on the results, Cloudflare Free is not unusable at all. For overseas traffic, static asset caching, HTTPS, and the global edge network, it is still excellent.
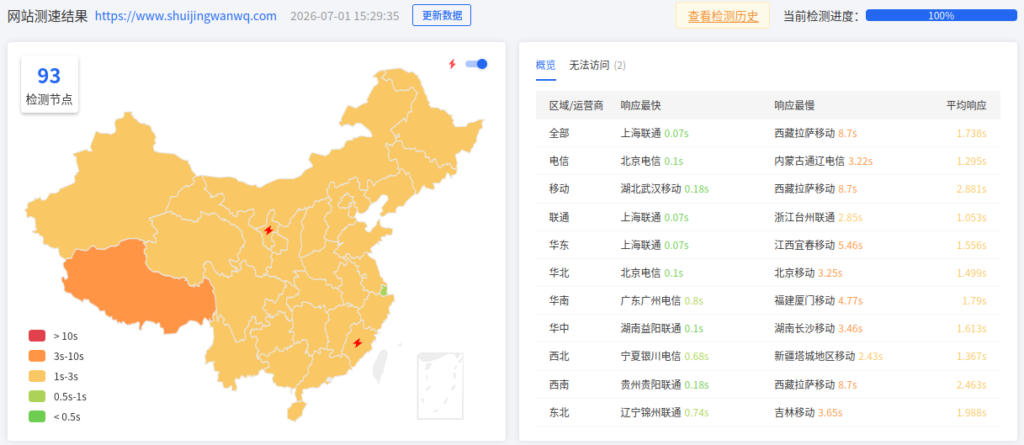
The problem is the network path from mainland China.
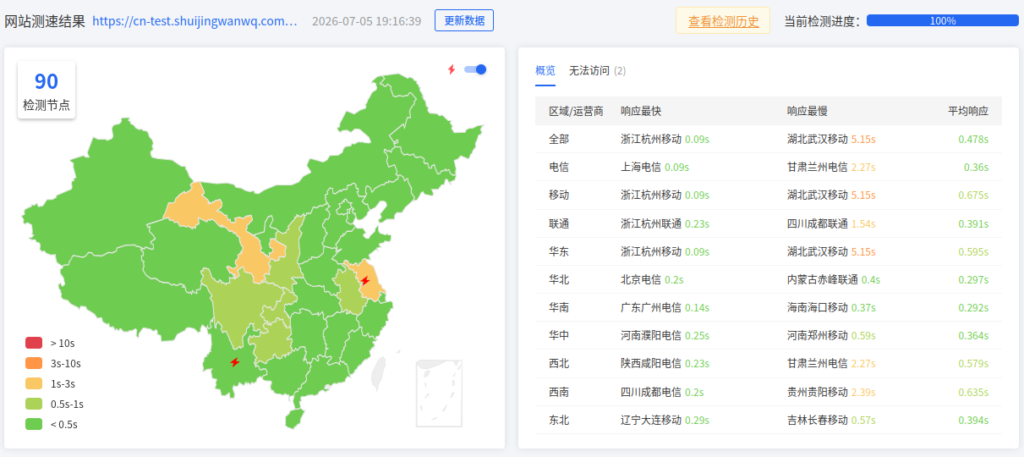
In my site’s case, Cloudflare Free was not stable enough for users in mainland China. On China Mobile and China Unicom routes in particular, I occasionally saw slow access, large response-time fluctuations, and obvious routing detours from some test nodes.
My site structure is:
中文主站:https://www.shuijingwanwq.com/
英文站:https://www.shuijingwanwq.com/en/
源站:阿里云杭州 ECS
程序:WordPress + Polylang + W3 Total Cache
I did not want to split it into:
中文站:www.shuijingwanwq.com
英文站:en.shuijingwanwq.com
I also did not want to add:
cn.shuijingwanwq.com
Images, CSS, JS, uploaded files, and WordPress resource paths are all shared across the site. If I changed the site structure just for CDN purposes, SEO, Polylang, multilingual routing, image paths, and cache rules would all become more complicated later.
So the goal of this migration was very clear:
不换主域名
不拆 /en/ 目录
不新增 cn 子域名
不升级 Cloudflare Business
尽量低成本解决中国大陆访问慢的问题
同时尽量不要明显牺牲海外访问体验
In the end, I chose Tencent Cloud EdgeOne.
![[Figure 1: Tencent Cloud EdgeOne product page, selecting “Start Now”]](https://www.shuijingwanwq.com/wp-content/uploads/2026/07/1-12.png)
2. Why I Chose EdgeOne Instead of Continuing to Tweak Cloudflare
At first, I considered several options.
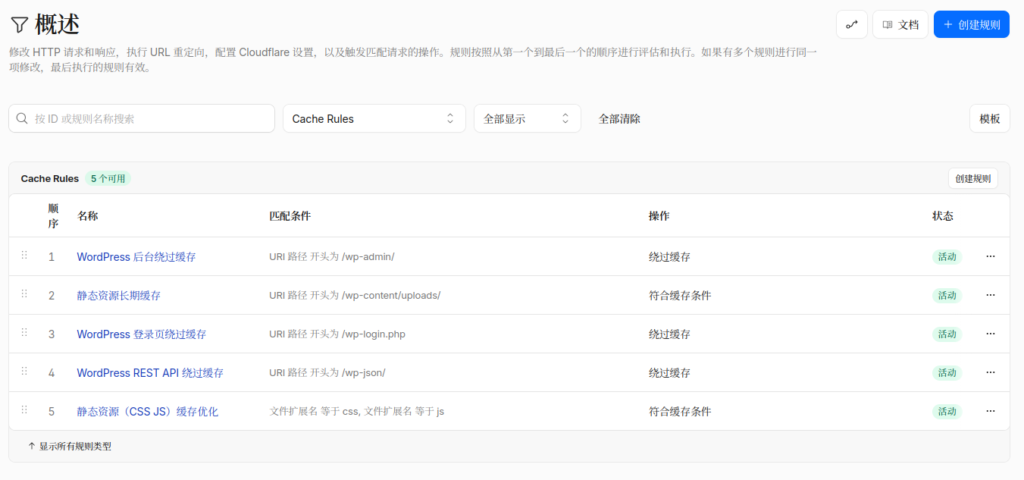
The first option was to keep using Cloudflare Free and keep experimenting with cache rules, DNS-only records, traffic splitting, and intelligent DNS. The problem with this direction is that Cloudflare Free itself does not provide true in-mainland China acceleration. A cache hit does not necessarily mean the network path is good.
The second option was to upgrade to Cloudflare Pro or Business. Pro offers limited help for mainland China routes. Business can support more complex architectures through Partial CNAME Setup, but the price is clearly too high for a personal blog.
The third option was a dual-CDN setup: a mainland China CDN plus Cloudflare for overseas traffic. Technically, this is feasible. In practice, however, the maintenance cost is high, especially when the same www main domain has to handle /en/, images, static assets, certificates, caching, SEO, and the origin Host header at the same time.
So I chose a more direct approach:
www.shuijingwanwq.com → 腾讯云 EdgeOne → 阿里云杭州 ECS
In other words, I used EdgeOne as the new unified edge layer to replace Cloudflare Free.
![[Figure 2: EdgeOne console welcome page, selecting “Improve website / app speed and security”]](https://www.shuijingwanwq.com/wp-content/uploads/2026/07/2-13-1024x396.png)
3. Activating EdgeOne: Starting with the Personal Plan for a Low-Cost Test
After entering EdgeOne, the first step was to add a site.
Here I entered the root domain:
shuijingwanwq.com
Instead of:
www.shuijingwanwq.com
That is because EdgeOne first creates a “site”, and then you add specific acceleration domains under that site.
![[Figure 3: Adding the site and entering shuijingwanwq.com]](https://www.shuijingwanwq.com/wp-content/uploads/2026/07/3-12.png)
When choosing the plan, I did not go straight to the Basic plan. I started with the Personal plan instead.
At the time, the page showed the Personal plan as:
1 个站点
50GB/月加速流量
300 万次/月加速请求
There was also a promotion when I activated it, so the actual amount I paid was RMB 9.9.
![[Figure 4: Choosing the EdgeOne Personal plan]](https://www.shuijingwanwq.com/wp-content/uploads/2026/07/4-13-1024x534.png)
![[Figure 5: Confirming the order and paying RMB 9.9]](https://www.shuijingwanwq.com/wp-content/uploads/2026/07/5-13-1024x569.png)
The purpose of this choice was not to solve everything in one step, but to verify the following at the lowest possible cost:
EdgeOne 是否能正常接入 WordPress
中国大陆访问是否改善
海外访问是否还能接受
缓存规则是否能复刻 Cloudflare 的效果
If the traffic later exceeds the Personal plan quota, upgrading the plan will be a safer decision.
4. Access Mode: Choosing CNAME Access First Instead of NS Access
After adding the site in EdgeOne, I had to choose the acceleration region and access mode.
I chose:
加速区域:全球可用
接入模式:CNAME 接入
![[Figure 6: Selecting global availability and CNAME access]](https://www.shuijingwanwq.com/wp-content/uploads/2026/07/6-11.png)
Why didn’t I choose NS access?
Because NS access affects DNS resolution for the entire domain, including:
www
根域名
邮箱 MX
SPF
DKIM
DMARC
站长平台验证记录
其他子域名
My goal this time was only to migrate:
www.shuijingwanwq.com
If I migrated NS at the same time, the risk would be much higher. In particular, if enterprise email records, webmaster platform verification records, or old subdomains were missed, troubleshooting would become painful.
So I used the safer approach this time:
Cloudflare 暂时继续作为 DNS 管理面板
www 这条记录改成 CNAME 指向 EdgeOne
Cloudflare 不再代理 www 流量
5. Domain Ownership Verification: Adding a TXT Record in Cloudflare
After choosing CNAME access, EdgeOne required domain ownership verification.
It provided a TXT record:
主机记录:edgeonereclaim
记录类型:TXT
记录值:reclaim-...
![[Figure 7: EdgeOne requiring a TXT record for domain ownership verification]](https://www.shuijingwanwq.com/wp-content/uploads/2026/07/7-5.png)
Because the domain’s NS was still hosted on Cloudflare at that time, this TXT record had to be added in Cloudflare DNS.
![[Figure 8: Adding the edgeonereclaim TXT record in Cloudflare DNS]](https://www.shuijingwanwq.com/wp-content/uploads/2026/07/8-4-1024x563.png)
After adding it, I went back to EdgeOne and clicked verify. The verification passed quickly.
![[Figure 9: Domain ownership verification passed and the site was added successfully]](https://www.shuijingwanwq.com/wp-content/uploads/2026/07/9-3-1024x362.png)
6. Adding the www Acceleration Domain and Configuring the Origin
After the site verification passed, I needed to add the specific acceleration domain:
www.shuijingwanwq.com
This configuration is important.
My final configuration was:
加速域名:www.shuijingwanwq.com
源站类型:IP/域名
源站地址:121.40.248.29
回源协议:HTTPS
回源端口:443
回源 Host:使用加速域名 www.shuijingwanwq.com
推荐模板:不使用模板
![[Figure 10: Adding the www acceleration domain, configuring the Alibaba Cloud ECS origin IP, and enabling HTTPS origin pull]](https://www.shuijingwanwq.com/wp-content/uploads/2026/07/10-3.png)
Do not set the origin to:
www.shuijingwanwq.com
Otherwise, after DNS is switched to EdgeOne, the origin pull may end up looping back through the edge layer.
The correct approach is to use the public IP address of the origin server.
EdgeOne then generated a CNAME target:
www.shuijingwanwq.com.eo.dnse2.com
![[Figure 11: EdgeOne generating the CNAME record for www]](https://www.shuijingwanwq.com/wp-content/uploads/2026/07/11-2-1024x490.png)
7. Changing www from an A Record to a CNAME in Cloudflare
Before the migration, the www record in Cloudflare was:
www.shuijingwanwq.com
类型:A
内容:121.40.248.29
代理状态:已代理
In other words, it was still going through Cloudflare’s orange-cloud proxy.
![[Figure 12: The original www A record in Cloudflare, with proxy enabled]](https://www.shuijingwanwq.com/wp-content/uploads/2026/07/12-2-1024x449.png)
Cloudflare does not allow directly changing an A record into a CNAME, so I first deleted the old www A record and then added a new CNAME record:
类型:CNAME
名称:www
目标:www.shuijingwanwq.com.eo.dnse2.com
代理状态:仅 DNS
TTL:自动
![[Figure 13: Changing www to a CNAME in Cloudflare and setting it to DNS only]](https://www.shuijingwanwq.com/wp-content/uploads/2026/07/13-1-1024x316.png)
After this step, www.shuijingwanwq.com no longer went through the Cloudflare proxy. Instead, DNS pointed it directly to EdgeOne.
Back in EdgeOne, I could see the www domain gradually change to an active status.
![[Figure 14: www.shuijingwanwq.com became active in EdgeOne]](https://www.shuijingwanwq.com/wp-content/uploads/2026/07/14-2-1024x234.png)
8. Configuring the Edge HTTPS Certificate in EdgeOne
The origin ECS server already had an SSL certificate, but that did not mean the EdgeOne edge nodes also had a certificate.
The full request path is:
用户浏览器
↓ HTTPS
EdgeOne 边缘节点
↓ HTTPS 回源
阿里云 ECS / Nginx / WordPress
So the certificate that needed to be configured here was:
用户浏览器 → EdgeOne
the edge HTTPS certificate for this segment.
![[Figure 15: EdgeOne HTTPS settings page showing that the edge HTTPS certificate was not configured]](https://www.shuijingwanwq.com/wp-content/uploads/2026/07/15-2.png)
I chose EdgeOne’s free certificate and used automatic validation.
![[Figure 16: Applying for a free certificate and choosing automatic validation]](https://www.shuijingwanwq.com/wp-content/uploads/2026/07/16-2.png)
After the certificate was issued, the HTTPS status changed to deployed.
![[Figure 17: EdgeOne HTTPS certificate deployed]](https://www.shuijingwanwq.com/wp-content/uploads/2026/07/17-2-1024x231.png)
After this step, visiting:
https://www.shuijingwanwq.com/
worked normally, with no certificate warning.
9. Verifying the Frontend, English Site, Article Pages, and WordPress Admin
After EdgeOne was connected, I first verified the Chinese homepage in a private browser window.
![[Figure 18: The Chinese homepage opened normally in a private window]](https://www.shuijingwanwq.com/wp-content/uploads/2026/07/18-2-1024x497.png)
Then I verified the English site:
https://www.shuijingwanwq.com/en/
The English site path, styles, and images all worked correctly.
Next, I verified an English article page. Images, tables, and body layout were all normal.
Finally, I verified the WordPress admin area:
https://www.shuijingwanwq.com/wp-admin/
The admin area was also accessible.
This confirmed several important points:
WordPress 没有异常
Polylang /en/ 路径没有异常
图片资源没有异常
CSS / JS 没有异常
后台登录没有异常
HTTPS 没有异常
At this point, the basic EdgeOne integration was complete.
10. Migrating Cloudflare Cache Rules to EdgeOne
When I was using Cloudflare, I had two categories of configuration.
The first was installing the Cloudflare plugin in WordPress admin and clicking:
Apply Recommended Cloudflare Settings for WordPress
I also enabled:
Auto Purge Content On Update
The second was configuring six cache rules in Cloudflare Cache Rules.
After migrating to EdgeOne, the Cloudflare plugin could no longer automatically purge EdgeOne’s cache. So the core task became recreating the cache rules inside EdgeOne.
I went to:
EdgeOne → 站点加速 → 规则引擎
![[Figure 19: Opening the EdgeOne rule engine and creating a blank rule]](https://www.shuijingwanwq.com/wp-content/uploads/2026/07/19-2-1024x307.png)
11. Rule 1: Bypass Cache for the WordPress Admin Area
The first rule is used to exclude the WordPress admin area:
规则名称:WordPress 后台绕过缓存
匹配条件:URL path 正则匹配 ^/wp-admin/
动作:节点缓存 TTL → 不缓存
![[Figure 20: Configuring the cache-bypass rule for WordPress admin]](https://www.shuijingwanwq.com/wp-content/uploads/2026/07/20-2-1024x387.png)
![[Figure 21: Final configuration of the WordPress admin cache-bypass rule]](https://www.shuijingwanwq.com/wp-content/uploads/2026/07/21-2-1024x175.png)
Admin pages must not be cached by the CDN. Otherwise, login state, admin UI behavior, and management operations may break.
12. Rule 2: Bypass Cache for the WordPress Login Page
The second rule is used to exclude the login page:
规则名称:WordPress 登录页绕过缓存
匹配条件:URL path 正则匹配 ^/wp-login\.php$
动作:节点缓存 TTL → 不缓存
![[Figure 22: WordPress login page cache-bypass rule]](https://www.shuijingwanwq.com/wp-content/uploads/2026/07/22-2-1024x180.png)
The login page must bypass cache because it sets test cookies and involves login redirects, security checks, and related logic.
13. Rule 3: Bypass Cache for the WordPress REST API
The third rule is used to exclude the REST API:
规则名称:WordPress REST API 绕过缓存
匹配条件:URL path 正则匹配 ^/wp-json/
动作:节点缓存 TTL → 不缓存
![[Figure 23: WordPress REST API cache-bypass rule]](https://www.shuijingwanwq.com/wp-content/uploads/2026/07/23-2-1024x180.png)
The WordPress editor, plugins, themes, and some frontend features all use the REST API. Caching the REST API can easily cause unexpected issues, so I bypassed cache for it directly.
14. Rule 4: Long-Term Cache for Static Assets in the Uploads Directory
The fourth rule is used to cache the uploads directory:
规则名称:静态资源长期缓存
匹配条件:URL path 正则匹配 ^/wp-content/uploads/
动作:节点缓存 TTL → 自定义时间 30 天
强制缓存:关闭
![[Figure 24: Caching static assets under wp-content/uploads for 30 days]](https://www.shuijingwanwq.com/wp-content/uploads/2026/07/24-1024x197.png)
This directory mainly contains static assets such as images and attachments, so it is suitable for longer cache durations.
15. Rule 5: CSS / JS Cache Optimization
The fifth rule is used to cache CSS and JS:
规则名称:静态资源(CSS JS)缓存优化
匹配条件:
文件后缀 等于 css
OR
文件后缀 等于 js
动作:
节点缓存 TTL → 自定义时间 30 天
强制缓存:关闭
![[Figure 25: Cache rule based on CSS / JS file extensions]](https://www.shuijingwanwq.com/wp-content/uploads/2026/07/25-1024x238.png)
Here, using “file extension” instead of a URL regular expression makes the rule easier to understand.
16. Rule 6: HTML Page Cache (SEO-Safe)
This is the most important rule.
The final configuration was:
规则名称:HTML 页面缓存(SEO 安全)
匹配条件:
URL path 正则不匹配
^/(wp-admin/|wp-login\.php|wp-json/|feed/|xmlrpc\.php|wp-cron\.php)
动作:
节点缓存 TTL → 自定义时间 10 分钟
强制缓存:关闭
![[Figure 26: HTML page cache rule, 10-minute TTL, forced caching disabled]](https://www.shuijingwanwq.com/wp-content/uploads/2026/07/26-1024x177.png)
At first, I considered adding this condition to the HTML rule:
HTTP 请求头 Cookie 不存在
But I later realized that normal visitors may also carry analytics cookies such as _ga. If the rule requires cookies to be absent, many real visitors may fail to hit the HTML cache.
So the final HTML rule no longer checks cookies. Instead, “bypass cache for logged-in users” is handled separately as the last rule.
Setting the HTML page cache TTL to 10 minutes is a conservative choice. Even if I forget to manually purge the cache, the homepage, archive pages, and article pages will only serve slightly stale content for a short period.
17. Rule 7: Bypass Cache for Logged-In WordPress Users
To prevent logged-in users from receiving cached pages meant for normal visitors, I added a seventh rule:
规则名称:WordPress 已登录用户绕过缓存
匹配条件:
HTTP 请求头 Cookie 正则匹配 wordpress_logged_in
动作:
节点缓存 TTL → 不缓存
![[Figure 27: Cache-bypass rule for logged-in WordPress users]](https://www.shuijingwanwq.com/wp-content/uploads/2026/07/27-1024x179.png)
This rule must be placed at the very bottom.
That is because EdgeOne’s rule priority works like this:
下方规则优先级更高
The final rule order is:
01 HTML 页面缓存(SEO 安全)
02 静态资源长期缓存
03 静态资源(CSS JS)缓存优化
04 WordPress 后台绕过缓存
05 WordPress 登录页绕过缓存
06 WordPress REST API 绕过缓存
07 WordPress 已登录用户绕过缓存
![[Figure 28: Final order of the seven EdgeOne cache rules]](https://www.shuijingwanwq.com/wp-content/uploads/2026/07/28-1024x454.png)
This order matters a lot.
Normal HTML pages first match rule 1. Static assets are covered by rules 2 and 3. The admin area, login page, REST API, and logged-in users are overridden by lower rules and ultimately bypass cache.
18. Always Wait Until the Deployment Status Becomes “Active”
There is one detail in EdgeOne configuration that is easy to misread.
After each rule or domain configuration change, EdgeOne may show:
部署中
If you test immediately at this point, the results may be unstable.
![[Figure 29: Domain configuration still in deploying status]](https://www.shuijingwanwq.com/wp-content/uploads/2026/07/29-1024x237.png)
At one point, I thought HTML cache could only hit if “forced caching” was enabled. Later, after both the domain and the rules changed to “active”, I tested again and found that:
强制缓存关闭
HTML 也可以正常 HIT
So my final conclusion is:
HTML 页面缓存:强制缓存关闭
TTL:10 分钟
This is safer than enabling forced caching.
19. Verifying EdgeOne Cache with curl
After finishing the configuration, I ran several tests with curl.
1. Homepage as a Normal Visitor
curl -s -D - -o /dev/null https://www.shuijingwanwq.com/
curl -s -D - -o /dev/null https://www.shuijingwanwq.com/
Result:
eo-cache-status: HIT
This means normal HTML pages are already hitting the EdgeOne cache.
2. Normal Visitor with Analytics Cookies
curl -s -D - -o /dev/null -H "Cookie: _ga=test" https://www.shuijingwanwq.com/
curl -s -D - -o /dev/null -H "Cookie: _ga=test" https://www.shuijingwanwq.com/
Result:
eo-cache-status: HIT
This shows that analytics cookies such as _ga do not prevent normal visitors from hitting the HTML cache.
3. Simulating a Logged-In User
curl -s -D - -o /dev/null -H "Cookie: wordpress_logged_in_test=1" https://www.shuijingwanwq.com/
curl -s -D - -o /dev/null -H "Cookie: wordpress_logged_in_test=1" https://www.shuijingwanwq.com/
Result:
eo-cache-status: MISS
This confirms that logged-in users will not hit the normal visitor cache.
![[Figure 30: Verifying normal visitor HIT, _ga Cookie HIT, and logged-in Cookie MISS in the terminal]](https://www.shuijingwanwq.com/wp-content/uploads/2026/07/30-1024x845.png)
This set of results was exactly what I wanted:
普通访客:首页 HIT
带统计 Cookie 的普通访客:首页 HIT
已登录用户:首页 MISS
20. About the Cloudflare Plugin and Automatic Cache Purging
After migrating to EdgeOne, the Cloudflare plugin in WordPress can no longer handle EdgeOne cache purging.
Previously, the Cloudflare plugin option:
Auto Purge Content On Update
could automatically purge Cloudflare cache when an article was updated.
But now:
www.shuijingwanwq.com → EdgeOne
Cloudflare no longer proxies www traffic, so this automatic purge feature has no effect on EdgeOne.
However, you may still see this response header:
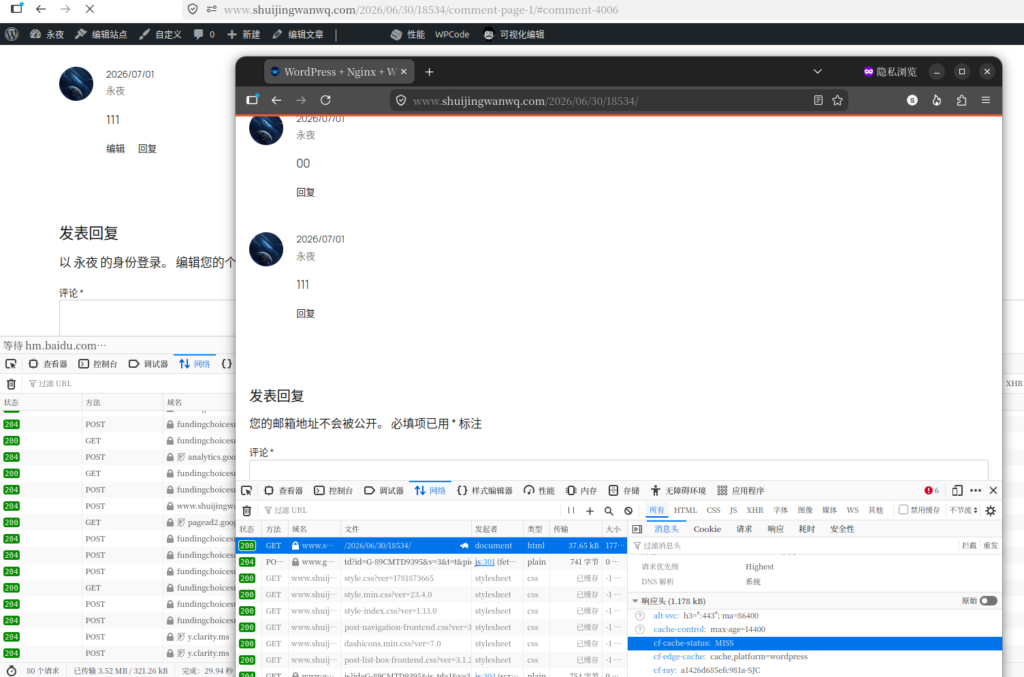
cf-edge-cache: cache,platform=wordpress
This does not mean the request is still going through Cloudflare. It is just a response header left by the WordPress plugin or a previous configuration.
For now, I am using a conservative approach:
HTML 页面 TTL 只设置 10 分钟
更新文章后必要时手动刷新 EdgeOne 缓存
后续再考虑接入 EdgeOne API 自动刷新
Later, I can consider two options:
方案一:寻找支持 EdgeOne 的 WordPress 缓存刷新插件
方案二:自己写一个小插件或 WPCode 代码片段,调用 EdgeOne 缓存清理 API
But this is not the top priority for this migration. The most important things right now are a stable main request path and safe cache rules.
21. Final Result
After this migration, the current status is:
www.shuijingwanwq.com 已接入 EdgeOne
加速区域:全球可用
接入模式:CNAME 接入
源站:阿里云杭州 ECS
回源协议:HTTPS
HTTPS 证书:EdgeOne 免费证书
中文首页:正常
英文 /en/:正常
单篇文章:正常
WordPress 后台:正常
图片缓存:HIT
HTML 页面缓存:HIT
登录页:MISS
REST API:MISS
已登录用户:MISS
The final EdgeOne cache rules are:
| Order | Rule Name | Purpose |
|---|---|---|
| 01 | HTML page cache (SEO-safe) | Cache normal HTML pages for 10 minutes |
| 02 | Long-term static asset cache | Cache /wp-content/uploads/ for 30 days |
| 03 | Static asset cache optimization (CSS JS) | Cache CSS / JS for 30 days |
| 04 | Bypass cache for WordPress admin | Do not cache /wp-admin/ |
| 05 | Bypass cache for WordPress login page | Do not cache /wp-login.php |
| 06 | Bypass cache for WordPress REST API | Do not cache /wp-json/ |
| 07 | Bypass cache for logged-in WordPress users | Do not cache requests with the wordpress_logged_in Cookie |
22. Lessons Learned from This Migration
First, do not start with NS access immediately.
If you only need to migrate the www main site, CNAME access is safer and has a much smaller blast radius.
Second, pay close attention to EdgeOne’s rule priority.
Rules placed lower have higher priority, so “do not cache” rules should be placed lower in the list.
Third, do not draw conclusions immediately after changing rules.
If the domain status is still “deploying”, test results may be unstable. Always wait until it becomes “active” before testing.
Fourth, do not set the HTML page cache duration too long at the beginning.
Ten minutes is a relatively safe starting point. It reduces origin load without delaying content updates for too long.
Fifth, normal visitors may also carry cookies.
If the HTML cache rule requires “no cookies”, the real cache hit rate may drop. A better approach is to bypass cache only for login cookies such as wordpress_logged_in.
Sixth, after the migration, the Cloudflare plugin cannot automatically purge EdgeOne cache.
This needs to be handled separately later. Do not assume the Cloudflare plugin is still effective.
Conclusion
This migration from Cloudflare Free to Tencent Cloud EdgeOne was not because Cloudflare is bad. It was because most of my visitors are still in mainland China.
Cloudflare Free works very well for overseas access, but unstable mainland China routes are a real issue. For a WordPress blog that already has an ICP filing, uses an Alibaba Cloud Hangzhou ECS origin, receives a high share of Chinese traffic, and also runs an English /en/ site, an integrated domestic-and-overseas edge acceleration platform like EdgeOne is a better fit for the current stage.
After this migration, I did not change the WordPress structure, split the English site, or add a new cn subdomain.
The final result is:
同一个 www 主域名
同一个 /en/ 英文目录
统一 EdgeOne 加速
普通访客 HTML HIT
静态资源 HIT
后台、登录页、REST API、已登录用户安全绕过缓存
Based on the current results, this migration was successful.
Linux Server Operations, Deployment & Production Troubleshooting
If your website or backend service runs on a Linux server and you are facing unstable access, Nginx configuration issues, MySQL / Redis errors, Docker service failures, full disk usage, or high CPU / memory usage, feel free to contact me for remote troubleshooting.
Ideal For:
✅ Website downtime or unstable access
✅ Nginx / PHP-FPM configuration issues
✅ MySQL / Redis performance or connection problems
✅ Docker service deployment and maintenance
✅ Server migration and environment setup
✅ CPU / memory / disk usage investigation
What I Offer:
✅ Linux environment inspection
✅ Website migration and deployment
✅ Nginx / PHP-FPM / MySQL / Redis troubleshooting
✅ Docker configuration and maintenance
✅ Server performance analysis
✅ Long-term remote operations support
Please contact me and mention: Linux Operations Consultation.
Contact Me:
Telegram: @shuijingwan
WeChat: 13980074657
Email: shuijingwanwq@gmail.com
Leave a Reply