Detailed explanation of the configuration implementation process of deploying the LAMP environment on the Alibaba Cloud server ECS, the operating system is CentOS 6.5 64-bit!
1. Use Putty to connect to the server remotely;

Use Putty to connect to the server remotely
2. The current operating system is CentOS 6.5 64-bit.

The current operating system is CentOS 6.5 64-bit
3. Check the disk space usage, command:
df-h

View disk space usage
4. Check the disk space usage, including the data disk that has not been mounted, command:
fdisk-l
Friendly reminder: If you execute the fdisk -l command and find that there is no /dev/xvdb to indicate that your cloud service has no data disk, then you do not need to mount, this tutorial is not applicable to you

View disk space usage, including data disks that are not yet mounted
5. Partition the data disk
execute:
fdisk /dev/xvdb
, partition the data disk;
According to the prompts, enter in sequence
n
p
1
Enter twice
wq
, the partition starts, and it will be completed soon.

Partition the data disk
6. View new partitions
Use:
fdisk-l
The command can see that the new partition XVDB1 has been established.

View new partitions
7, can use:
mkfs.ext4 /dev/xvdb1
The command formats the new partition, and the formatting time varies according to the size of the hard disk.

Format new partitions
8. Add partition information
If the user wants to mount the new partition to the /var/www directory, the following command can be used. Note: If the /var/www directory does not exist, you need to run the command first:
mkdir /var/www
, create the directory.
echo “/dev/xvdb1 /var/www ext4 defaults 0 0” >> /etc/fstab
The command writes the new partition information. Then use
cat /etc/fstab
If you check the command, the following information will indicate that the writing is successful.

Add partition information
9. Mount the new partition
Use
mount -a
command to mount the new partition, then use
df-h
If you check the command, the following information will indicate that the mount is successful, and you can start using the new partition.

Mount a new partition
10. Use
yum install httpd
y
command to install apache

Install Apache
11. Run the command:
service httpd start
Start Apache now
Verify the status of the httpd service:
service httpd status
Run the command:
chkconfig –levels 235 httpd on
Make Apache can start automatically
Check the startup level of this service
chkconfig –list httpd
As long as it is determined that it is ON in the state of 3 or 5, it is enough.

Configure the httpd service
12. Open in the native browser:
http://公网IP地址
If it appears: Apache 2 Test Page Powered by CentOS, it means that the httpd service is installed and started successfully;

httpd service installation and startup success
13. Set the publishing directory of the website and create a virtual host
cd /etc/httpd/conf
ls
Create a backup of a profile
cp httpd.conf httpd.bak
ls
vim httpd.conf

Create a backup of a profile
?documentroot
Use the N key to view the next matching place;

Find DocumentRoot
Use the I key to enter the editing mode, modify the default website root directory to: /var/www/wwwroot
Use the ESC key to exit the editing mode, press: WQ to save and exit;
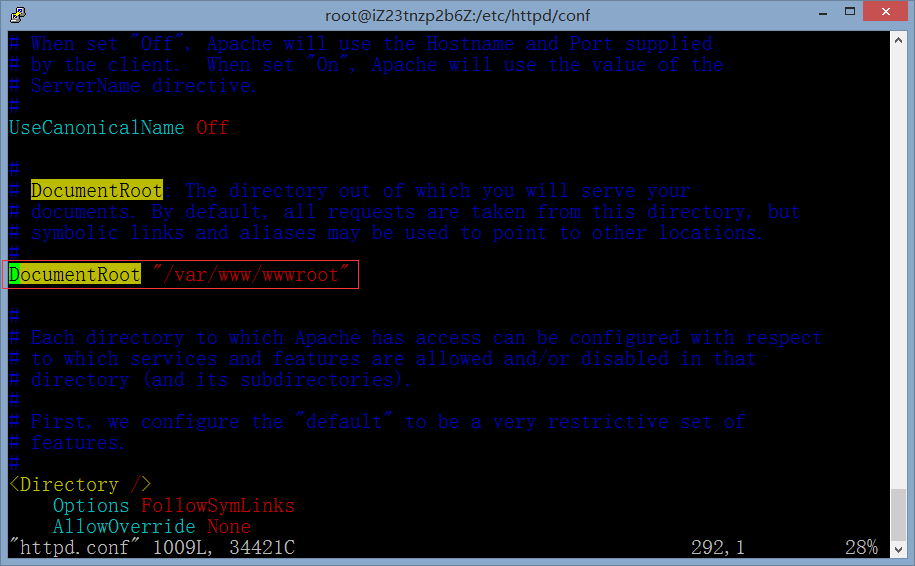
Modify the default website root directory to: /var/www/wwwroot
Create the root directory of the website, command:
mkdir -p /var/www/wwwroot
Reload the configuration file
service httpd reload
Create a virtual host
vim /etc/httpd/conf/httpd.conf
Use the I key to enter the editing mode, but except for the # number of the NameVirtualHost *:80, it supports the virtual host;
Go to the /etc/httpd/conf.d directory
cd /etc/httpd/conf.d
Create a new virtual host configuration file vhosts.conf
vim vhosts.conf

Create a virtual host
service httpd reload
14. Install and configure PHP
yum install php
y

Install and configure PHP
Install php-mysql and other packages to make php support mysql, the command is as follows: run the command
yum search php
to find the available PHP module packages, select the required packages and run the commands
yum install php-mysql php-gd php-imap php-ldap php-odbc php-pear php-xml php-xmlrpc php-cli php-common php-devel php-mbstring php-mcrypt php-soap php-bcmath php-mysqli
to install (can be not limited to the package in this example)
y

Install php-mysql and other packages to make php support mysql, etc.
service httpd restart
echo “<?php phpinfo(); ?>” >> /var/www/wwwroot/phpinfo.php
Verify that php is installed successfully

Verify that php is installed successfully
15. Install and configure the FTP server
yum install vsftpd
y
vim /etc/vsftpd/vsftpd.conf
Configure vsftpd:
Anonymous users are not allowed to log in to ftp, command:
anonymous_enable=no
chroot_list_enable=yes
chroot_list_file=/etc/vsftpd/chroot_list

Configure vsftpd

Configure vsftpd
chkconfig –levels 235 vsftpd on
useradd -d /var/www/wwwroot/phpmyadmin -s /sbin/nologin phpmyadmin
passwd phpmyadmin
FTP%$FG65DFLM43$3
FTP%$FG65DFLM43$3
Add the created user to the profile, one user occupies one line
vim /etc/vsftpd/chroot_list
service vsftpd restart
Change all phpmyadmin to phpmyadmin:
chown -r phpmyadmin /var/www/wwwroot/phpmyadmin
chmod -r 755 /var/www/wwwroot/phpmyadmin
Assign some directories that require apaceh user operations to apaceh, such as image upload directories, etc.
chown -r apache directory
Test whether the connection is successful through the FTP client software

Test whether the connection is successful through the FTP client software
Because the database adopts the cloud database RDS, there is no need to configure on the ECS, and then the end configuration is at some end.