1. Configure the CentOS 7 yum source, refer to:“CentOS, Ubuntu, Debian dependency source configuration” . Error when updating the cache: File contains no section headers. Loaded plugins: fastestmirror . The reason is that CentOS stops maintenance.
[root@iZ23wv7v5ggZ ~]# cd /etc/yum.repos.d/
[root@iZ23wv7v5ggZ yum.repos.d]# ls -l
total 8
-rw-r--r-- 1 root root 2523 Jan 28  2022 CentOS-Base.repo
-rw-r--r-- 1 root root  664 Jan 28  2022 epel.repo
[root@iZ23wv7v5ggZ yum.repos.d]# rm -rf /etc/yum.repos.d/*.repo
[root@iZ23wv7v5ggZ yum.repos.d]# ls -l
total 0
[root@iZ23wv7v5ggZ yum.repos.d]# curl -o /etc/yum.repos.d/CentOS-Base.repo https://mirrors.aliyun.com/repo/Centos-7.repo
  % Total    % Received % Xferd  Average Speed   Time    Time     Time  Current
                                 Dload  Upload   Total   Spent    Left  Speed
100  7221  100  7221    0     0   3763      0  0:00:01  0:00:01 --:--:--  3762
[root@iZ23wv7v5ggZ yum.repos.d]# curl -o /etc/yum.repos.d/epel.repo http://mirrors.aliyun.com/repo/epel-7.repo
  % Total    % Received % Xferd  Average Speed   Time    Time     Time  Current
                                 Dload  Upload   Total   Spent    Left  Speed
100  7215  100  7215    0     0  11531      0 --:--:-- --:--:-- --:--:-- 11525
[root@iZ23wv7v5ggZ yum.repos.d]# yum makecache
Loaded plugins: fastestmirror


File contains no section headers.
file: file:///etc/yum.repos.d/CentOS-Base.repo, line: 1
'\n'
[root@iZ23wv7v5ggZ yum.repos.d]# ls -l
total 16
-rw-r--r-- 1 root root 7221 Jun  6 14:32 CentOS-Base.repo
-rw-r--r-- 1 root root 7215 Jun  6 14:32 epel.repo
[root@iZ23wv7v5ggZ yum.repos.d]#
2. Reference:Alibaba Cloud’s Migration Scheme for CentOS EOL . Prepare to migrate the CentOS currently in use to the Alibaba Cloud Linux operating system.
3. Create snapshot backup data for ECS instances before migration to avoid data loss during operation. as shown in Figure 1

4. Detailed migration steps for CentOS 7 migration Alibaba Cloud Linux 2, see CentOS 7 Migrate Alibaba Cloud Linux 2
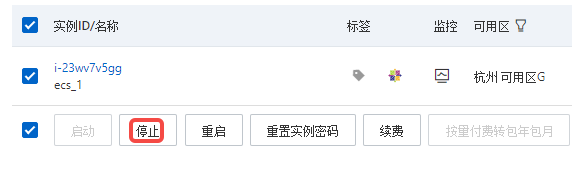
5. Stop the ECS instance. as shown in Figure 2
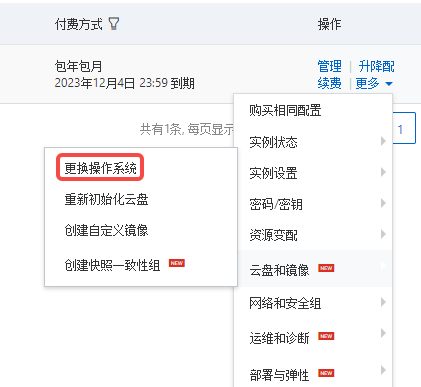
6. Log in to the ECS management console. To find the target instance, select More > Cloud Disks and Images in the Actions column to replace the operating system. as shown in Figure 3
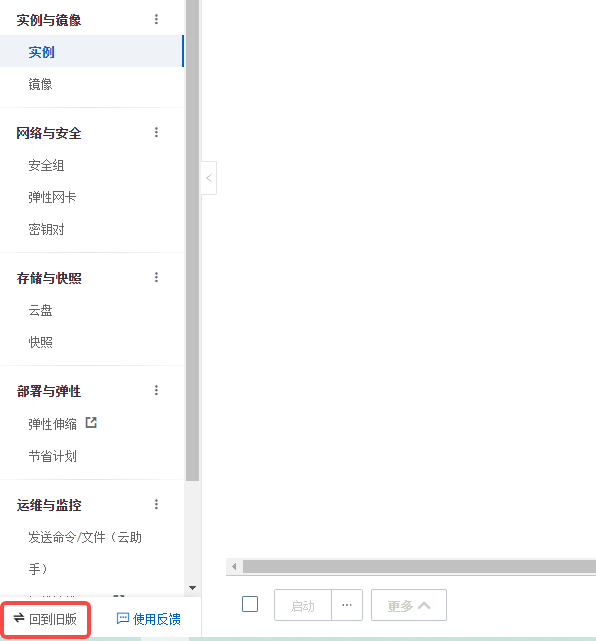
7. There is no option for operating system migration, you need to switch to the new version of the console. as shown in Figure 4
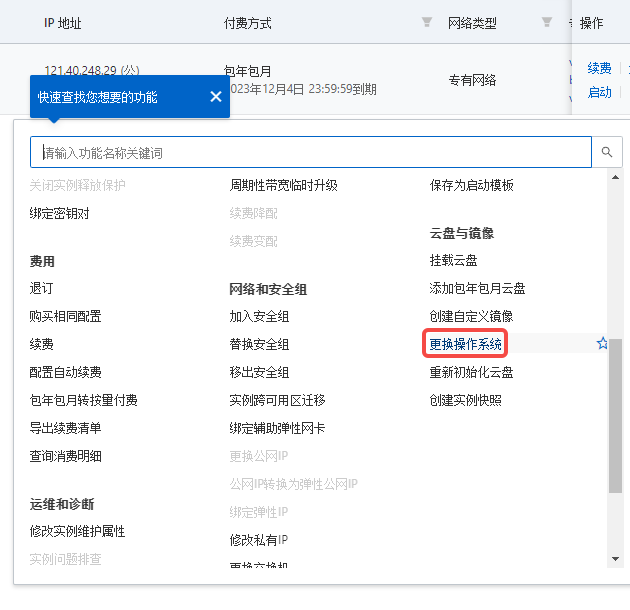
8. Select more > cloud disks and mirrors in the operation column to replace the operating system. as shown in Figure 5
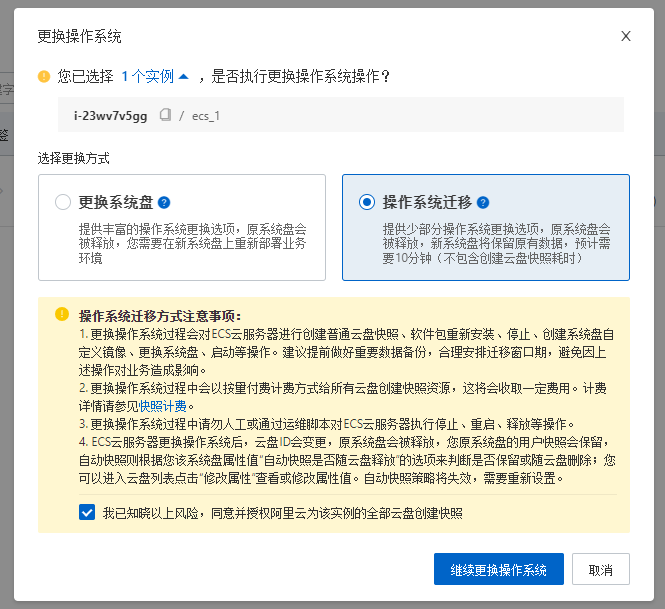
9. In the Replace the operating system dialog box, select the operating system migration. as shown in Figure 6
10. Target operating system, select Alibaba Cloud Linux 3 to stop support date: April 30, 2031. as shown in Figure 7

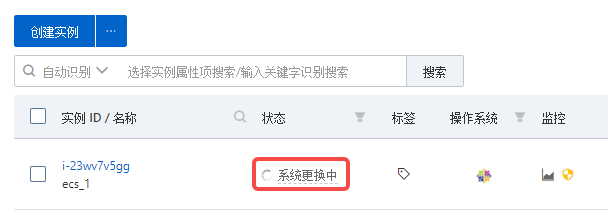
11. The status is displayed as system replacement. Replacement failed and stopped Normal shutdown mode. as shown in Figure 8
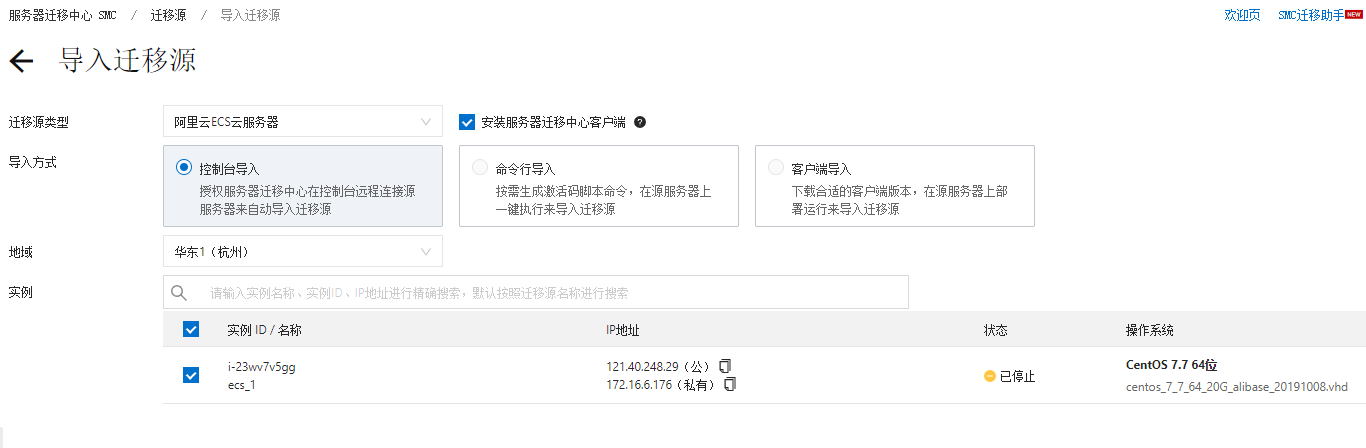
12. Server migration center SMC, import the migration source. as shown in Figure 9
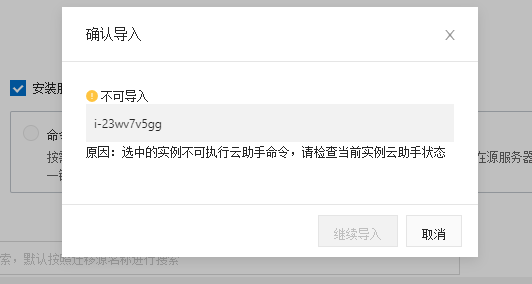
13. No import Reason: The selected instance cannot execute the cloud assistant command, please check the current instance cloud assistant status. As shown in Figure 10
14. After starting the instance, import the migration source again. Migration source status: importing. as shown in Figure 11

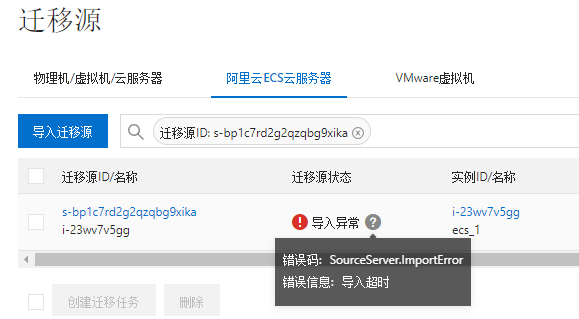
15. Import exceptions. After deleting, re-import. Error still reported: Error code: sourceserver.importError Error message: Import timeout. as shown in Figure 12
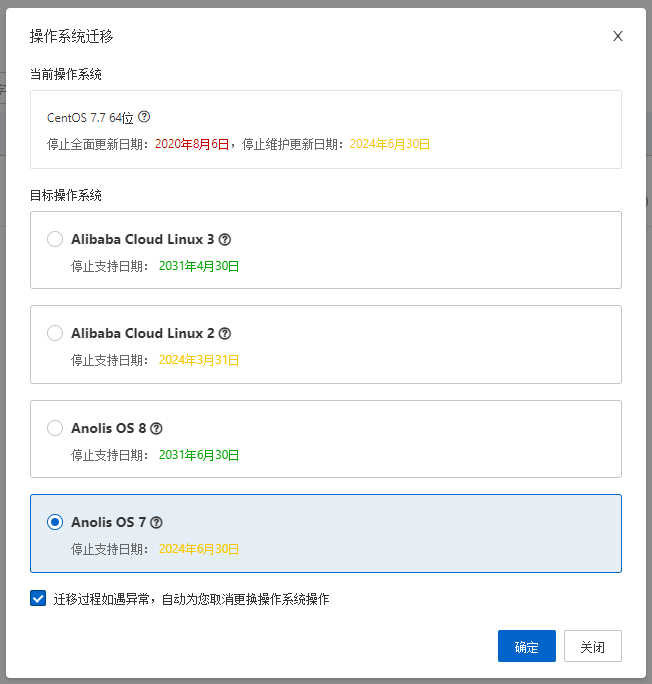
16. After deletion, stop the instance, the target operating system, select Anolis OS 7 stop support date: June 30, 2024. as shown in Figure 13
17. Finally, it was found that the 4 target systems under the operating system migration failed.
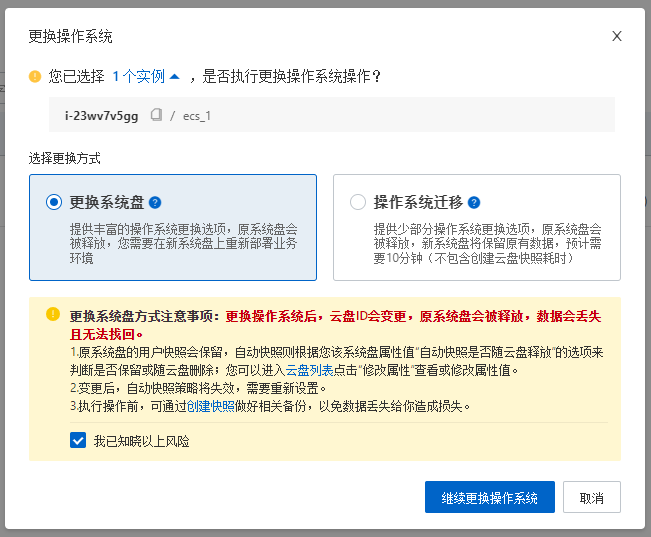
18. The only way to do this is to replace the system disk option, and then re-deploy the relevant environment. Figure 14
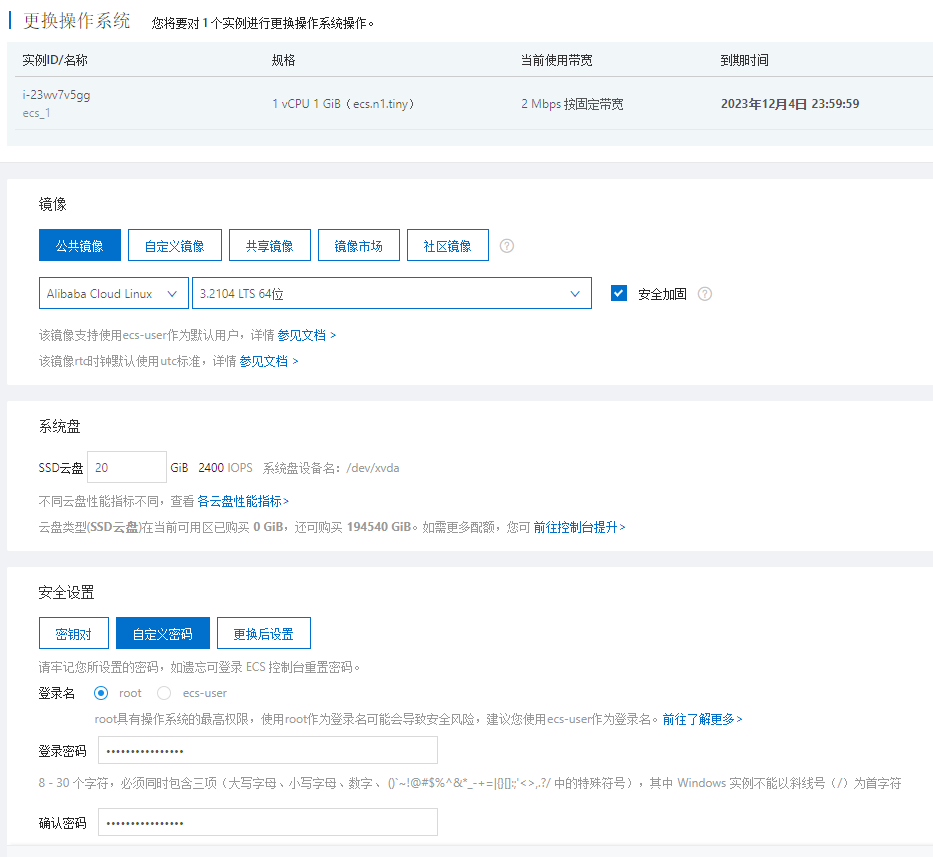
19. Select the image: Alibaba Cloud Linux, 3.2104 LTS 64 bit. as shown in Figure 15
20. If the operating system is replaced before and after the linux system, the data disk is set to automatically mount the partition at startup. After switching the operating system, the mount information of the data disk partition will be lost, and the /etc/fstab configuration needs to be updated. For specific operations, see Configure UUID in the fstab file to automatically mount the data disk. Run the following command to check the mount result
[root@iZ23wv7v5ggZ ~]# df -h
Filesystem      Size  Used Avail Use% Mounted on
devtmpfs        464M     0  464M   0% /dev
tmpfs           482M     0  482M   0% /dev/shm
tmpfs           482M  440K  481M   1% /run
tmpfs           482M     0  482M   0% /sys/fs/cgroup
/dev/vda1        20G  2.9G   16G  16% /
tmpfs           482M     0  482M   0% /tmp
tmpfs            97M     0   97M   0% /run/user/0
21. Run the following command to view the cloud disk information of the instance
[root@iZ23wv7v5ggZ ~]#  fdisk -lu
Disk /dev/vda: 20 GiB, 21474836480 bytes, 41943040 sectors
Units: sectors of 1 * 512 = 512 bytes
Sector size (logical/physical): 512 bytes / 512 bytes
I/O size (minimum/optimal): 512 bytes / 512 bytes
Disklabel type: dos
Disk identifier: 0x51cf5d51

Device     Boot Start      End  Sectors Size Id Type
/dev/vda1  *     2048 41943039 41940992  20G 83 Linux


Disk /dev/vdb: 40 GiB, 42949672960 bytes, 83886080 sectors
Units: sectors of 1 * 512 = 512 bytes
Sector size (logical/physical): 512 bytes / 512 bytes
I/O size (minimum/optimal): 512 bytes / 512 bytes
Disklabel type: dos
Disk identifier: 0xc0ac4089

Device     Boot Start      End  Sectors Size Id Type
/dev/vdb1        2048 83886079 83884032  40G 83 Linux
[root@iZ23wv7v5ggZ ~]#
22. Run the following command to query the UUID information of the cloud disk.
[root@iZ23wv7v5ggZ ~]# blkid
/dev/vda1: UUID="3bda0135-1a08-4c3e-8216-e07c05dd073a" BLOCK_SIZE="4096" TYPE="ext4" PARTUUID="51cf5d51-01"
/dev/vdb1: UUID="0feecc5e-62d8-4282-98b3-cdc8ecf51952" BLOCK_SIZE="4096" TYPE="ext4" PARTUUID="c0ac4089-01"
[root@iZ23wv7v5ggZ ~]#
23. Run the following commands to create the mount points of the data disk respectively. Create the mount point of /dev/vdb1 /data
[root@iZ23wv7v5ggZ /]# mkdir /data
24. Add mount information to the fstab file. Run the following command to edit fstab. Add the following mount information. The results are shown below. as shown in Figure 16
[root@iZ23wv7v5ggZ /]# vi /etc/fstab
[root@iZ23wv7v5ggZ /]# cat /etc/fstab

#
# /etc/fstab
# Created by anaconda on Thu May 25 04:02:20 2023
#
# Accessible filesystems, by reference, are maintained under '/dev/disk/'.
# See man pages fstab(5), findfs(8), mount(8) and/or blkid(8) for more info.
#
# After editing this file, run 'systemctl daemon-reload' to update systemd
# units generated from this file.
#
UUID=3bda0135-1a08-4c3e-8216-e07c05dd073a /                       ext4    defaults        1 1
UUID=0feecc5e-62d8-4282-98b3-cdc8ecf51952   /data     ext4    defaults     0   0
[root@iZ23wv7v5ggZ /]#
25. Run the following command to mount the file system of the data disk partition. Mount /dev/vdb1
[root@iZ23wv7v5ggZ /]# mount /dev/vdb1 /data
26. Run the following command to check the mount result.
[root@iZ23wv7v5ggZ /]# df -h
Filesystem      Size  Used Avail Use% Mounted on
devtmpfs        464M     0  464M   0% /dev
tmpfs           482M     0  482M   0% /dev/shm
tmpfs           482M  440K  481M   1% /run
tmpfs           482M     0  482M   0% /sys/fs/cgroup
/dev/vda1        20G  2.9G   16G  16% /
tmpfs           482M     0  482M   0% /tmp
tmpfs            97M     0   97M   0% /run/user/0
/dev/vdb1        40G   24G   14G  65% /data
[root@iZ23wv7v5ggZ /]#
27. After the configuration is completed, restart the ECS instance, check the mount result again, and the system will automatically mount the data disk.
[root@iZ23wv7v5ggZ ~]# df -h
Filesystem      Size  Used Avail Use% Mounted on
devtmpfs        464M     0  464M   0% /dev
tmpfs           482M     0  482M   0% /dev/shm
tmpfs           482M  436K  481M   1% /run
tmpfs           482M     0  482M   0% /sys/fs/cgroup
/dev/vda1        20G  2.9G   16G  16% /
tmpfs           482M     0  482M   0% /tmp
/dev/vdb1        40G   24G   14G  65% /data
tmpfs            97M     0   97M   0% /run/user/0
[root@iZ23wv7v5ggZ ~]#
28. Go to the /etc/yum.repos.d/ directory to view the yum source, in line with expectations
[root@iZ23wv7v5ggZ ~]# cd /etc/yum.repos.d/
[root@iZ23wv7v5ggZ yum.repos.d]# ls -l
total 20
-rw-r--r-- 1 root root 1475 May 25 12:15 AliYun.repo
-rw-r--r-- 1 root root  703 Jun 10  2022 epel-modular.repo
-rw-r--r-- 1 root root  664 Jun 10  2022 epel.repo
-rw-r--r-- 1 root root  781 Jun 10  2022 epel-testing-modular.repo
-rw-r--r-- 1 root root  742 Jun 10  2022 epel-testing.repo
[root@iZ23wv7v5ggZ yum.repos.d]#
Linux Server Operations, Deployment & Production Troubleshooting
If your website or backend service runs on a Linux server and you are facing unstable access, Nginx configuration issues, MySQL / Redis errors, Docker service failures, full disk usage, or high CPU / memory usage, feel free to contact me for remote troubleshooting.
Ideal For:
✅ Website downtime or unstable access
✅ Nginx / PHP-FPM configuration issues
✅ MySQL / Redis performance or connection problems
✅ Docker service deployment and maintenance
✅ Server migration and environment setup
✅ CPU / memory / disk usage investigation
What I Offer:
✅ Linux environment inspection
✅ Website migration and deployment
✅ Nginx / PHP-FPM / MySQL / Redis troubleshooting
✅ Docker configuration and maintenance
✅ Server performance analysis
✅ Long-term remote operations support
Please contact me and mention: Linux Operations Consultation.
Contact Me:
Telegram: @shuijingwan
WeChat: 13980074657
Email: shuijingwanwq@gmail.com
Leave a Reply