Implementation Process of SSL Support for Virtual Hosts Configuring Apache under 64-bit CentOS 6.5
1. Introduction to SSL certificate installation environment:
Operating system: CentOS 6.5 64-bit
apache2.2.15
Wotong Free SSL Certificate
2. Network environment requirements
http://api.ygt.cmIt can be accessed normally through the external network
3. Obtain an SSL certificate
After successfully applying for a certificate in Wotong, you will get a compressed file with a password, enter the certificate password and decompress it to get five files, as shown in Figure 0:
for apache, for iis, for nginx, for other server, for tomcat,
This is several formats of the certificate, and a certificate in For Apache format needs to be used on Apache. as shown in Figure 1

Figure 1: This is several formats of the certificate, and a certificate in For Apache format needs to be used on Apache
4. Unzip the certificate file
Unzip the for apache file to see 3 files. Including public key, private key, certificate chain, as shown in Figure 2

Figure 2: Unzip the for Apache file to see 3 files. Including public key, private key, certificate chain
5. Find the ssl.conf file in the conf.d directory in the apache installation directory. If not, apache does not compile the ssl module, and you need to reinstall mos_ssl.
6. Run: yum install mod_sll, as shown in Figure 3

Figure 3: Run: yum install mod_sll
7. Upload 3 files to the api.ygt.cm directory through FTP, as shown in Figure 4.0

Figure 4.0: Upload 3 files through FTP to the api.ygt.cm directory
7.1, copy 3 files to the corresponding directory of /etc/httpd/, as shown in Figure 5

Figure 5: Copy 3 files to the corresponding directory of /etc/httpd/
7.2. Open the ssl.conf file in the conf.d directory in the apache installation directory
Find the following configuration statements in the configuration file:
Modify the encryption protocol as follows, as shown in Figure 4
sslprotocol all -sslv2 -sslv3

Figure 4: SSLProtocol ALL -sslv2 -sslv3
7.3. Configure the public key of the server certificate to this path, as shown in Figure 6
sslcertificatefile /etc/httpd/conf/ssl.crt/api.ygt.cm.crt Certificate public key

Figure 6: Certificate Public Key
7.4. Configure the private key of the server certificate to this path
SSLCertificateKeyFile /etc/httpd/conf/ssl.key/api.ygt.cm.key Certificate private key
7.5. Configure the server certificate chain to this path
SSLCertificateChainFile /etc/httpd/conf/ssl.crt/api.ygt.cm.root_bundle.crt Certificate chain
7.6, edit /ect/httpd/conf.d/ssl.conf, in the virtual host, as shown in Figure 7
First, all configurations between comments
# <virtualhost _default_:443>
# </virtualhost>

Figure 7: Annotate all configurations between VirtualHost
7.7. Configure the virtual host, and make corresponding settings based on the original default virtual host configuration, as shown in Figure 7.1

Figure 7.1: Configure the virtual host, make corresponding settings based on the original default virtual host configuration
8. Service httpd restart, restart the apache server
9. Restart error:
Starting httpd: httpd: could not reliably determine the serverS fully efficient domain name, using 10.171.221.184 for servername
as shown in Figure 8

Figure 8: Restart error: Starting httpd: httpd: could not reliably determine the servers fully qualitified domain name
10. Edit the httpd.conf file, as shown in Figure 9
Find #servernamewww.example.com:80Modified to: servernamewww.ygt.cm:80

Figure 9: Find #ServerNamewww.example.com:80Modified to: servernamewww.ygt.cm:80
11. Restart and restart the Apache server, start Httpd: httpd: could not reliably determine the servers Fully qualified domain name, using 10.171.221.184 for servername error disappears;
As shown in Figure 9.1

Figure 9.1: Using 10.171.221.184 for servername error disappears
12. There is also this error:
[Mon Aug 31 15:15:25 2015][warn]Virtualhost 121.40.99.104:443 Overlaps with virtualhost 121.40.99.104:443, the first has Precedence, perhaps you need a nameVirtualhost directive
As shown in Figure 10

Figure 10: The first has precedence, perhaps you need a nameVirtualhost directive
13. Edit /etc/httpd/httpd.conf
NameVirtualHost Server Public IP:80

Figure 10.1: NameVirtualHost Server public network IP: 80
14. Restart apache, no error is reported, as shown in Figure 11

Figure 11: Restart apache, no error is reported
15. Check the web page and find that the interface URL already supports HTTPS, as shown in Figure 12, 12.1
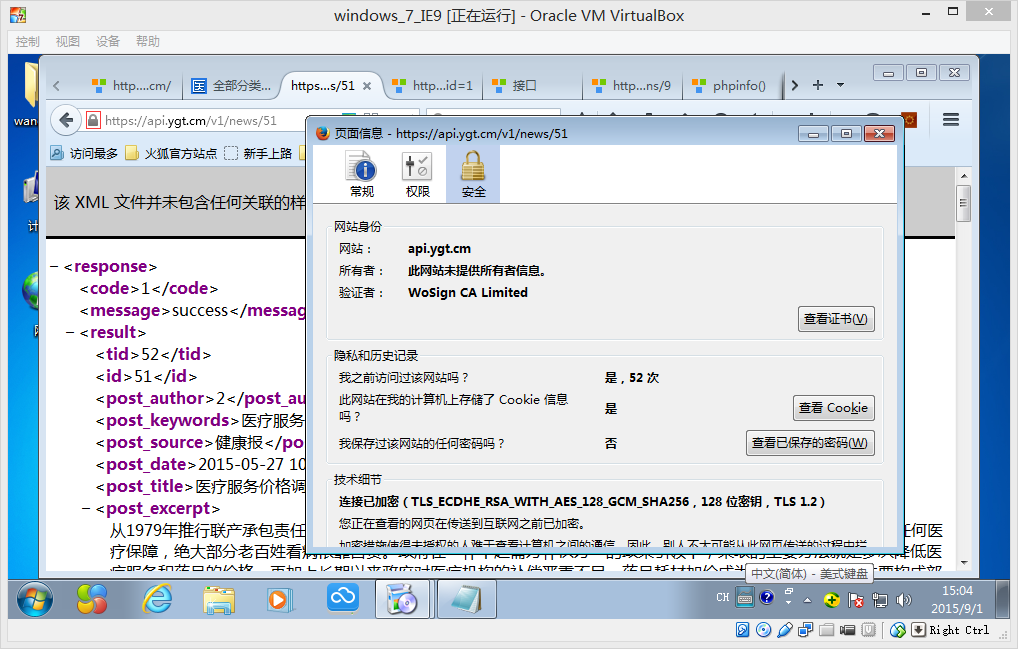
Figure 12: View SSL certificate information

Figure 12.1: Certificate Viewer, SSL Client Certificate