Windows 8.1 64-bit installation and configuration Apache 2.2.25+mysql-5.5.28+php-5.3.5+phpmyadmin-4.2.9.1 server environment detailed process!
First, the installation steps of Apache are as follows:
1. Prepare the installation file of apache.
Its download address is:http://mirrors.hust.edu.cn/apache/httpd/binaries/win32/,其文件名称为:httpd-2.2.25-win32-x86-no_ssl.msi。其中2.2.25表示Apache服务器的版本号;win32-x86表示此安装文件是专门为Windows操作系统提供的;no_ssl表示此安装文件不支持安全套接层协议SSL。
2. Double-click the installation file “httpd-2.2.25-win32-x86-no_ssl.msi” to start the installation, as shown in the picture apache-1.
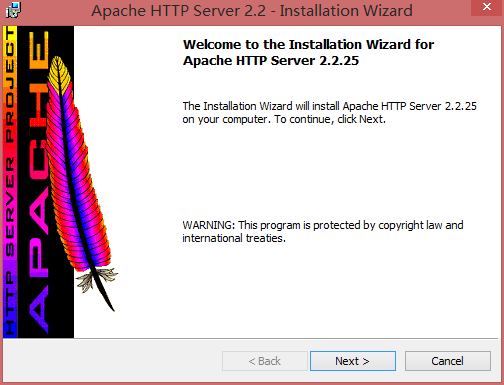
Figure Apache-1 Apache welcome interface
3. Click the “Next” button in the welcome interface to start the next step, as shown in the picture Apache-2.

Figure Apache-2 Apache license agreement interface
4. Select the “I accept the terms in the License Agreement” radio button, and then click the “Next” button to start the next step, as shown in the picture Apache-3.

Figure Apache-3 Apache readme description interface
5. The main contents of Apache’s self-report description include the source, development history and update log of Apache. Click the “Next” button to start the next step, as shown in the picture Apache-4.

Figure Apache-4 Apache configuration interface
6. Fill in the network domain name, URL and administrator’s email address of the Apache server, and then select “For all users, on port 80, as a service — Recommended.” radio button, indicating that all users can run the Apache server on the server mode on port 80. After all the options are set, click the “Next” button to start the next step, as shown in the picture apache-5.

Figure Apache-5 Apache installation method selection interface
7. Select the “Typical” radio button, which means to use the classic method to install. This option is suitable for most users. Select the “Custom” radio button to indicate a custom installation. This option is suitable for users who are familiar with the Apache server. Click “Next” to start the next step, as shown in the picture Apache-6.

Figure Apache-6 Apache installation path selection interface
8. The default installation path of the Apache server is shown in the figure Apache-6. If you want to change to another path, you can click the “Change” button to set a new path. Here we use the default installation path, click the “Next” button to start the next step, as shown in the picture Apache-7.

Figure Apache-7 Apache installation interface
9. After confirming all the installation steps, click the “Install” button to install. The next step is shown in the picture Apache-8.

Figure Apache-8 installation completed
10. After the installation is complete, open the browser and enter “http://localhost:80”或者“http://127.0.0.1:80”,然后按“Enter”键,如果浏览器上的输出为“ItWorks!”, as shown in Figure Apache-9, this means that the Apache server has been successfully installed.

Figure Apache-9
Second, install PHP 5.3.5
1. Prepare the installation file of PHP5.3.5. Its download address is:http://windows.php.net/downloads/releases/archives/,其文件名称为:php-5.3.5-Win32-VC6-x86.zip
2. Extract the php binary compressed package into the directory “c:\php-5.3.5” and in “c:\php-5.3” Find the file “php.ini-production” under .5″ and change the file name to “php.ini”.
3. Configure php and modify the configuration information in php.ini. The content that needs to be configured includes the following parts.
(1) Find
; extension_dir = “ext”
Modified to:
extension_dir = “c:/php-5.3.5/ext”
(2) Modify the configuration information so that PHP can directly call other modules, and find similar to
;extension=
The way to load the module is to remove the semicolon in front of the module to be loaded (;). For example, if you want to use the mysql module, you need to remove the semicolon in front of extension=php_mysql.dll.
4. Configure the session function of php
When using the session function, we must configure the save directory of the session file on the server, otherwise we cannot use the session, we need to Create a new readable directory folder on 8.1, this directory is preferably independent of the web main program directory, here I have created the phpsessiontmp directory on the root directory of the d drive, and then finds it in the php.ini configuration file
;session.save_path = “/tmp”
Modified to:
session.save_path = “D:/phpsessiontmp”
5. Configure the file upload function of PHP
Like Session, when using the PHP file upload function, we must specify a temporary folder to complete the file upload function, otherwise the file upload function will fail, and we still need to Create a readable and write directory folder on 8.1, here I have created the phpuploadtmp directory on the root directory of the d drive, and then find it in the php.ini configuration file
;upload_tmp_dir =
Modified to:
upload_tmp_dir = d:/phpuploadtmp
6. Modify date.timezone and find
;date.timezone =
Modified to:
Date.TimeZone = Asia/Shanghai
7. Modify the system environment variable, the purpose is to make the system find the file path of the php module file “c:\php-5.3.5\e” XT”, the specific steps are as follows: right-click on “This Computer”, select the “Properties” command in the pop-up shortcut menu, and then select “Advanced System” “Settings”, click the “Environment Variables” button, find the “Path” variable under “System Variables”, click the “Edit” option, and “;C:\php- 5.3.5;C:\php-5.3.5\ext” is added to the back of the original value, as shown in PHP-1 in Figure, and then click the “OK” button.

Figure php-1 Modify system environment variables
3. Integrate PHP and Apache
PHP can be executed as a module of the Apache Web server, making it more efficient than ordinary CGI programs, and can execute dynamic web pages faster than CGI or Perl. The specific steps to combine PHP with Apache server in Module mode are as follows.
1. First, make PHP into the Apache server, in “C:\Program Files (x86)\Apache Software Find the configuration file named “httpd.conf” in the path of foundation\apache2.2\conf”, then open the httpd.conf file and add “loadmodule php5_module “C:/php-5.3.5/php5apache2_2.dll”” line, its meaning refers to loading php in a module. The added result is shown in the picture apache-php-1.

Figure apache-php-1 Modify the loadmodule of the httpd.conf file
2. In the httpd.conf file, add “addType application/x-httpd-php .php” and “addtype application/x-httpd-php .html” two lines, you can also add more, the essence is to add file types that can execute php. The added result is shown in the figure apache-php-2.

Figure apache-php-2 modify the addType of the httpd.conf file
3. In the httpd.conf file, add a line of code like “phpinidir “c:/php-5.3.5”, the purpose is to specify the path of the php.ini file for the apache server. The added result is shown in the figure apache-php-3.

Figure apache-php-3 modify the phpinidir of the httpd.conf file
4. The default Apache server executes the web main program directory is “C:\Program Files (x86)\Apache Software foundation\apache2.2\htdocs”, so when your web main program directory is changed to “e:\wwwroot”, we need to modify the corresponding apache configuration, that is,
# documentRoot “C:/program files (x86)/apache software foundation/apache2.2/htdocs”
Modified to:
documentroot “e:/wwwroot”
Seek
# <directory “C:/Program Files (x86)/Apache Software Foundation/Apache2.2/HTDocs”>
Modified to:
<directory “e:/wwwroot”>
5. Modify the specific index file order, find
DirectoryIndex index.html
Modified to:
DirectoryIndex index.html index.php
6. After modifying httpd.conf, restart the apache server to support php. Let’s test whether the php installation is successful, create a new test file named “phpinfo.php” and put the file in the “e:\wwwroot” directory, the code is as follows:
<?php
phpinfo();
?>
When you see the browser displayed on the page shown in the picture apache-php-4, it proves that the php installation environment configuration is successful.

Figure apache-php-4 php related information
Fourth, install MySQL 5.5.28
Prepare the mysql installation file, the download address is:http://dev.mysql.com/downloads/file.php?id=409777,下载名称为:mysql-5.5.28-winx64.msi。
2. Start the mysql installer, as shown in the figure mysql-1.

Figure mysql-1 start mysql installation
3. Click the “Next” button to start the next step, as shown in the picture mysql-2.

Figure mysql-2 mysql license agreement interface
4. Click the “Next” button to enter the selection mode installation interface, as shown in the figure mysql-3, where “typical” means a typical installation, and the typical installation provides running mysq Most of the functions of l; “complete” means a complete installation, and a complete installation will install all optional components; “custom” means a custom installation, that is, the user can install it by himself. Here I chose the full installation.

Figure mysql-3 mode installation interface
5. Click the “Next” button to enter the preparation installation interface, as shown in the picture MySQL-4. In this interface, you should confirm the previously selected installation mode and installation path.

Figure MYSQL-4 Prepare the installation interface
6. Click the “Install” button to start the installation. After the installation is complete, as shown in the figure MySQL-5, ask if you need to configure the MySQL server now.

Figure mysql-5 installation completion interface
7. Click the “Finish” button to complete the installation of MySQL, and then prepare to configure MySQL 5.5.28.
8. The corresponding information screenshots will appear continuously, just click the “Next” button, as shown in the picture MySQL-6 and MySQL-7.

Figure mysql-6 corresponding information interface

Figure MYSQL-7 Corresponding information interface
9. As shown in MySQL-8 in Figure, it means that the MySQL configuration wizard has been started.

Figure mysql-8 to start the configuration wizard of mysql
10. Click the “Next” button to enter the selection configuration type interface, as shown in the figure mysql-9, where the “Detailed configuration” option indicates the detailed configuration; “Standard The configuration” option represents the standard configuration, and here I choose the detailed configuration.

Figure mysql-9 configuration type interface
11. Click the “Next” button to enter the selection server type configuration interface, as shown in the figure MySQL-10, among which “Developer machine” means that the MySQL server is configured to use the least system resources when multiple desktop applications are running in the system; “Server Machine” means that the MySQL server is configured to use the appropriate proportion of system resources; Server Machine” means that the MySQL server is configured to use all available system resources.

Figure mysql-10 server type configuration interface
12. Click the “Next” button to enter the database user interface, as shown in the MySQL-11 in the figure. In this interface, you can choose whether to use the InnoDB storage engine, and what proportion of server resources InnoDB occupies.

Figure mysql-11 database usage interface
13. Click the “Next” button to enter the InnoDB table space setting interface, as shown in the picture MySQL-12. If you do not want to use the default location of InnoDB tablespace files, you can choose a new path here.

Figure mysql-12 InnoDB tablespace setting interface
14. Click the “Next” button to enter the concurrent connection setting interface, as shown in the picture MySQL-13, where “Decision Support (DSS)/OLAP” can get 20 concurrent connections; “Online Transaction Processing (OLAP)” can get 500 concurrent connections; the “Manual setting” option can be customized by the user.

Figure MYSQL-13 Concurrent connection setting interface
15. Click the “Next” button to enter the network option setting interface, as shown in the MySQL-14 in the figure. The interface can enable or disable the TCP/IP network, and you can also configure the port number to connect to the MySQL server, and the default connection port number is “3306”.

Figure MYSQL-14 Network Options Settings Interface
16. Click the “Next” button to enter the character set setting interface, as shown in the figure MySQL-15. The standard character set is used to support Western languages, such as English, German, etc.; multi-language support can be used in Eastern languages, such as Chinese, Japanese, etc.

Figure MYSQL-15 character set setting interface
17. Click the “Next” button to enter the Windows option setting interface, as shown in the picture MySQL-16. The “Install as Windows Service” option indicates that MySQL is set as a service for Windows; “Include bin directory in Windows Path” means to add MySQL’s bin directory to the system path of Windows.

Figure MYSQL-16 Windows option setting interface
18. Click the “Next” button to enter the security option setting interface, as shown in the picture MySQL-17. You can set the password to log in to MySQL on this interface.

Figure MYSQL-17 Security Options Settings Interface
19. Click the “Next” button, as shown in the picture MySQL-18. Start performing the configuration of MySQL until it is complete.

Figure mysql-18 execution configuration interface
20. Test mysql5.5. After the installation and configuration of mysql5.5 are completed, you can check whether it can run normally through some tests. The steps to test whether mysql is successfully installed are: log in to mysql5, select “Start” -> “Application” -> “MySQL Command Line client”, enter the MySQL client interface, enter the password to log in to MySQL, if there is a welcome message and mysql version number and other content, it means that it has successfully connected with the mysql server. The operation result is shown in the figure MySQL-19.

Figure mysql-19 login mysql
5. Install phpmyadmin
1. Prepare the installation file and download the address:http://www.phpmyadmin.net/home_page/downloads.php,文件名:phpMyAdmin-4.2.9.1-all-languages.zip。
2. Extract phpmyadmin-4.2.9.1-all-languages.zip to “e:\wwwroot\phpmyadmin”, and then open it in the browserhttp://localhost/phpmyadmin/setup/,如图phpmyadmin-1所示;

Figure phpmyadmin-1 cannot load or save the configuration
3. According to the prompts, create a config folder under the directory “E:\wwwroot\phpmyadmin” and refresh the browser again, as shown in the figure phpmyadmin-2.

Figure phpmyadmin-2 to establish the interface after the config folder
4. Create a new server, as shown in the picture phpmyadmin-3, directly click the “Apply” button, using the default settings.

Figure phpmyadmin-3 new server
5. For the configuration file, select the default language as Simplified Chinese, as shown in the figure phpmyadmin-4, and click the “Save” button.

Figure phpmyadmin-4 profile settings
6. Copy the config.inc.php file under the directory “e:\wwwroot\phpmyadmin\config” to “e:\ww wroot\phpmyadmin\”, then delete the directory “e:\wwwroot\phpmyadmin\config” and open it in the browserhttp://localhost/phpmyadmin/,如图phpmyadmin-5所示,配置完毕。

Figure phpmyadmin-5 configuration completed