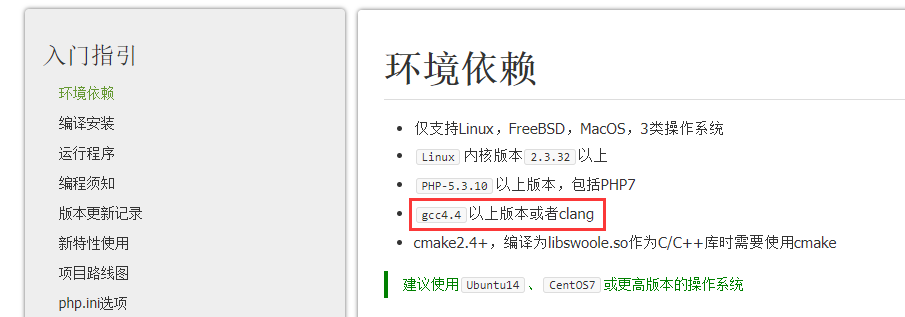
1. Open the URL: https://wiki.swoole.com/wiki/page/7.html , check the environment dependencies, as shown in Figure 1
environment dependence
Only supports Linux, FreeBSD, macOS, 3 types of operating systems
Linux kernel version 2.3.32 or above
php-5.3.10 and above, including php7
GCC4.4 or above or clang
CMake2.4+, you need to use CMake when compiling to libswoole.so as a C/C++ library
It is recommended to use Ubuntu14, CentOS7 or later operating systems
Figure 1
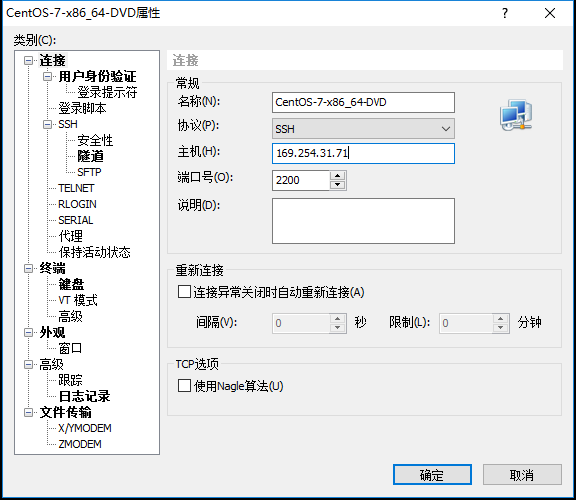
2. Set the port forwarding rules in VirtualBox to facilitate remote connection of CentOS 7 64, as shown in Figure 2
Figure 2
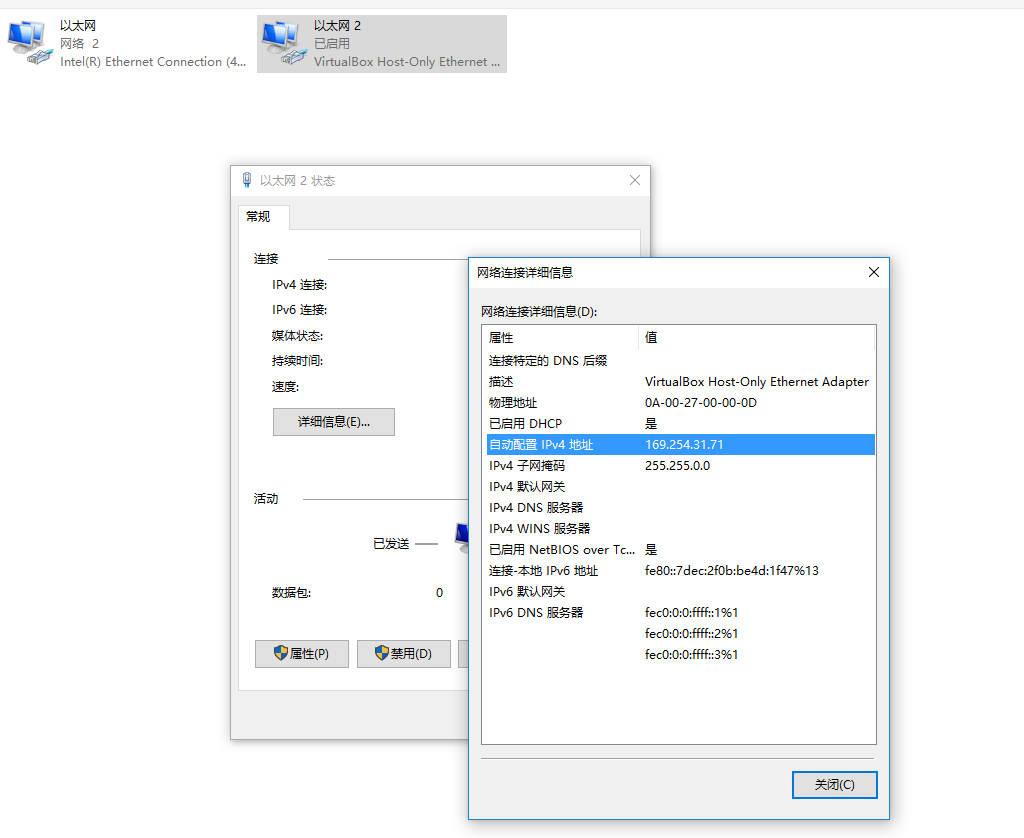
3. Check the IP address of VirtualBox, as shown in Figure 3
Figure 3
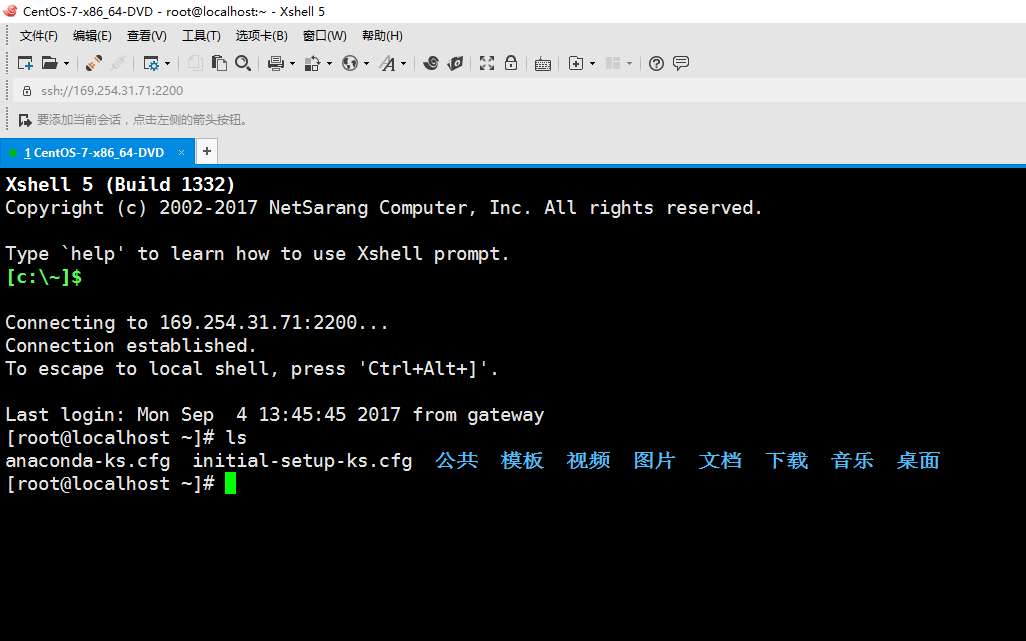
4. Connect CentOS 7 64 through Xshell 5, as shown in Figure 4
Figure 4
5. The SSH connection is successful, as shown in Figure 5
Figure 5
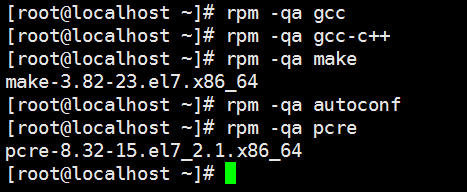
6. Environmental dependency check, check the installation of gcc, gcc-c++, make, autoconf, and pcre respectively. If it is not installed, it needs to be installed.
rpm -qa gccrpm -qa gcc-c++rpm -qa makerpm -qa autoconfrpm -qa pcreFigure 6
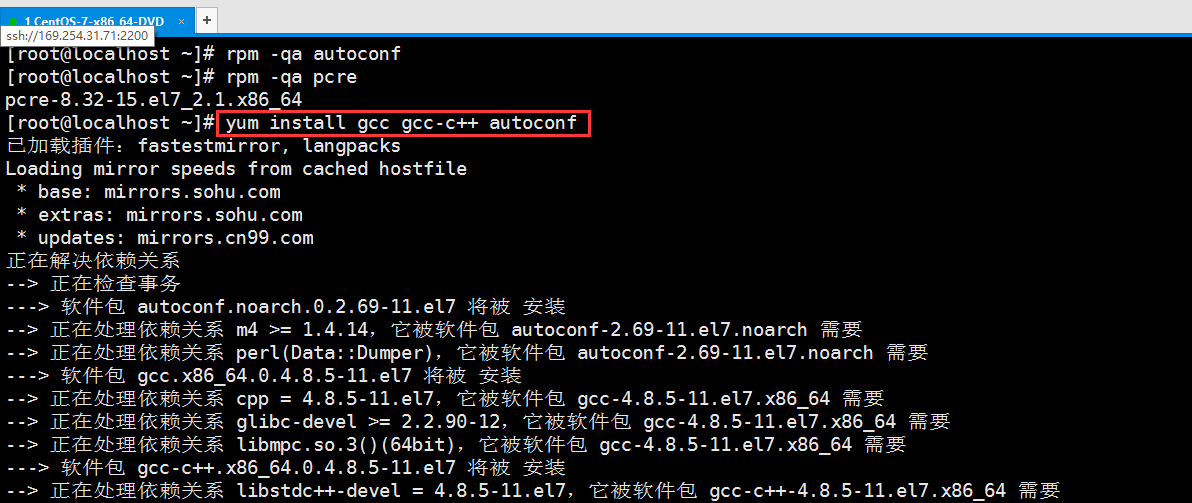
7. Install gcc, gcc-c++, autoconf, as shown in Figure 7
yum install gcc gcc-c++ autoconfFigure 7
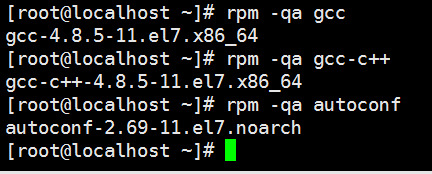
8. Check the installation of GCC, GCC-C++, and AutoConf again, all of which have been installed successfully, as shown in Figure 8
rpm -qa gccrpm -qa gcc-c++rpm -qa autoconf8
9. Before compiling and installing php7, you need to install the corresponding compilation tools and dependencies, run the following commands, as shown in Figure 9
rpm -qa libxml2 libxml2-devel openssl openssl-devel curl-devel libjpeg-devel libpng-devel freetype-devel libmcrypt-develyum -y install libxml2 libxml2-devel openssl openssl-devel curl-devel libjpeg-devel libpng-devel freetype-devel libmcrypt-develFigure 9
10. Check the installation situation, libmcrypt-devel is not installed, as shown in Figure 10
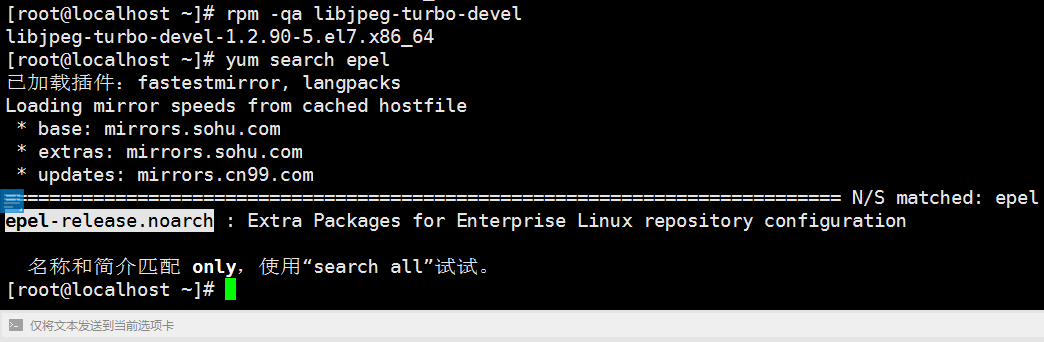
rpm -qa libxml2 libxml2-devel openssl openssl-devel curl-devel libjpeg-devel libpng-devel freetype-devel libmcrypt-develrpm -qa libcurl-develrpm -qa libjpeg-turbo-develFigure 10
11. libmcrypt-devel is not installed because: there is no available package libmcrypt-devel, as shown in Figure 11
Figure 11
12. Search EPEL related software packages, as shown in Figure 12
yum search EPELFigure 12
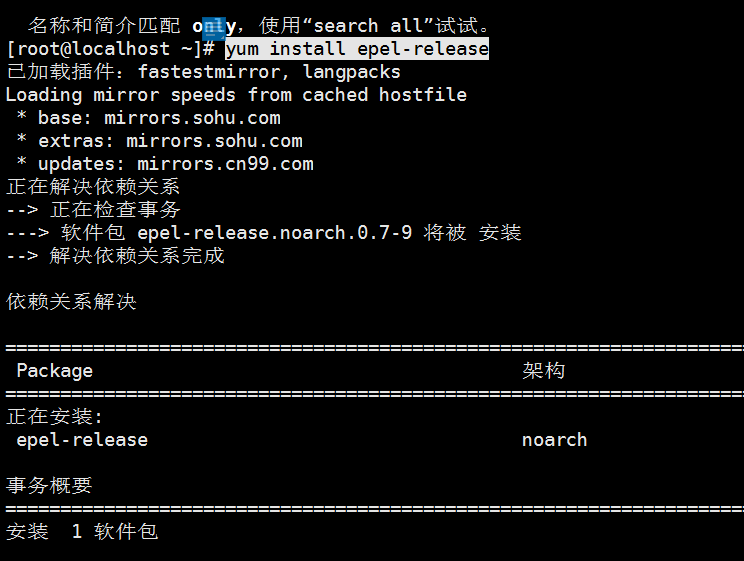
13. Install the EPEL package, as shown in Figure 13
yum install epel-releaseFigure 13
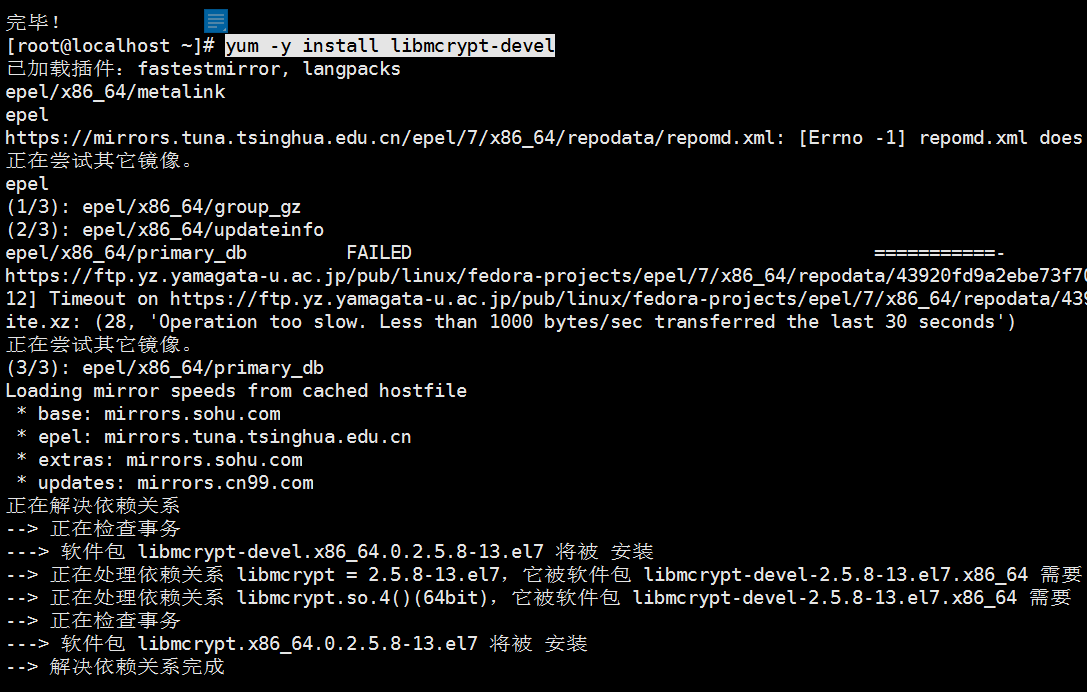
14. Install libmcrypt-devel again, as shown in Figure 14
yum -y install libmcrypt-develFigure 14
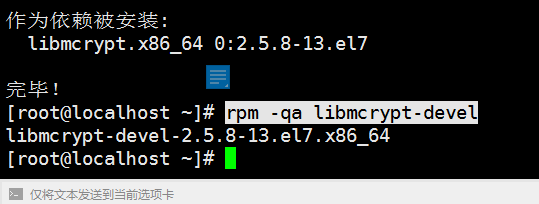
15. Check the installation situation, libmcrypt-devel has been installed, as shown in Figure 15
rpm -qa libmcrypt-develFigure 15
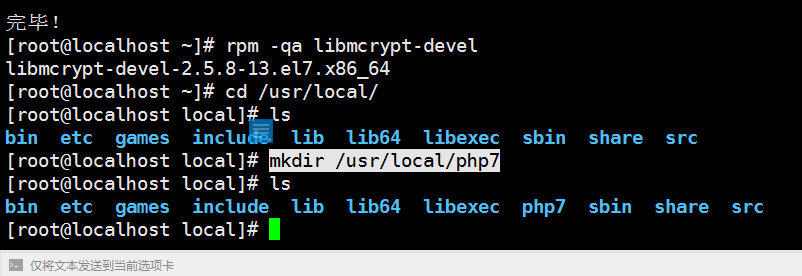
16. Reference URL: http://www.shaunfreeman.name/compiling-php-7-on-centos/, create a new directory: /usr/local/php7, as shown in Figure 16
mkdir /usr/local/php7Figure 16
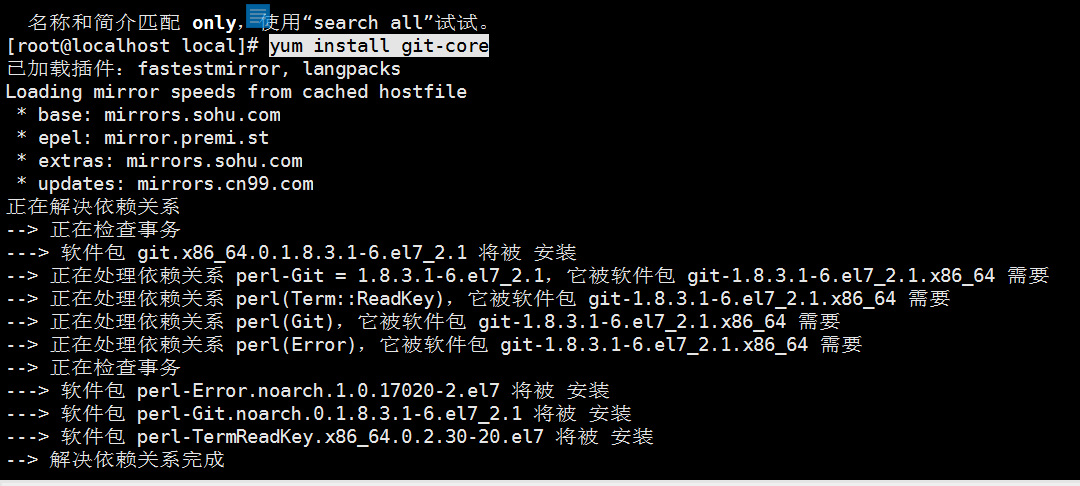
17. Install git, as shown in Figure 17
yum install git-coreFigure 17
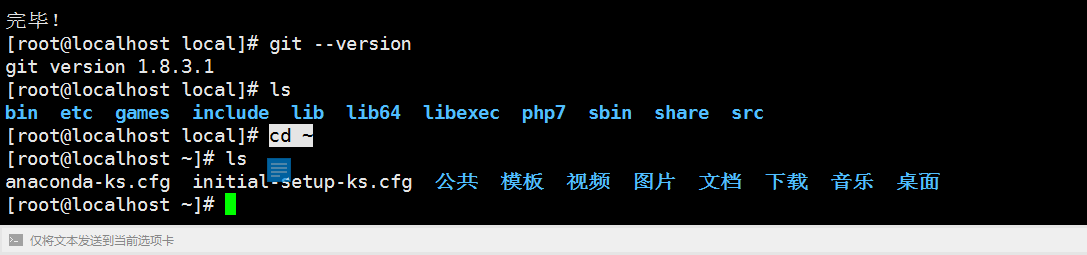
18. Enter the user home directory, as shown in Figure 18
cd ~18
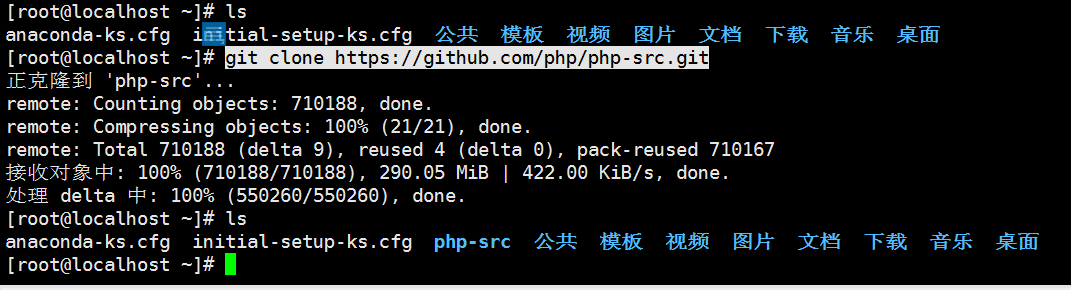
19. Get the source code from the php github repository, as shown in Figure 19
git clone https://github.com/php/php-src.gitFigure 19
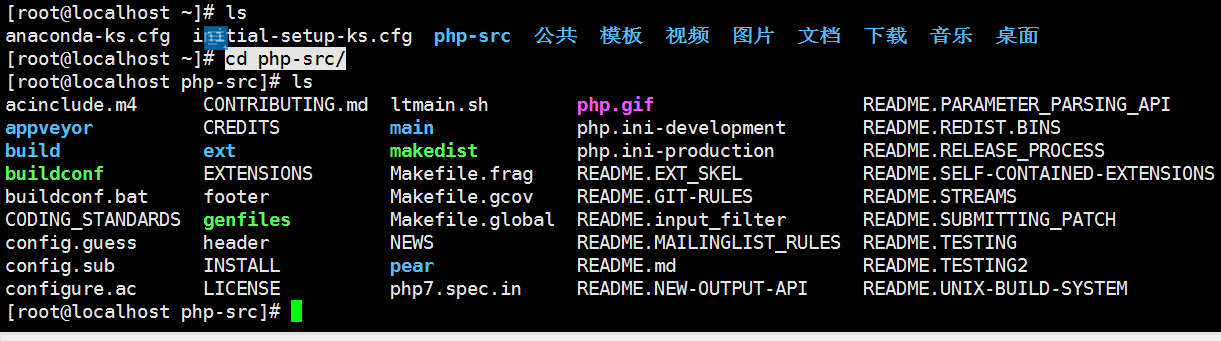
20. Enter the directory: php-src, as shown in Figure 20
cd php-src/Figure 20
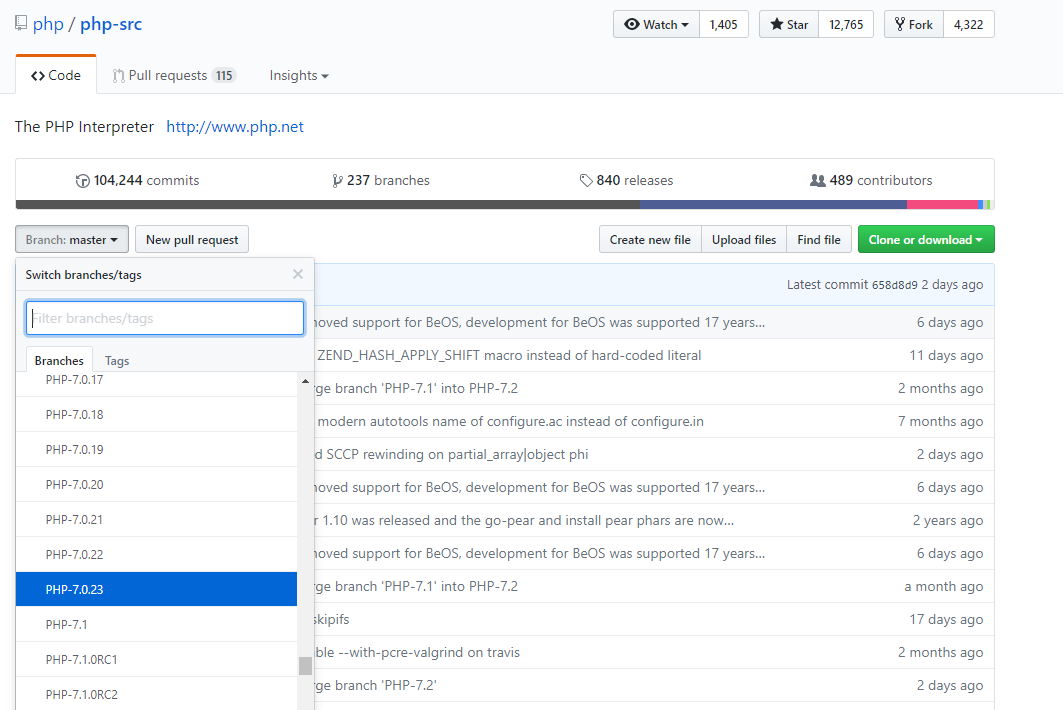
21. Open the URL: https://github.com/php/php-src , the latest branch of the current 7.0.* is 7.0.23, as shown in Figure 21
Figure 21
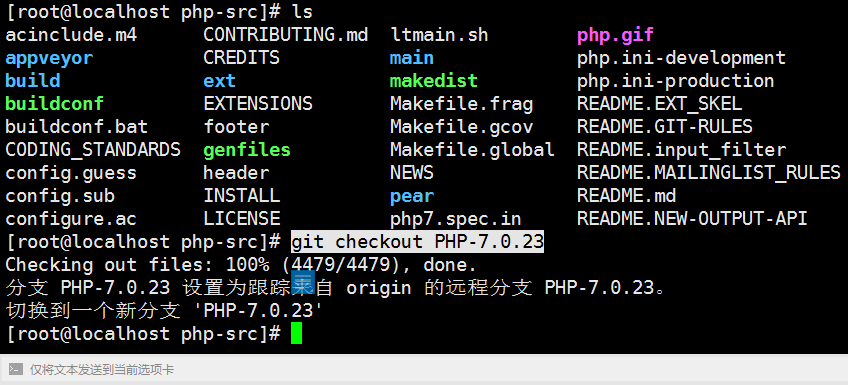
22. Switch to 7.0.23, as shown in Figure 22
Git Checkout PHP-7.0.23Figure 22
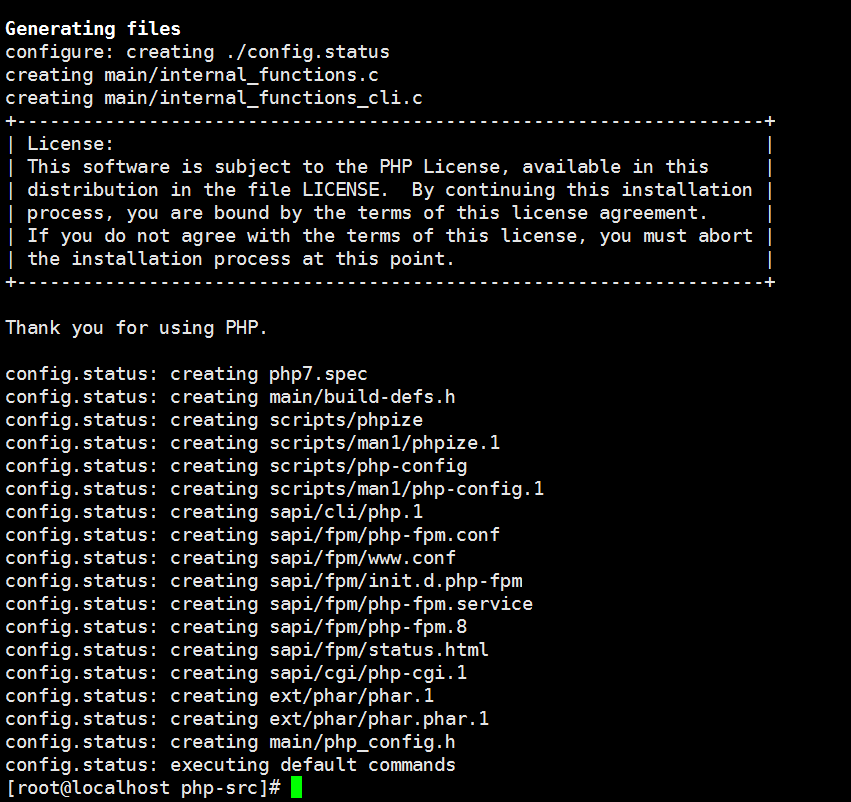
23. Generate a configuration script, as shown in Figure 23
./buildconf –forceFigure 23
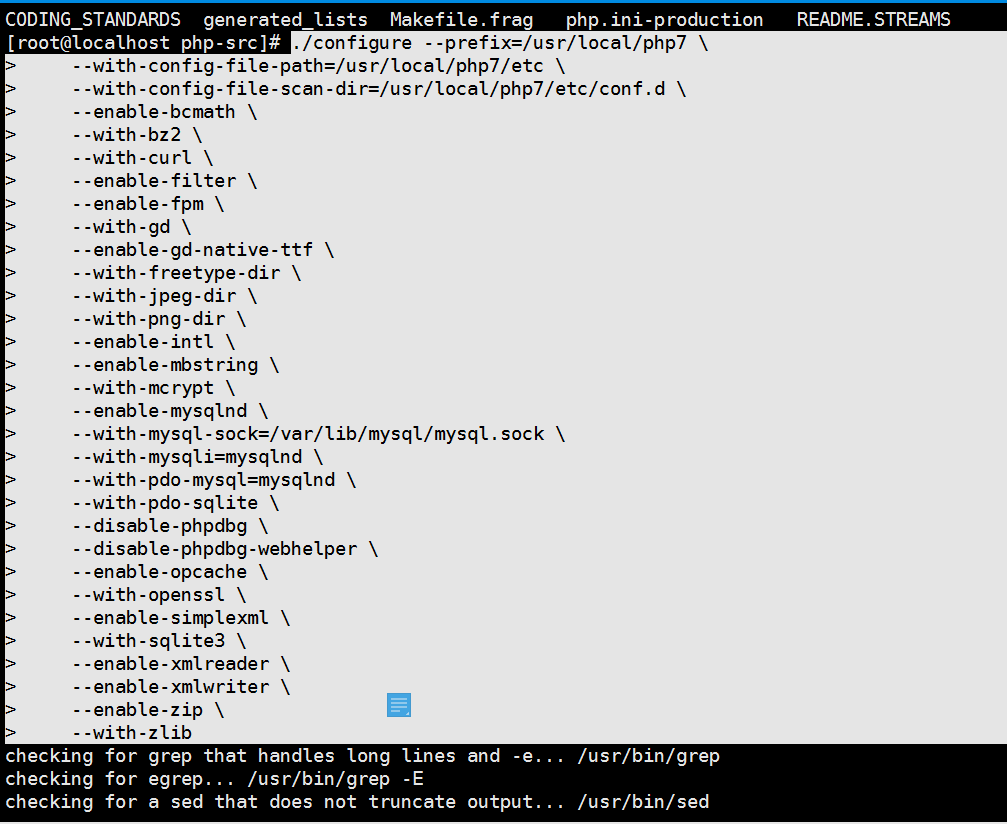
24. Use the following command to compile the configuration, as shown in Figure 24
./configure –prefix=/usr/local/php7 \ –with-config-file-path=/usr/local/php7/etc \ –with-config-file-scan-dir=/usr/local/php7/etc/conf.d \ –enable-bcmath \ –with-bz2 \ –with-curl \ –enable-filter \ –enable-fpm \ –with-gd \ –enable-gd-native-ttf \ –with-freetype-dir \ –with-jpeg-dir \ –with-png-dir \ –enable-intl \ –enable-mbstring \ –with-mcrypt \ –enable-mysqlnd \ –with-mysql-sock=/var/lib/mysql/mysql.sock \ –with-mysqli=mysqlnd \ –with-pdo-mysql=mysqlnd \ –with-pdo-sqlite \ –disable-phpdbg \ –disable-phpdbg-webhelper \ –enable-opcache \ –with-openssl \ –enable-simplXml \ –with-sqlite3 \ –enable-xmlreader \ –enable-xmlwriter \ –enable-zip \ –with-zlibFigure 24
25. Report an error, as shown in Figure 25
Configure: this Bison version is not supported for regeneration of the Zend/PHP parsers (found: none, min: 204, excluded: ).
Checking for re2c… no
configure: warning: you will need re2c 0.13.4 or later if you want to regenerate php parsers.
configure: error: bison is required to build php/zend when building a git checkout!
Figure 25
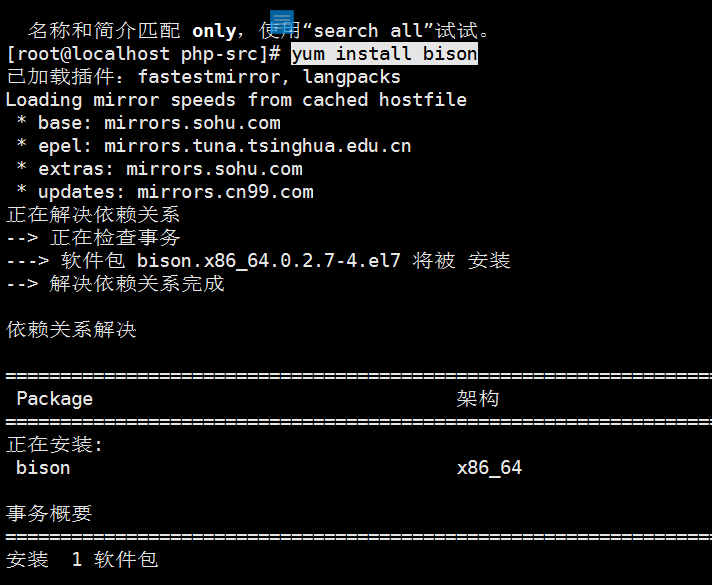
26. Install bison, as shown in Figure 26
yum install bisonFigure 26
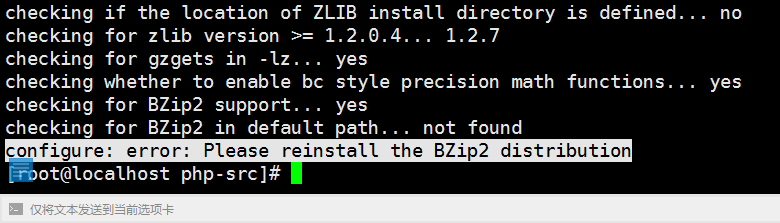
27. Compile and configure again, report an error, as shown in Figure 27
Checking for bzip2 support… yes
Checking for bzip2 in default path… not found
configure: error: please reinstall the bzip2 distribution
Figure 27
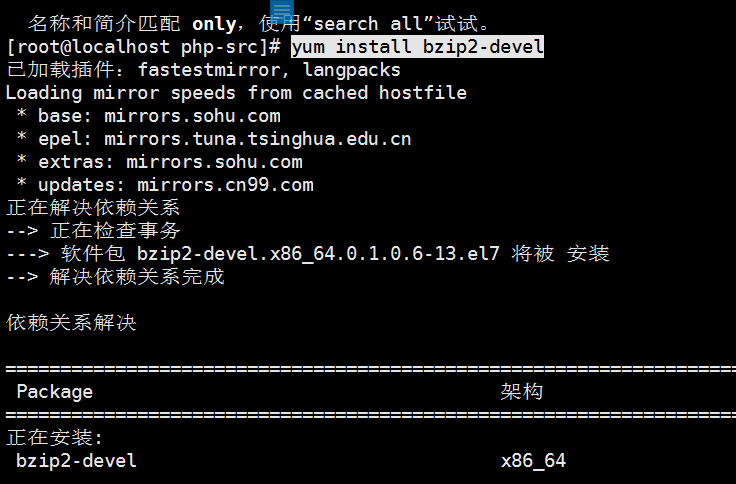
28. Install bzip2-devel, as shown in Figure 28
yum install bzip2-develFigure 28
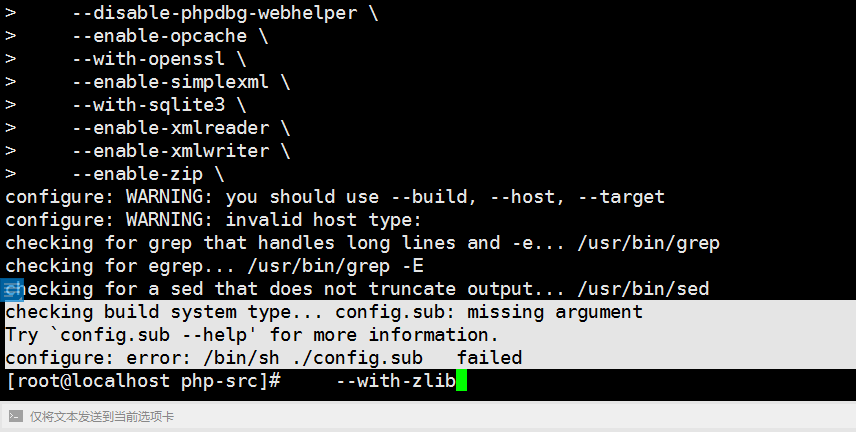
29. Compile and configure again, report an error, as shown in Figure 29
Checking build system type… config.sub: missing argument
try `config.sub –helpfor more information.
configure: error: /bin/sh ./config.sub failed
Figure 29
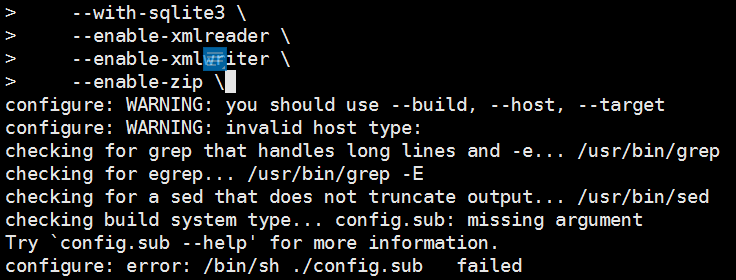
30. After checking, it is found that there is an extra space after –enable-zip \, as shown in Figure 30
Figure 30
31. Remove the space after –enable-zip\, compile and install php again, and report an error, as shown in Figure 31
Checking for ICU-config… No
Checking for location of ICU headers and libraries… not found
Configure: Unable to Detect ICU prefix or no failed. Please verify ICU install prefix and make sure ICU-config works.
Figure 31
32. Install libicu-devel, as shown in Figure 32
yum install libicu-develFigure 32
33. Compile and configure again, normal, as shown in Figure 33
Figure 33
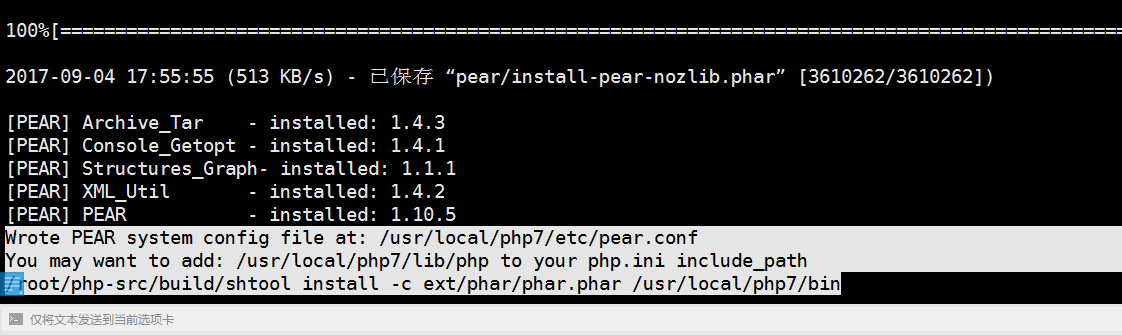
34. Formal installation and execution in sequence, as shown in Figure 34
makemake testmake installFigure 34
35. Add the ini option, as shown in Figure 35
mkdir /usr/local/php7/etc/conf.dcp ./php.ini-development /usr/local/php7/lib/php.iniFigure 35
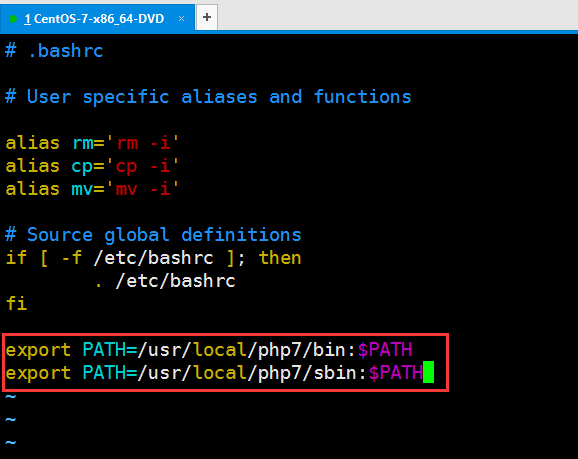
36. Add the executable directory of php to the environment variable, use vim to open ~/.bashrc, add the following content at the end: as shown in Figure 36
vim ~/.bashrcexport path=/usr/local/php7/bin:$PATHexport path=/usr/local/php7/sbin:$pathFigure 36
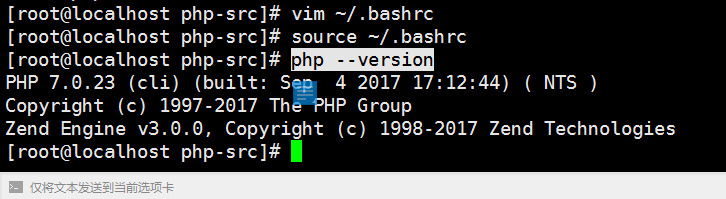
37. After saving, run the following command in the terminal: as shown in Figure 37
source ~/.bashrcFigure 37
38. Check the PHP version, as shown in Figure 38
php –version
PHP 7.0.23 (CLI) (Built: Sep 4 2017 17:12:44) (NTS)
Copyright (C) 1997-2017 The PHP Group
Zend Engine v3.0.0, Copyright (C) 1998-2017 Zend Technologies
Figure 38
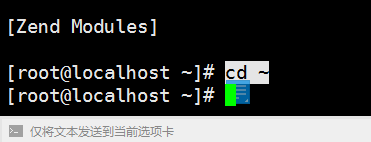
39. Enter the user home directory, as shown in Figure 39
cd ~Figure 39
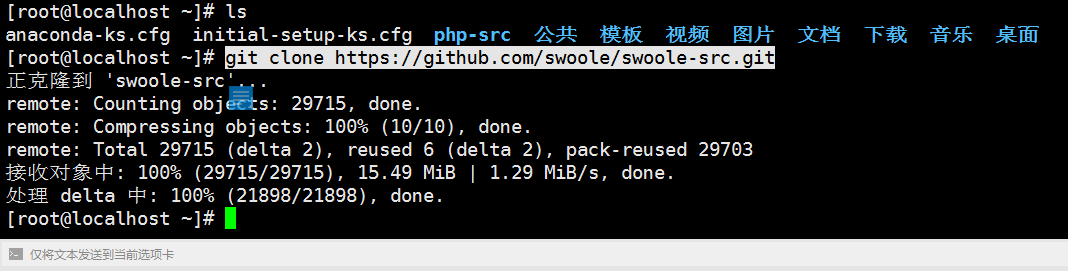
40. Get the source code from the Swoole GitHub repository, as shown in Figure 40
Git clone https://github.com/swoole/swoole-src.gitFigure 40
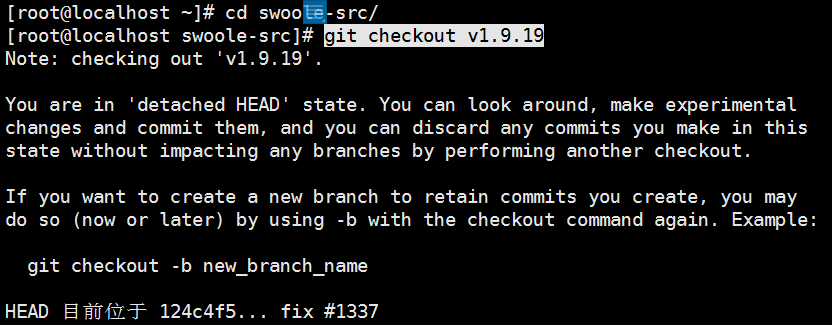
41. Enter the directory: swoole-src, as shown in Figure 41
cd swoole-src/Figure 41
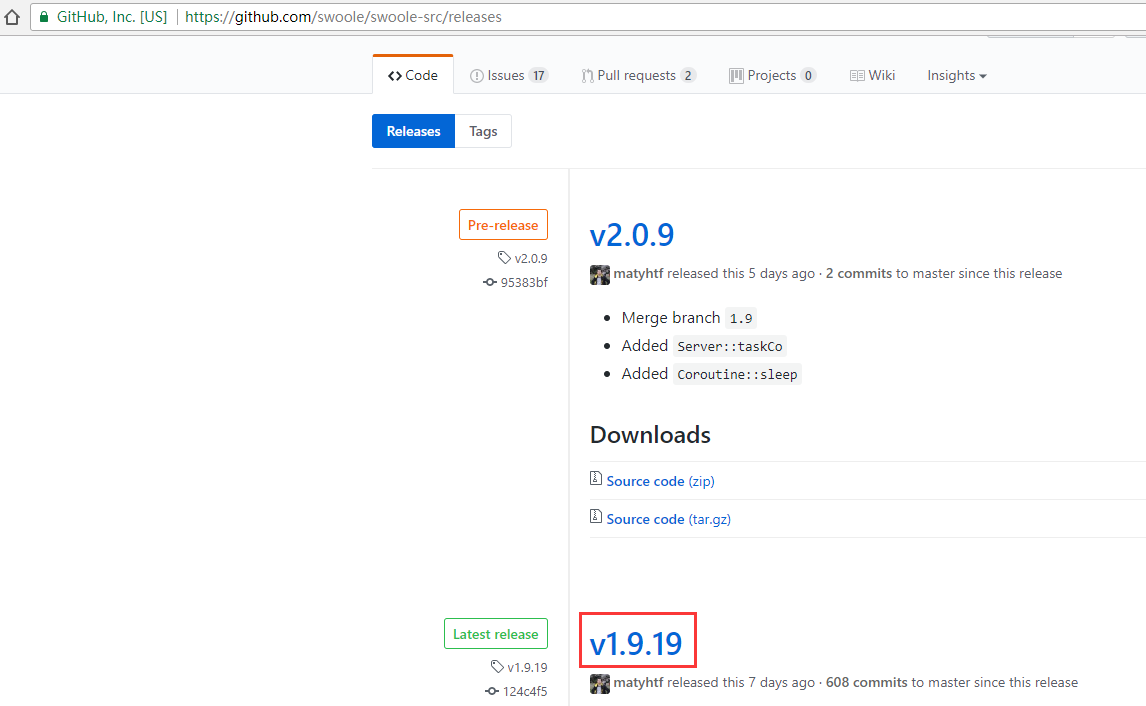
42. Open the URL: https://github.com/swoole/swoole-src/releases, the latest stable version is v1.9.19, as shown in Figure 42
Figure 42
43. Switch to V1.9.19, as shown in Figure 43
Git Checkout v1.9.19
Error: note: checking outv1.9.19.
You are indetached headState. You can look around, make experimental
Changes and commit them, and you can discard any commits you make in this
State without impacting any branches by performing another checkout.
If you want to create a new branch to retain commits you create, you may
Do so (now or later) by using -b with the checkout command again. Example:
git checkout -b new_branch_name
HEAD is currently at 124C4F5… FIX #1337
Figure 43
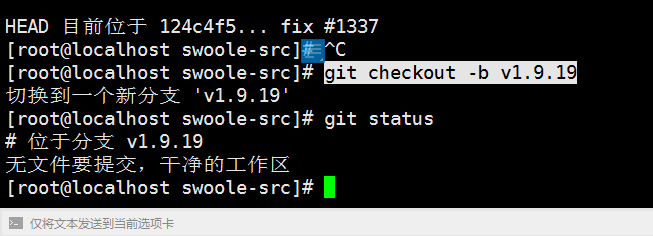
44. Switch to V1.9.19, as shown in Figure 44
git checkout -b v1.9.19Figure 44
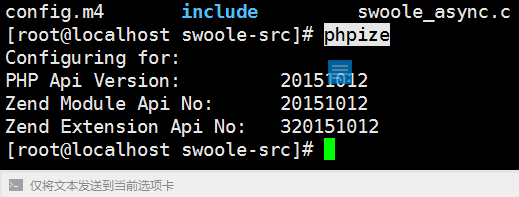
45. Use phpize to generate php compilation configuration, execute the command: as shown in Figure 45
phpizeFigure 45
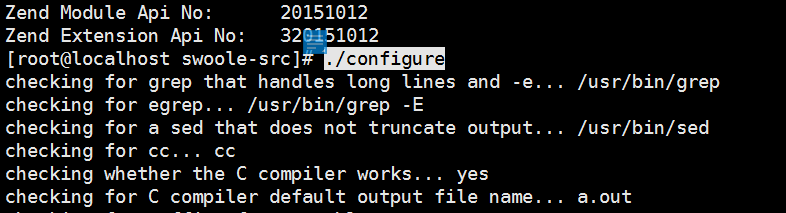
46. Use ./configure for compilation configuration detection. Swoole’s ./configure has many additional parameters, which can be viewed through the ./configure –help command. The default items are selected here, as shown in Figure 46
./configureFigure 46
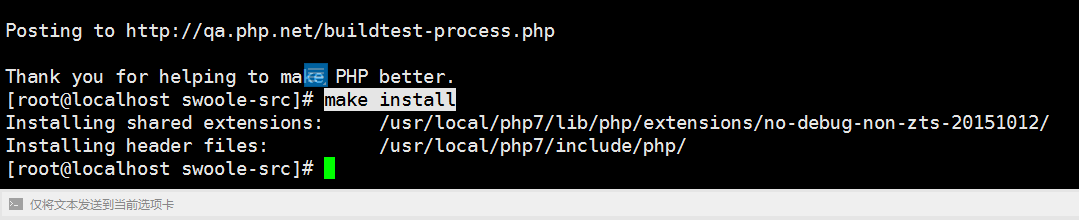
47. Compile and install, execute in sequence, as shown in Figure 47
makemake testmake installFigure 47
48. After the installation is complete, edit the /usr/local/php7/etc/conf.d/modules.ini file, as shown in Figure 48
vim /usr/local/php7/etc/conf.d/modules.iniFigure 48
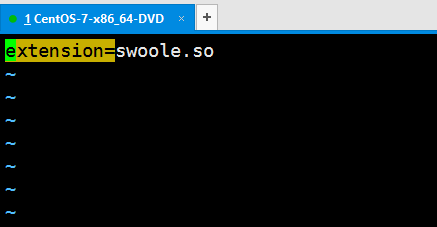
49. Add the following sentence, as shown in Figure 49
extension=swoole.soFigure 49
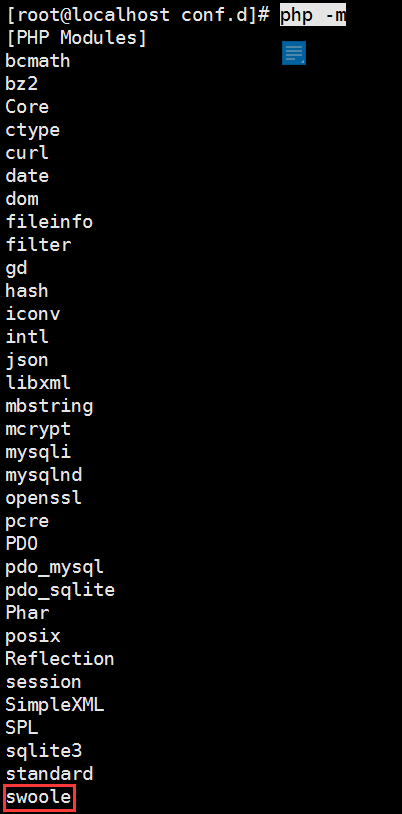
50. Enter the command php -m to view the extension installation, and see swoole in the listed extensions, indicating that the installation is successful, as shown in Figure 50
php-mFigure 50
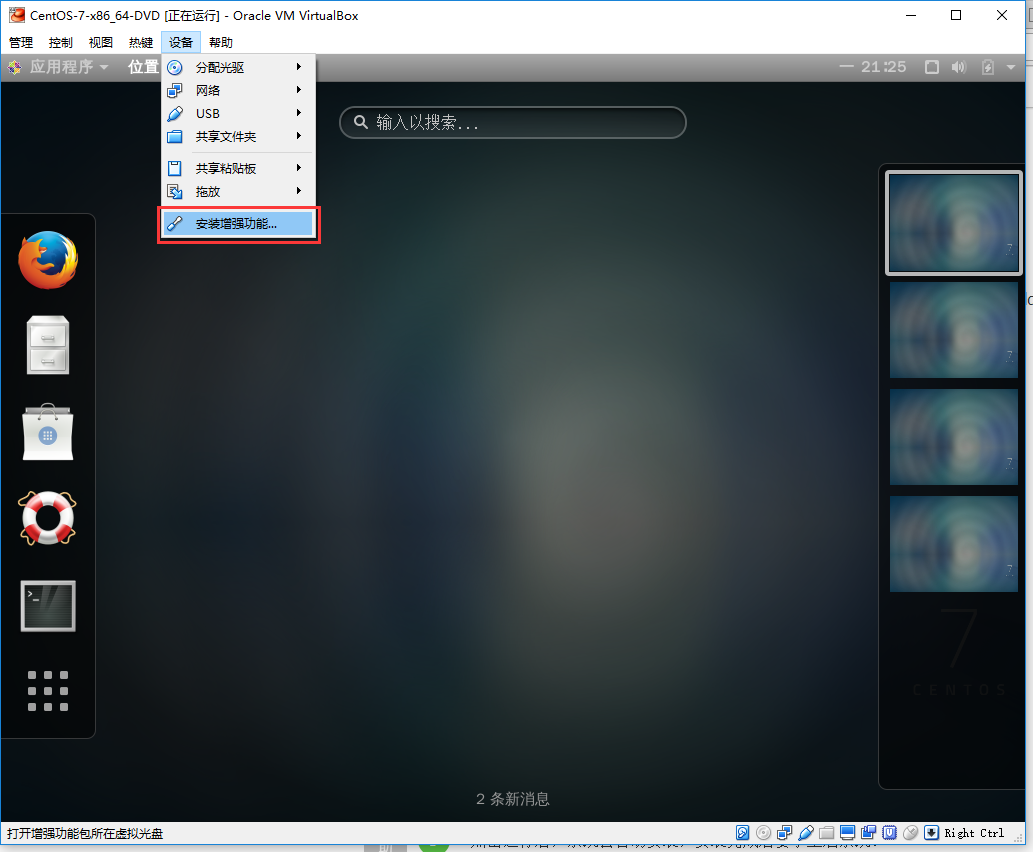
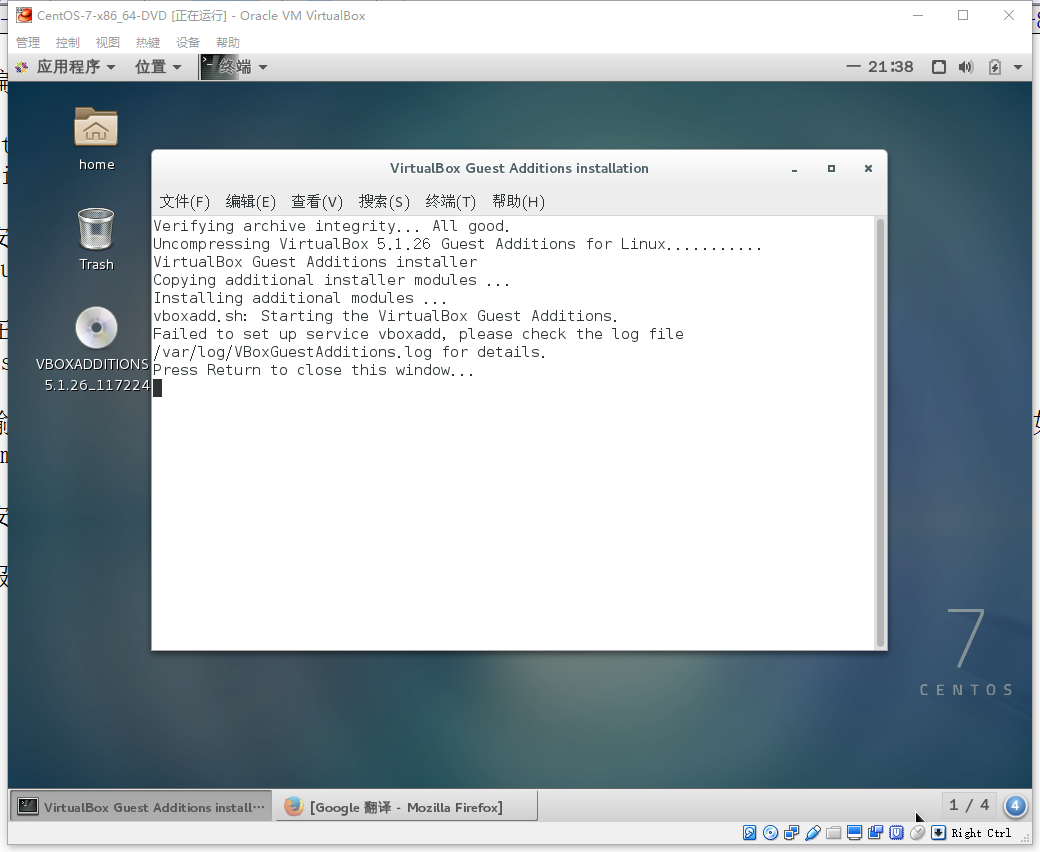
51. Install the enhancement function, as shown in Figure 51
Figure 51
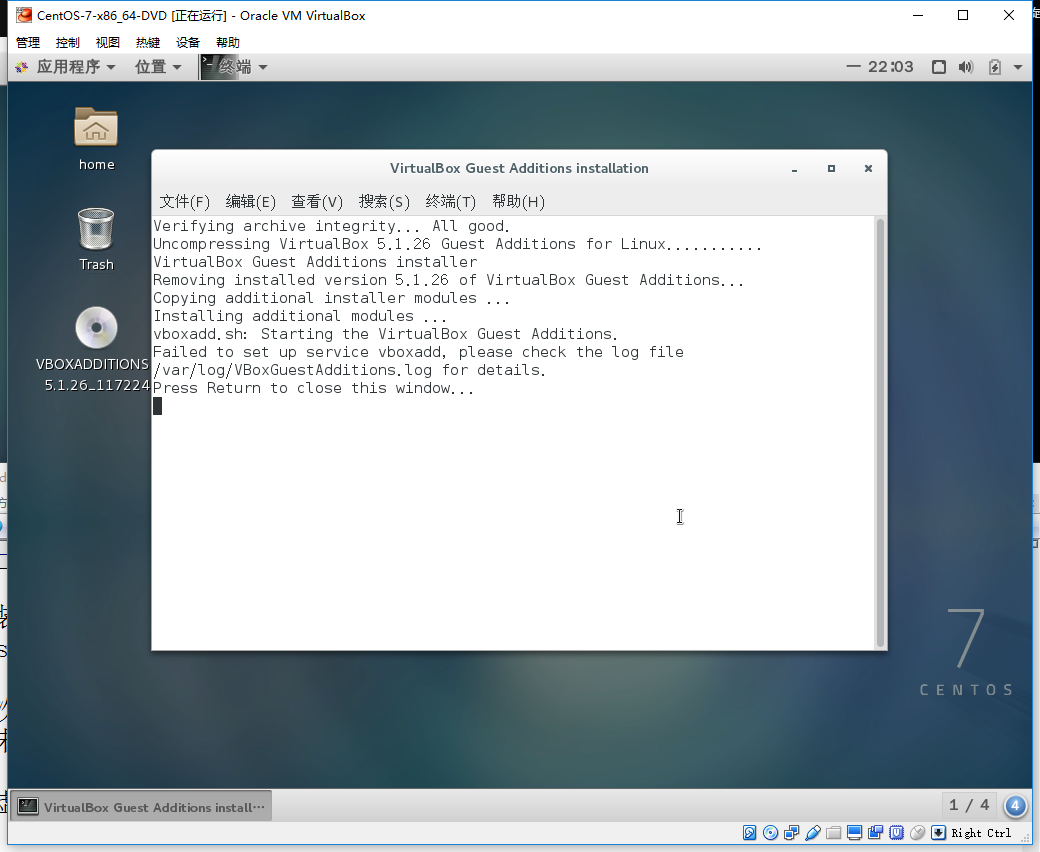
52. Report an error, as shown in Figure 52
Failed to set up service vBoxAdd, please check the log file /var/log/vBoxGuestAdditions.log for details.
Press return to close this window…
Figure 52
53. Check the /var/log/vboxguestadditions.log file, as shown in Figure 53
cat /var/log/vboxguestadditions.log
log:
vboxadd.sh: failed: look at /var/log/vboxadd-install.log to find out what went wrong.
vboxadd.sh: failed: look at /var/log/vboxadd-install.log to find out what went wrong.
vboxadd.sh: failed: modprobe vboxguest failed.
Figure 53
54. View the /var/log/vboxadd-install.log file, as shown in Figure 54
cat /var/log/vboxadd-install.log
log:
/tmp/vbox.0/makefile.include.header:112: *** Error: Unable to find the sources of your current Linux kernel. specify kern_dir=<directory> and run make again. stop.
Creating user for the guest additions.
Creating udev rule for the guest additions kernel module.
Figure 54
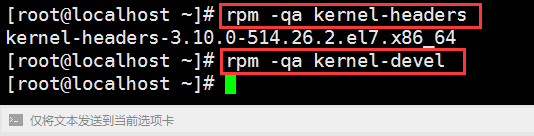
55. Check the installation of kernel-headers and kernel-devel, kernel-devel is not installed, as shown in Figure 55
rpm -qa kernel-headersrpm -qa kernel-develFigure 55
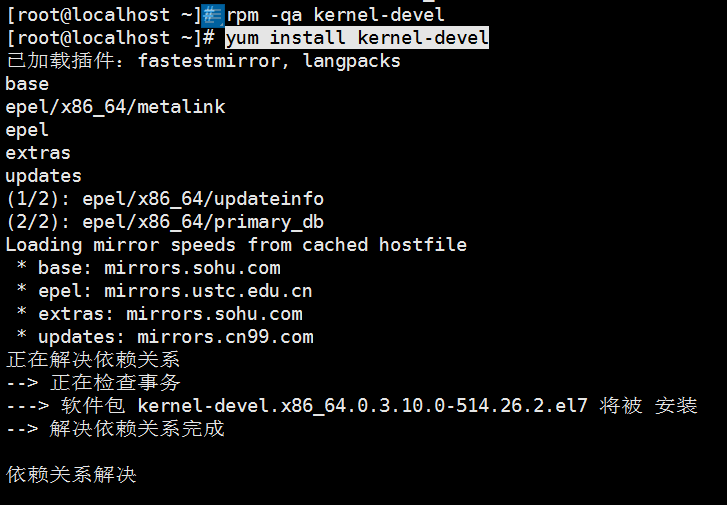
56. Install Kernel-Devel, as shown in Figure 56
yum install kernel-develFigure 56
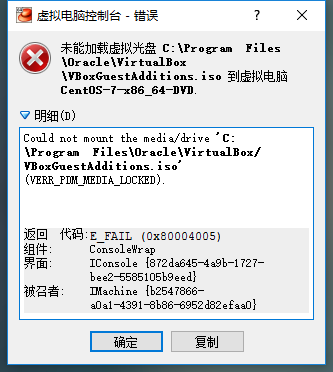
57. Restart the virtual computer based on VirtualBox, and install the enhancement function again, as shown in Figure 57
Error: Failed to load virtual disc vboxsguestadditions.iso to virtual computer
Figure 57
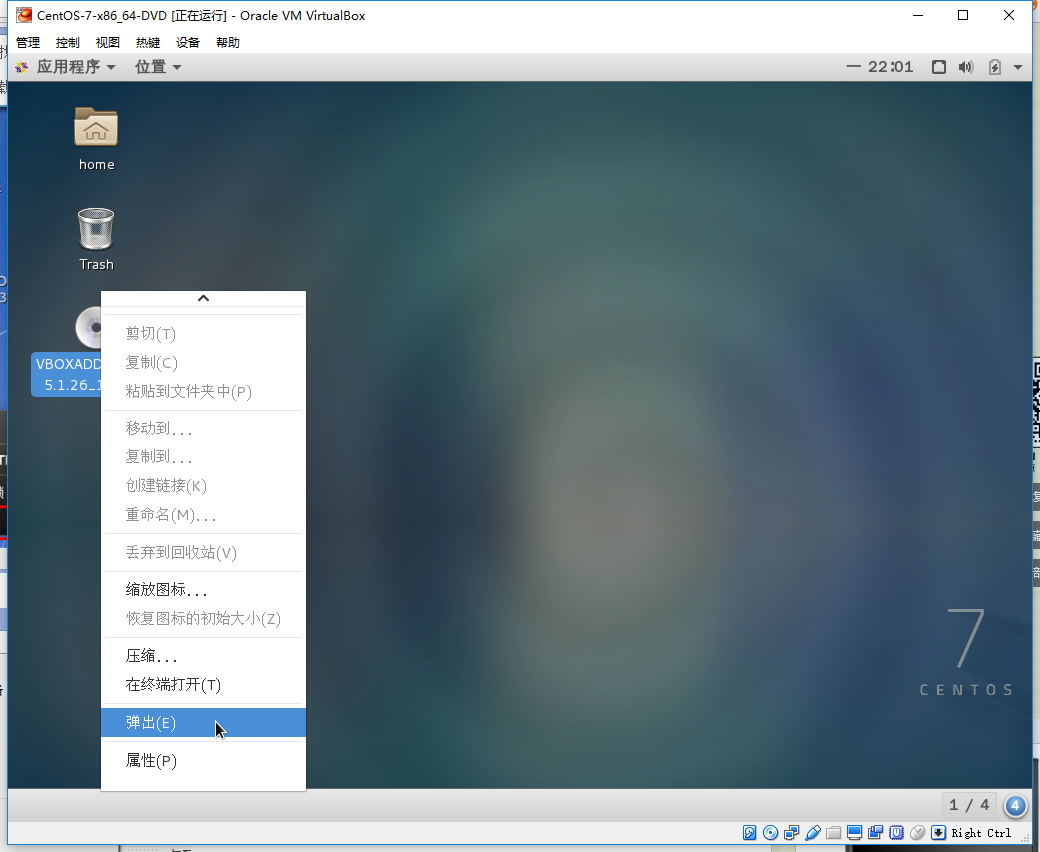
58. Pop the optical drive in the virtual computer, as shown in Figure 58
Figure 58
59. Install the enhancement function again, and still report an error, as shown in Figure 59
Figure 59
60. Upgrade all packages and also upgrade the software and system kernel, as shown in Figure 60
yum updateFigure 60
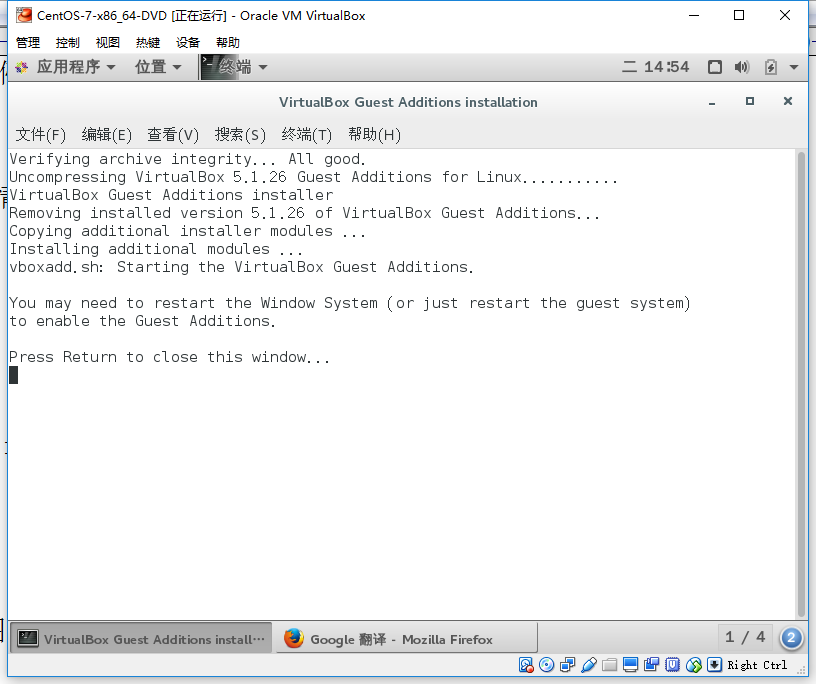
61. Restart the virtual computer based on CentOS, install the enhancement function again, and the installation is successful, as shown in Figure 61
Figure 61
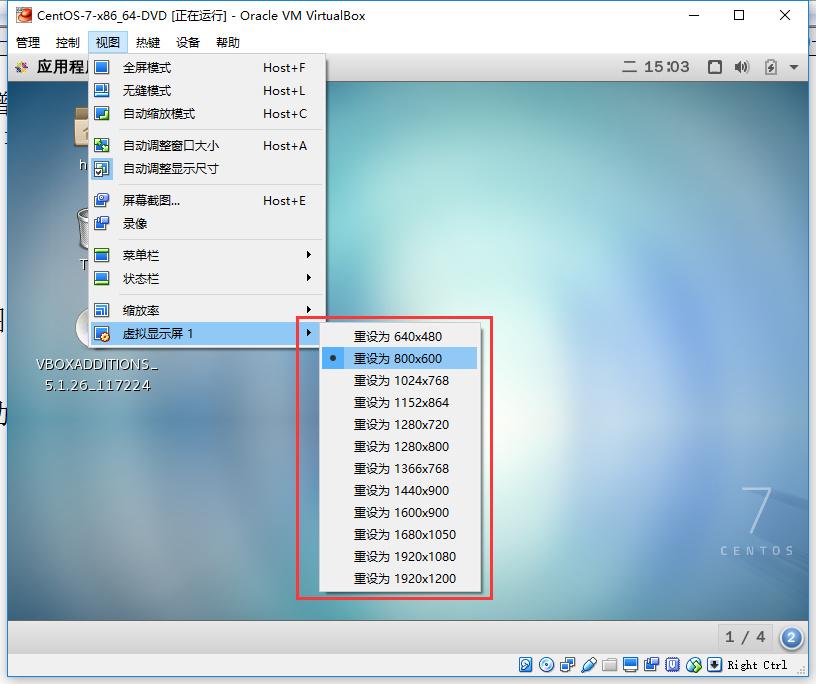
62. According to the installation prompt, restart the Windows system. In View – Virtual Display, if the resolution is optional, the enhancement function is successfully installed, as shown in Figure 62
Figure 62
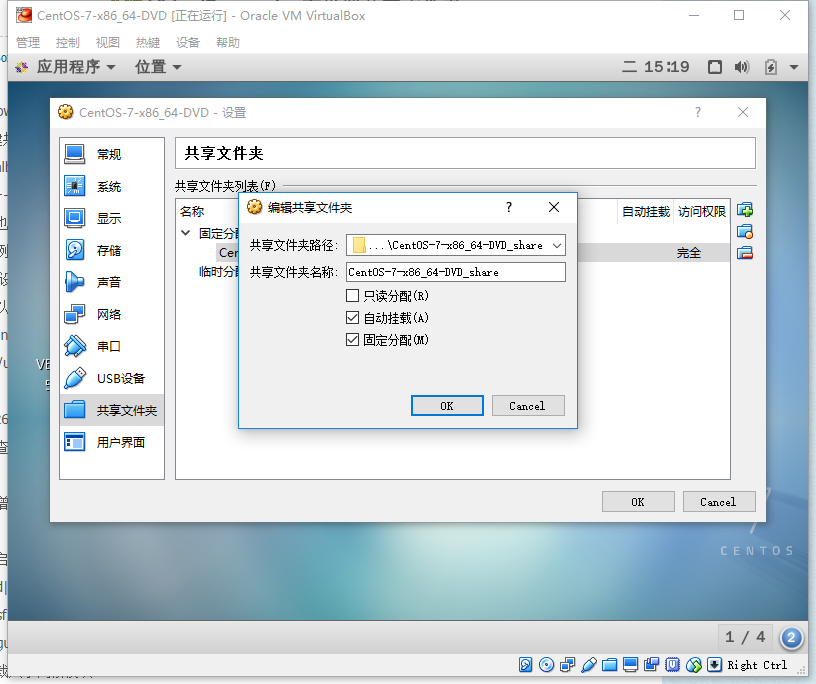
63. Create a new shared folder, e:\wwwroot\centos-7-x86_64-dvd_share, as shown in Figure 63
Figure 63
64. Create a mount folder in CentOS, as shown in Figure 64
mount -t vboxsf centos-7-x86_64-dvd_share /mnt/share
Error:
/sbin/mount.vboxsf: Mounting failed with the error: no such file or directory
Figure 64
65. Create a new directory /mnt/share, as shown in Figure 65
mkdir /mnt/shareFigure 65
66. Mount the folder again in CentOS, normal, as shown in Figure 66
mount -t vboxsf centos-7-x86_64-dvd_share /mnt/shareFigure 66
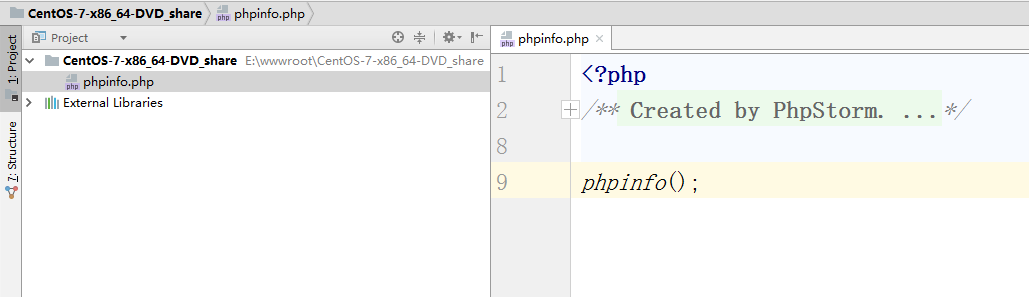
67. In the directory e:\wwwroot\centos-7-x86_64-dvd_share, create a new phpinfo.php file, as shown in Figure 67
Figure 67
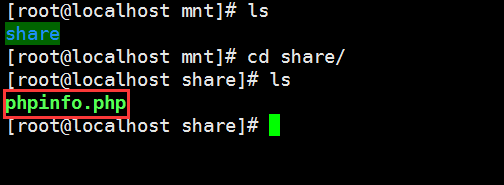
68. Check /mnt/share , the phpinfo.php file already exists, the sharing is successful, as shown in Figure 68
Figure 68
69. Run php phpinfo.php, normal, as shown in Figure 69
Figure 69
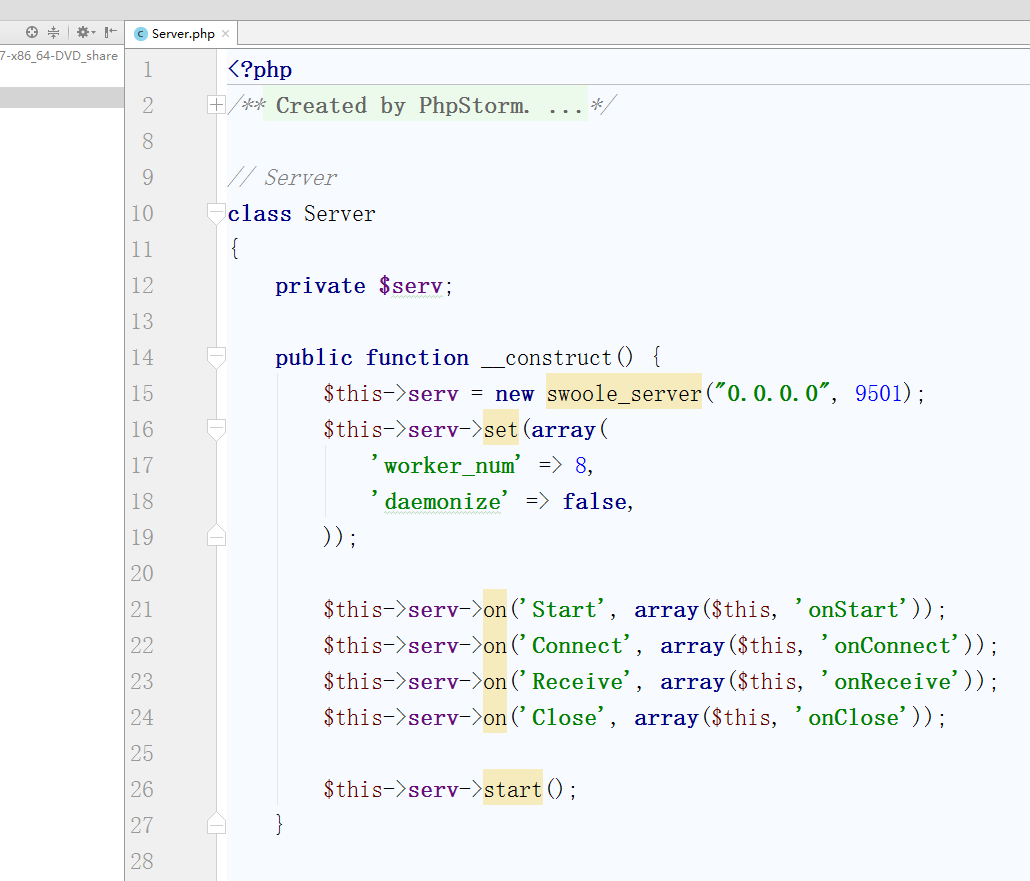
70. Create an echo server, create a server.php file and enter the following content: as shown in Figure 70
<?php
/**
 * Created by PhpStorm.
 * User: Administrator
 * Date: 2017/9/5
 * Time: 15:33
 */

// Server
class Server
{
    private $serv;

    public function __construct() {
        $this->serv = new swoole_server("0.0.0.0", 9501);
        $this->serv->set(array(
            'worker_num' => 8,
            'daemonize' => false,
        ));

        $this->serv->on('Start', array($this, 'onStart'));
        $this->serv->on('Connect', array($this, 'onConnect'));
        $this->serv->on('Receive', array($this, 'onReceive'));
        $this->serv->on('Close', array($this, 'onClose'));

        $this->serv->start();
    }

    public function onStart( $serv ) {
        echo "Start\n";
    }

    public function onConnect( $serv, $fd, $from_id ) {
        $serv->send( $fd, "Hello {$fd}!" );
    }

    public function onReceive( swoole_server $serv, $fd, $from_id, $data ) {
        echo "Get Message From Client {$fd}:{$data}\n";
        $serv->send($fd, $data);
    }

    public function onClose( $serv, $fd, $from_id ) {
        echo "Client {$fd} close connection\n";
    }
}
// 启动服务器 Start the server
$server = new Server();
Figure 70
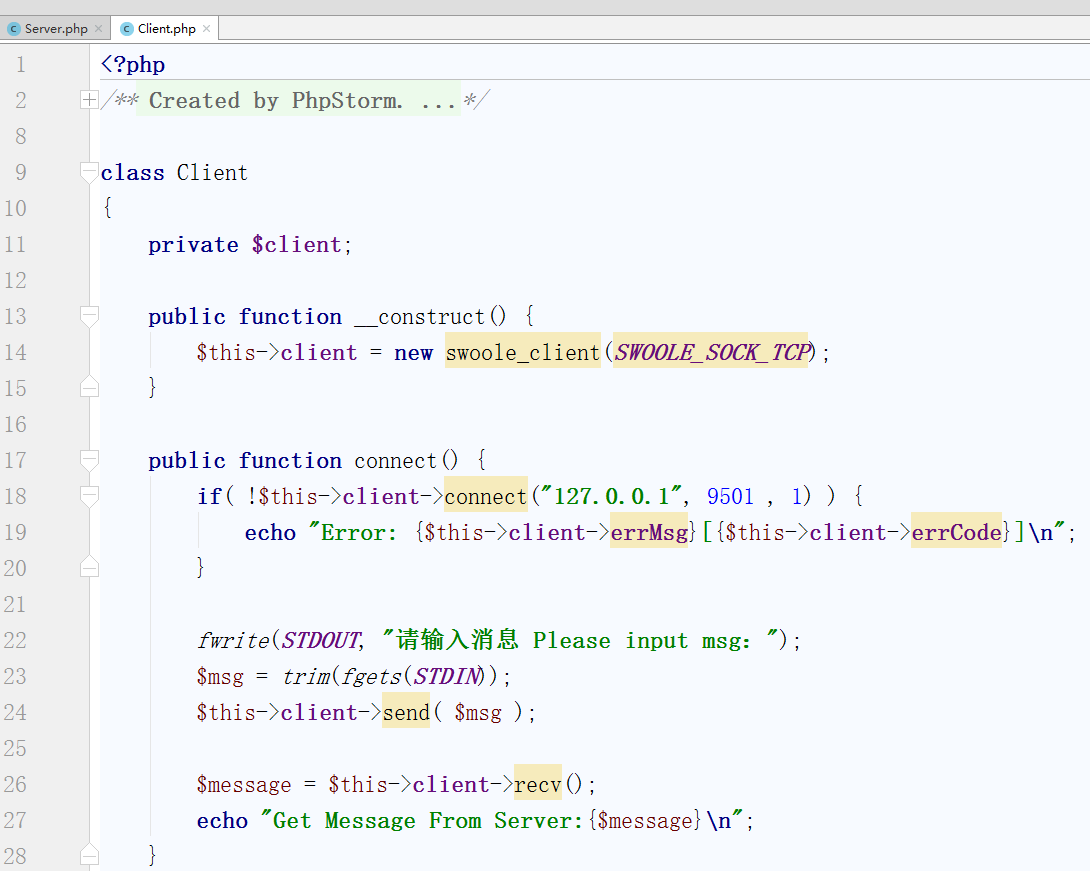
71. Create a client.php file and enter the following content: as shown in Figure 71
<?php
/**
 * Created by PhpStorm.
 * User: Administrator
 * Date: 2017/9/5
 * Time: 15:35
 */

class Client
{
    private $client;

    public function __construct() {
        $this->client = new swoole_client(SWOOLE_SOCK_TCP);
    }

    public function connect() {
        if( !$this->client->connect("127.0.0.1", 9501 , 1) ) {
            echo "Error: {$this->client->errMsg}[{$this->client->errCode}]\n";
        }

        fwrite(STDOUT, "请输入消息 Please input msg:");
        $msg = trim(fgets(STDIN));
        $this->client->send( $msg );

        $message = $this->client->recv();
        echo "Get Message From Server:{$message}\n";
    }
}

$client = new Client();
$client->connect();
Figure 71
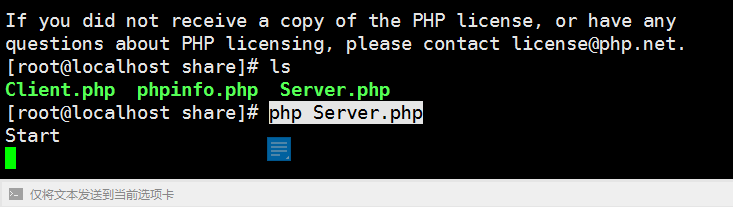
72. Run the server in an Xshell terminal, as shown in Figure 72
php server.phpFigure 72
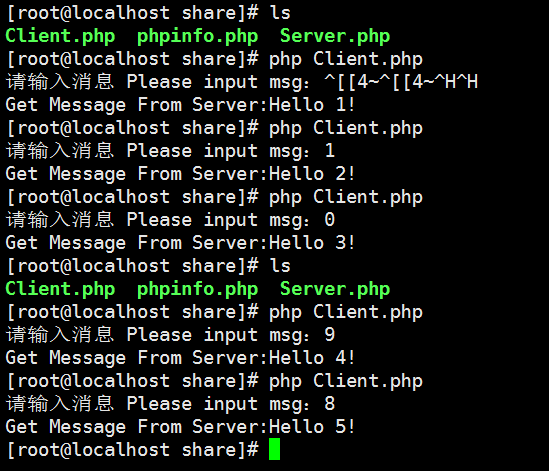
73. Run the client in an Xshell terminal, as shown in Figure 73
php client.phpFigure 73


Leave a Reply