Say goodbye to copy and paste: use AD INSERTER to realize a series of articles and automatically add multi-language CTA (record on the pit)
From manual copy to fully automatic, it took me half a day to step on three big pits and share it with you.
The pain point of the handicraft era
As a person who has written a technical blog for more than ten years, my ‘self-built VPN’ series has dozens of articles, both Chinese and English. At the end of each article, you must add a CTA to promote VPN generation services. The previous practice was:
- After writing the article → open another old article → copy the CTA code → paste into a new article → save.
- Repeat the English station again.
- If the CTA copy is to be changed by one word, all articles are edited manually.
Not to mention I have other series (such as MySQL performance optimization, Linux operation and maintenance), and will also be equipped with different CTAs in the future.Manually copy and paste, it is definitely a nightmare.
So I started looking for automation solutions and finally locked the WordPress plugin ad inserter.
(Screenshot 1: Search plugin AD INSERTER)
2. Why is AD INSERTER?
AD INSERTER is a very old ad/content insert plugin, and the free version is already powerful enough. It supports:
- By article, page, home page, category, label,custom classification(such as the ‘series’ created by PublishPress Series) Insert content.
- Support URL matching, device orientation, user roles, etc.
- The insertion position can be precisely controlled (before/after text, between paragraphs, before and after comments, etc.).
My blog just used:
- PublishPress Series To manage the article series (such as the ‘self-built VPN’ series).
- polylang to realize bilingual in both Chinese and English.
AD INSERTER can theoretically match them perfectly. But in the actual configuration process, I stepped on three big pits, and I will talk about them one by one.
3. The first attempt: use the classification ID, completely invalid
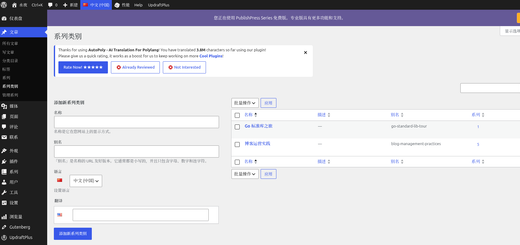
Many tutorials on the Internet say that in ad INSERTER taxonomies Fill in the input boxCategory ID Just do it. So I first found the ID of the ‘self-built VPN’ series (see in the URL of the background editing series tag_id=35606) and then:
- Open AD INSERTER →
block 1. - In
conditionsfound in the paneltaxonomiesinput box. - fill in
35606(tried alsoSeries:35606). - save.
Result: Visit any article (including totally irrelevant PHP tutorial) and the CTA appears at the bottom.All articles are available, including VPN series.
This means Series:35606 This writing method is not recognized by the plugin at all, the plugin treats it as an empty condition, so it is inserted into all the articles by default. This has nothing to do with the whitelist/blacklist, it is simply invalid.
This pit made me waste half an hour.
4. Key breakthrough: with alias + toggle taxonomy editor
I stare carefully taxonomies input box, find itThere is a small icon on the left. Mouse overhead Toggle Taxonomy Editor. I clicked it and a drop-down list popped up, which lists all my existing series (such as windows-to-ubuntu,self-hosted-vpn etc.).
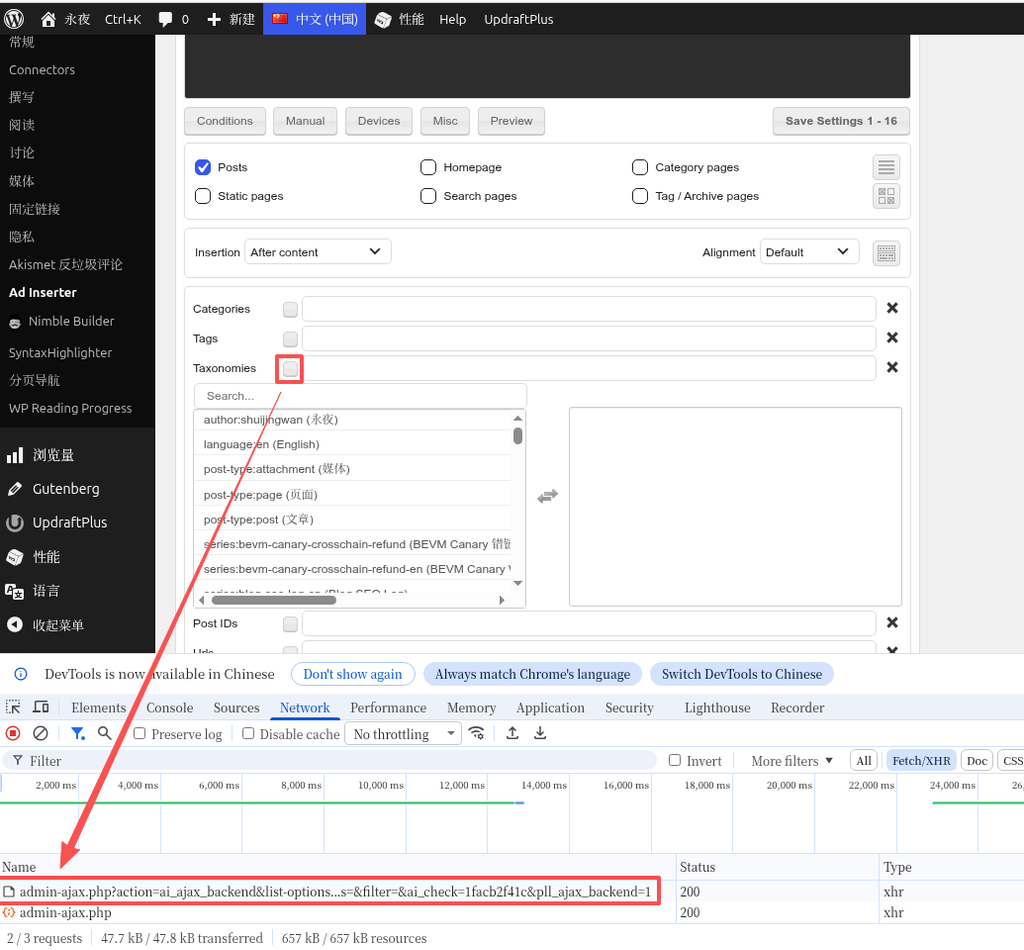
(Screenshot 2: In the background, click the filter box on the left side of Taxonomies toggle Taxonomy Editor, and the drop-down list will pop up, which is essentially ajax request)
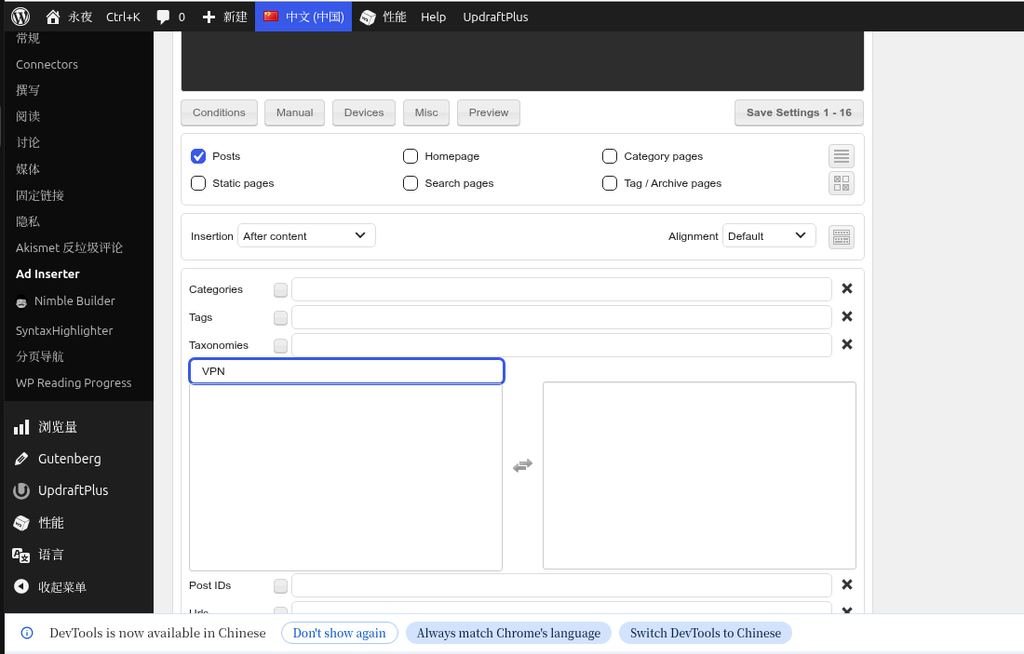
(Screenshot 3: Search for ‘vpn’ in the drop-down list, the search result is empty, I didn’t understand the reason, I will give it up for the time being)
I randomly chose a series (eg, windows-to-ubuntu), the text box automatically becomes Series:Windows-to-Ubuntu.
Suddenly realized: the correct format is series: alias(English colon), not a numeric ID.
So i’m taxonomies Manual input in Series:self-hosted-vpn.
But after saving, I found All articles(Except the VPN series) There are CTAs at the bottom, but the articles on the VPN series do not.
This is because taxonomies The small icon on the right side of the box is by default Black Fork ✖ – representative blacklist mode.
Blacklist means:Except for this series, all other series are displayed.
So I’m just telling the plugin ‘except self-hosted-vpn In this series, all other articles add CTA’ – the blacklist logic in the middle.
I click that icon, switch from ✖ to Black ticks ✔(whitelist mode).
Save and refresh the front desk again –Only the ‘self-built VPN’ series of articles appeared at the bottom of the article, other articles are clean.
Lesson:
- Use
series: aliasformat, do not use numeric IDs. - The small icon to the left of each condition box determines the whitelist/blacklist, be sure to confirm that it is black ✔.
5. Is the format messed up? Copying from the visual editor is a trap
CTA finally only appeared in the correct article, butThe typography is all messed up– No line breaks, the list disappears, and the title and body are crowded together.

(Screenshot 4 The effect of messing up the CTA format in the page)
How did I do it in the first place? I write CTA (visual mode) in the WordPress article editor, and thenCopy all, paste directly into the block 1 edit box of Ad INSERTER. It looks normal in the background preview of the ad inserter, but the front page becomes a piece of text.
Reason: Gutenberg block comments with WordPress copied content (<!-- wp:paragraph --> , etc.), although ad inserter can retain html tags, it does not parse Gutenberg blocks, and sometimes loses newlines.
Solution: switch tocode editormode.
Specific operation:
- In the WordPress article list, click the Edit link.
- In the code editor for editing the article, you will see the complete code like this (CTA content):
Html
<!-- wp:paragraph -->
<p><strong>拒绝折腾 | 专属 WireGuard VPN 代搭建服务</strong></p>
<!-- /wp:paragraph -->

<!-- wp:paragraph -->
<p>本频道长期实测各类网络优化方案。<strong>自用线路已连续稳定运行超过 1 个月,全程无掉线记录</strong>。如果你不想反复踩坑、折腾复杂的服务器与协议配置,欢迎联系我获取专属解决方案。</p>
<!-- /wp:paragraph -->

<!-- wp:paragraph -->
<p><strong>服务内容:</strong><br>✅ <strong>远程代搭建</strong>:在你自己的服务器上部署专属 VPN,数据完全掌控,一劳永逸。<br>✅ <strong>免费试用福利</strong>:新用户可申请<strong>免费试用一个月我的自建节点</strong>,亲自体验极致的稳定性与速度。<br>✅ <strong>效果保证</strong>:深度优化分流规则,彻底解决日常使用中的卡顿与连接超时问题。</p>
<!-- /wp:paragraph -->

<!-- wp:paragraph -->
<p><strong>联系方式:</strong><br>Telegram:@shuijingwan<br>微信:13980074657<br>邮箱:<a href="mailto:shuijingwanwq@gmail.com">shuijingwanwq@gmail.com</a></p>
<!-- /wp:paragraph -->
- Copy this code.
- Go back to the Block 1 editor for Ad INSERTER and click Toggle Tools on the editor toolbar –
Toggle code generatorbutton, switch tosource code pattern. - Paste the code.
- save.
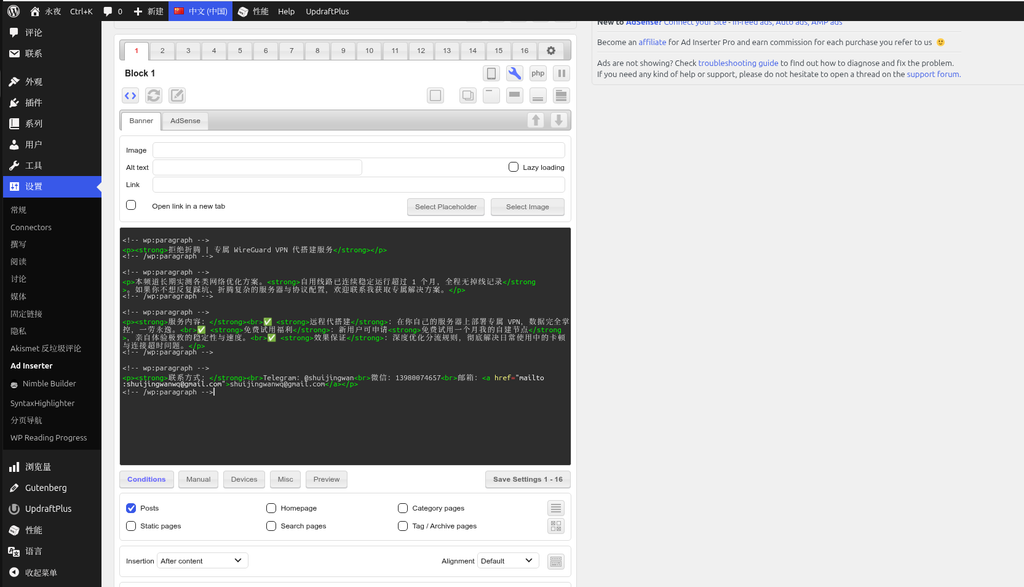
(Screenshot 5: In the background, use the code editor to copy the above code and save it in Block 1)
(Screenshot 6: The format is normal after saving, and the insertion is after content)
At this time, the foreground page is finally normal – line breaks, bold, list, and links are all displayed correctly.
Experience: always fromcode editorCopy content to Ad INSERTER, do not copy directly from the visual editor.
Six, insert position: after content vs after post
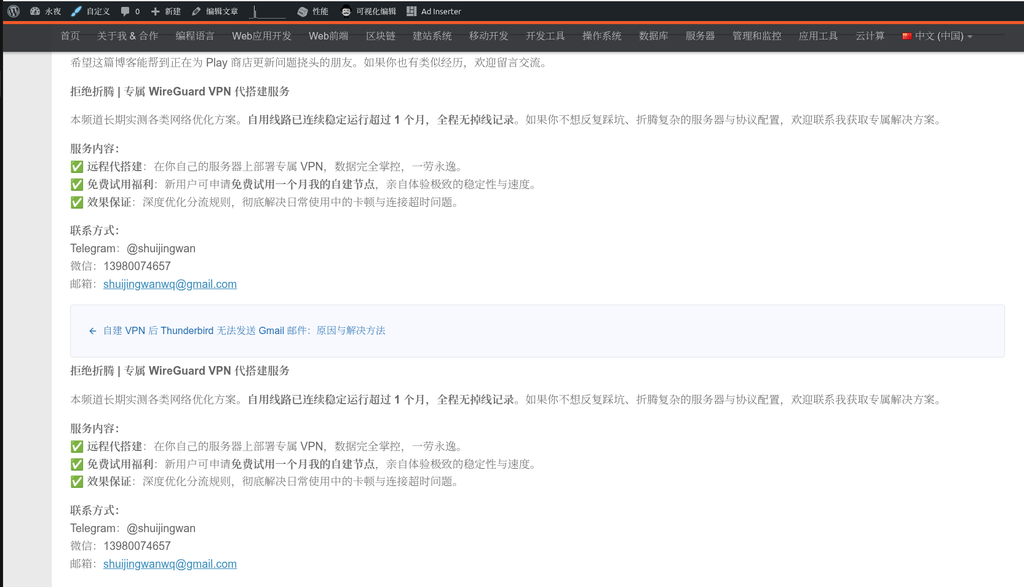
I use it by default Insertion Be after content, CTA appears at the end of the text of the article, before the comment area, and after the ‘Previous/Next’ navigation. I think it’s too close to the navigation, so I want to move down a little.
(Screenshot 7: After deleting the duplicate CTA content at the end of all articles under the Chinese self-built VPN series, the final effect is found, but I found that the content of Block 1 is somewhat close to the previous article and the next article)
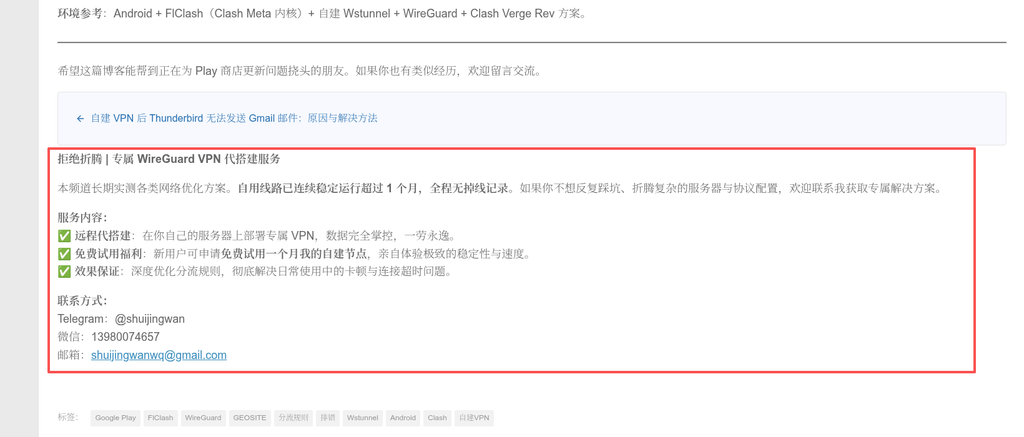
I try to change to after post——The effect is in line with expectations, and it is a little farther from navigation.
I have adjusted the insertion many times, and I want the CTA to be placed at the end of the content, and on the top of the previous article, I found that it is difficult to do it in the end. Decided to do so first. Accept the status quo. If you have obsessive-compulsive disorder, you can manually insert it into any position with short codes, but I think it is enough.
7. English series
My English ‘self-hosted vpn’ series alias is self-hosted-vpn-en, the series ID is 35608.
Create a new block (block 2):
taxonomiesEnterSeries:self-hosted-vpn-en.- The left icon switches to black ✔ (whitelist).
InsertionI chose this timeafter post(for comparison, but in the end you can also keepafter content).- Copy the English version of the CTA code from the code editor:
Html
<!-- wp:paragraph -->
<p><strong>Stop the Hassle | Custom WireGuard VPN Setup Service</strong></p>
<!-- /wp:paragraph -->
<!-- wp:paragraph -->
<p>I have been testing various network optimization solutions for a long time. <strong>My personal setup has been running continuously for over a month with absolutely zero downtime.</strong> If you are tired of troubleshooting and dealing with complex server configurations, feel free to reach out for a custom solution.</p>
<!-- /wp:paragraph -->
<!-- wp:paragraph -->
<p><strong>What I Offer:</strong><br>✅ <strong>Remote Setup Service:</strong> I will deploy an exclusive VPN on your own server. You keep full control of your data—set it once and forget about it.<br>✅ <strong>Free Trial:</strong> New users can apply for a <strong>one-month free trial of my self-hosted node</strong>, so you can personally experience the speed and stability.<br>✅ <strong>Performance Guaranteed:</strong> Deeply optimized routing rules to completely eliminate lag and connection timeouts in daily use.</p>
<!-- /wp:paragraph -->
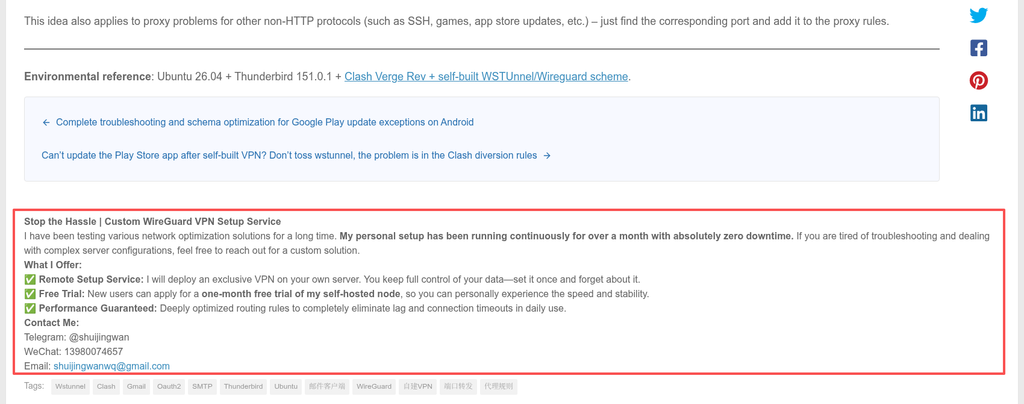
<!-- wp:paragraph -->
<p><strong>Contact Me:</strong><br>Telegram: @shuijingwan<br>WeChat: 13980074657<br>Email: <a href="mailto:shuijingwanwq@gmail.com">shuijingwanwq@gmail.com</a></p>
<!-- /wp:paragraph -->

(Screenshot 8: Paste the above code in Block 2, insert is after post, enter series:self-hosted-vpn-en, and block 1 is also adjusted to after post)
Save, the English CTA at the bottom of the English article at the front desk is displayed normally. Perfect!
(Screenshot 9: The final effect of the articles in the English series, in line with expectations)
8. Clean up the old code added manually
The last step: Go to every article in the ‘Self-built VPN’ series (Chinese and English), and delete the CTA code that was manually pasted before. Otherwise, the page will appear two CTAs (one manual and one automatic).
Batch processing can be used better search replace Plugin, replace all old code at once. I changed it manually, because there are not many articles.
9. Summary and suggestion
If you are also a WordPress blogger and have similar needs:
- Automatically add different contents under different series/categories/labels
- Support Chinese and English multi-language
- I don’t want to manually copy and paste every time
AD INSERTER + PublishPress Series + Polylang is a verified combination.
A few core points to share with you:
- use aliases, don’t use id:
taxonomiesInputseries: alias(English colon). - Whitelist/Blacklist: Note the small icon on the left side of the text box, black ✔ is a whitelist, black ✖ is a blacklist.
- Format: from WordPress code editorCopy the content and paste it into the source code mode of Ad INSERTER (
Toggle code generator), do not copy directly from the visual editor. - insertion position:
afterPOST is usually the most suitable. - Test: Enable a block first, confirm that it is correct and then configure other.
Now, I can write technical articles with peace of mind, and the CTA will automatically appear where it should appear. In the next step, I plan to add a different CTA to the ‘MySQL Performance Optimization’ series, and guide readers to contact me for database tuning services.