


![[截图 5:Clash 规则片段,突出显示新增的两行 DST-PORT 规则]](https://www.shuijingwanwq.com/wp-content/uploads/2026/06/5-8.png)
![[截图 2:Play 商店更新界面,显示两个应用正常下载]](https://www.shuijingwanwq.com/wp-content/uploads/2026/06/2-2-465x1024.jpg)


The early background
- Self-built WireGuard service, the original use port 57586, the computer wifi before 10 o’clock in the morning can be normal handshake, normal over the wall, and the domestic website is directly connected.
- The server has been optimized (the key command line operations are sorted in advance, which is convenient for subsequent reuse): Turn off and disable the UFW firewall, configure iptables forwarding rules and persist, and the network forwarding environment is clean and free of conflicts and no sequelae.
- The client originally adopted an intelligent diversion solution: domestic website direct connection, overseas traffic go to VPN, and Ali public DNS to improve the domestic resolution speed.
2. Preliminary server optimization (UFW, iptables complete command line, must save!)
This step is an optimization that has been completed before the fault, the purpose is to clean the server firewall conflict and ensure that the WireGuard forwarding is normal, and the subsequent troubleshooting can directly troubleshoot this link, and the command line is executed in sequence:
1. UFW firewall operation (close + disable, avoid conflicts with iptables)
Before configuring the iptables rule, you need to turn off and disable the UFW firewall that comes with the system to prevent the conflict between the two rules and cause network exceptions. The following is a complete operation step based on the actual server, including specific commands and execution feedback, which can be directly compared to the actual operation.
1.1. View the current Forward chain rules (pre-check)
Execute the following command to check the default chain policy and existing rules of iptables to confirm the initial status:
root@vultr:~# iptables -L FORWARD -n
Chain FORWARD (policy DROP)
target     prot opt source               destination
ACCEPT     all  --  0.0.0.0/0            0.0.0.0/0
ACCEPT     all  --  0.0.0.0/0            0.0.0.0/0
ufw-before-logging-forward  all  --  0.0.0.0/0            0.0.0.0/0
ufw-before-forward  all  --  0.0.0.0/0            0.0.0.0/0
ufw-after-forward  all  --  0.0.0.0/0            0.0.0.0/0
ufw-after-logging-forward  all  --  0.0.0.0/0            0.0.0.0/0
ufw-reject-forward  all  --  0.0.0.0/0            0.0.0.0/0
ufw-track-forward  all  --  0.0.0.0/0            0.0.0.0/0
Note: In the initial state, the default policy of the Forward chain is DROP (all forwarding is rejected), and it contains UFW-related forwarding rules. UFW needs to be turned off to clear the interference of these rules.
1.2. Turn off the currently running UFW firewall
Execute the command to stop the UFW service running immediately:
root@vultr:~# systemctl stop ufw
Note: This command has no additional output, and the UFW service will stop immediately after execution, and will no longer take effect.
1.3. Disable UFW boot self-start (avoid automatic start after restart)
Execute the command to prevent the UFW service from automatically starting at startup, and completely avoid interfering with the iptables configuration after restarting:
root@vultr:~# systemctl disable ufw
Synchronizing state of ufw.service with SysV service script with /lib/systemd/systemd-sysv-install.
Executing: /lib/systemd/systemd-sysv-install disable ufw
Removed /etc/systemd/system/multi-user.target.wants/ufw.service.
root@vultr:~# systemctl status ufw
○ ufw.service - Uncomplicated firewall
     Loaded: loaded (/lib/systemd/system/ufw.service; disabled; vendor preset: enabled)
     Active: inactive (dead)
       Docs: man:ufw(8)

Apr 27 07:51:53 guest systemd[1]: Starting Uncomplicated firewall...
Apr 27 07:51:54 guest systemd[1]: Finished Uncomplicated firewall.
Apr 29 06:55:20 vultr systemd[1]: Stopping Uncomplicated firewall...
Apr 29 06:55:20 vultr systemd[1]: ufw.service: Deactivated successfully.
Apr 29 06:55:20 vultr systemd[1]: Stopped Uncomplicated firewall.
Note: The output shows that the UFW service status has been synchronized, and the link to boot self-start is removed, and the UFW will not start automatically after restarting the server.
1.4. Check UFW status, confirm that it is closed
Execute the command to verify that the UFW service has stopped successfully and disabled:
root@vultr:~# systemctl status ufw
○ ufw.service - Uncomplicated firewall
     Loaded: loaded (/lib/systemd/system/ufw.service; disabled; vendor preset: enabled)
     Active: inactive (dead)
       Docs: man:ufw(8)

Apr 27 07:51:53 guest systemd[1]: Starting Uncomplicated firewall...
Apr 27 07:51:54 guest systemd[1]: Finished Uncomplicated firewall.
Apr 29 06:55:20 vultr systemd[1]: Stopping Uncomplicated firewall...
Apr 29 06:55:20 vultr systemd[1]: ufw.service: Deactivated successfully.
Apr 29 06:55:20 vultr systemd[1]: Stopped Uncomplicated firewall.
Key verification points:
- The loaded line shows Disabled: Indicates that the boot self-start is disabled;
- Active line displays inactive (dead): Indicates that the current UFW service has been stopped;
- The log shows deactivated successfully: Indicates that the UFW service has been successfully stopped.
2. Supplement: iptables configuration and rule persistence (connecting actual operations)
After closing UFW, you can configure iptables rules, and implement rules persistence through tools to avoid loss of rules after restarting. The following are the complete steps of actual execution:
2.1. Configure iptables forward chain rules
Modify the Forward chain default policy to Accept, and add WireGuard (WG0 network card) related forwarding rules (for VPN scenarios):
# 设置 FORWARD 链默认策略为 ACCEPT(允许所有转发)
iptables -P FORWARD ACCEPT
# 允许从 wg0 网卡进入的流量转发
iptables -A FORWARD -i wg0 -j ACCEPT
# 允许从 wg0 网卡出去的流量转发
iptables -A FORWARD -o wg0 -j ACCEPT
Note: There is no additional output, the rule will take effect immediately after execution, you can check whether the rule is added successfully through iptables -l forward -n
2.2. Install the iptables persistence tool
Install the iptables-persistent tool to save the iptables rules and ensure that the rules are not lost after restarting the server:
root@vultr:~# apt install -y iptables-persistent
Reading package lists... Done
Building dependency tree... Done
The following additional packages will be installed:
The following NEW packages will be installed:
  iptables-persistent netfilter-persistent
0 upgraded, 2 newly installed, 0 to remove and 5 not upgraded.
Need to get 13.9 kB of archives.
After this operation, 93.2 kB of additional disk space will be used.
Get:1 http://ubuntu.mirror.constant.com jammy/universe amd64 netfilter-persistent all 1.0.16 [7,440 B]
Get:2 http://ubuntu.mirror.constant.com jammy/universe amd64 iptables-persistent all 1.0.16 [6,488 B]
Fetched 13.9 kB in 1s (18.3 kB/s)
Preconfiguring packages ...
Selecting previously unselected package netfilter-persistent.
(Reading database ... 86643 files and directories currently installed.)
Preparing to unpack .../netfilter-persistent_1.0.16_all.deb ...
Unpacking netfilter-persistent (1.0.16) ...
Selecting previously unselected package iptables-persistent.
Preparing to unpack .../iptables-persistent_1.0.16_all.deb ...
Unpacking iptables-persistent (1.0.16) ...
Setting up netfilter-persistent (1.0.16) ...
Created symlink /etc/systemd/system/multi-user.target.wants/netfilter-persistent.service → /lib/systemd/system/netfilter-persistent.service.
Setting up iptables-persistent (1.0.16) ...
update-alternatives: using /lib/systemd/system/netfilter-persistent.service to provide /lib/systemd/system/iptables.service (iptables.service) in auto mode
Processing triggers for man-db (2.10.2-1) ...
Scanning processes...
Scanning candidates...
Scanning linux images...

Running kernel seems to be up-to-date.

Restarting services...
 /etc/needrestart/restart.d/systemd-manager
 systemctl restart multipathd.service packagekit.service polkit.service rsyslog.service ssh.service systemd-journald.service systemd-networkd.service systemd-resolved.service systemd-timesyncd.service systemd-udevd.service udisks2.service
Service restarts being deferred:
 systemctl restart ModemManager.service
 /etc/needrestart/restart.d/dbus.service
 systemctl restart networkd-dispatcher.service
 systemctl restart systemd-logind.service
 systemctl restart unattended-upgrades.service
 systemctl restart user@0.service

No containers need to be restarted.

No user sessions are running outdated binaries.

No VM guests are running outdated hypervisor (qemu) binaries on this host.
root@vultr:~# netfilter-persistent save
run-parts: executing /usr/share/netfilter-persistent/plugins.d/15-ip4tables save
run-parts: executing /usr/share/netfilter-persistent/plugins.d/25-ip6tables save
root@vultr:~# client_loop: send disconnect: Connection reset
PS C:\Users\Thinkpad> ssh root@139.180.154.26
ssh: connect to host 139.180.154.26 port 22: Connection timed out
PS C:\Users\Thinkpad> ssh root@139.180.154.26
root@139.180.154.26's password:
Welcome to Ubuntu 22.04.5 LTS (GNU/Linux 5.15.0-176-generic x86_64)

 * Documentation:  https://help.ubuntu.com
 * Management:     https://landscape.canonical.com
 * Support:        https://ubuntu.com/pro

 System information as of Wed Apr 29 07:13:48 AM UTC 2026

  System load:  0.0                Processes:               145
  Usage of /:   28.5% of 22.88GB   Users logged in:         1
  Memory usage: 25%                IPv4 address for enp1s0: 139.180.154.26
  Swap usage:   0%

 * Strictly confined Kubernetes makes edge and IoT secure. Learn how MicroK8s
   just raised the bar for easy, resilient and secure K8s cluster deployment.

   https://ubuntu.com/engage/secure-kubernetes-at-the-edge

Expanded Security Maintenance for Applications is not enabled.

1 update can be applied immediately.
To see these additional updates run: apt list --upgradable
Enable ESM Apps to receive additional future security updates.
See https://ubuntu.com/esm or run: sudo pro status

New release '24.04.4 LTS' available.
Run 'do-release-upgrade' to upgrade to it.


******************************PLEASE NOTE********************************
* If this a new instance, cloud-init may still be running and normal    *
* operations may not work as expected.                                  *
*                                                                       *
* Please use `cloud-init status' to check on the status of the instance *
* provisioning                                                          *
*                                                                       *
* Remove this message by editing /etc/motd                              *
*************************************************************************
Last login: Wed Apr 29 06:55:10 2026 from 183.221.85.7
Note: The dependency package netfilter-persistent will be automatically installed during the installation process, no additional operations are required.
2.3. Save iptables rules (persistence)
Execute the command to save the currently configured iptables rule to the persistent file:
root@vultr:~# netfilter-persistent save
run-parts: executing /usr/share/netfilter-persistent/plugins.d/15-ip4tables save
run-parts: executing /usr/share/netfilter-persistent/plugins.d/25-ip6tables save
Note: The output shows that the iptables rules of IPv4 (15-ip4tables) and IPv6 (25-ip6tables) have been successfully saved, and the rules will be automatically loaded after restarting the server.
3. Practical Notes
- Operating environment: This operation is based on the Ubuntu system (judgment from the software source http://ubuntu.mirror.constant.com), and other Debian system systems can refer to execution;
- Permission requirements: All commands must be executed with root user (use root@vultr:~# terminal in practice, no additional sudo is required);
- Rule verification: After each step, it is recommended to execute the corresponding viewing command (such as systemctl status ufw, iptables -l forward -n), and confirm that the operation is in effect;
- Persistence confirmation: After saving the rule, you can restart the server (reboot), check the iptables rule again, and confirm that the rule is not lost.
Note: After the above commands are executed, the server network forwarding environment is stable, and the subsequent faults have nothing to do with UFW and iptables configurations, and there is no need to repeat operations.
The failure phenomenon
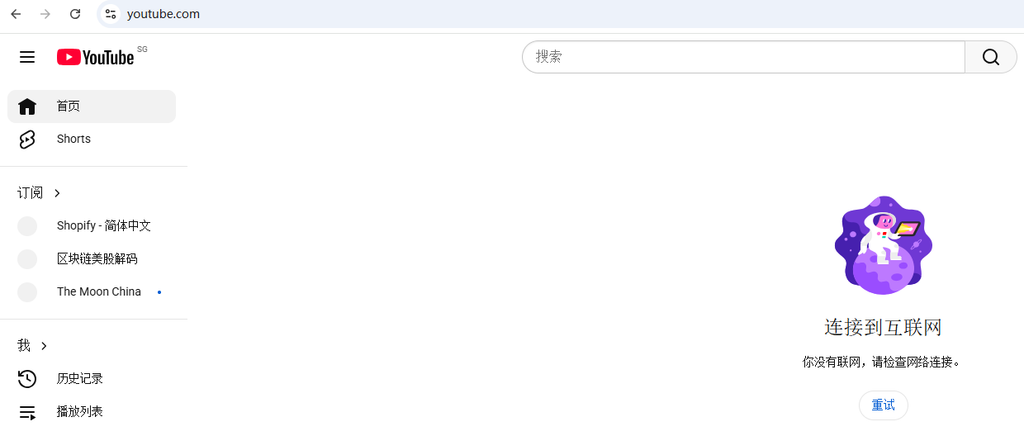
- It was suddenly unavailable in the afternoon, the client has no ‘last handshake time’, and has been waiting to connect.
- Computer home WiFi, mobile phone switching 5G network, both devices and two networks cannot shake hands.
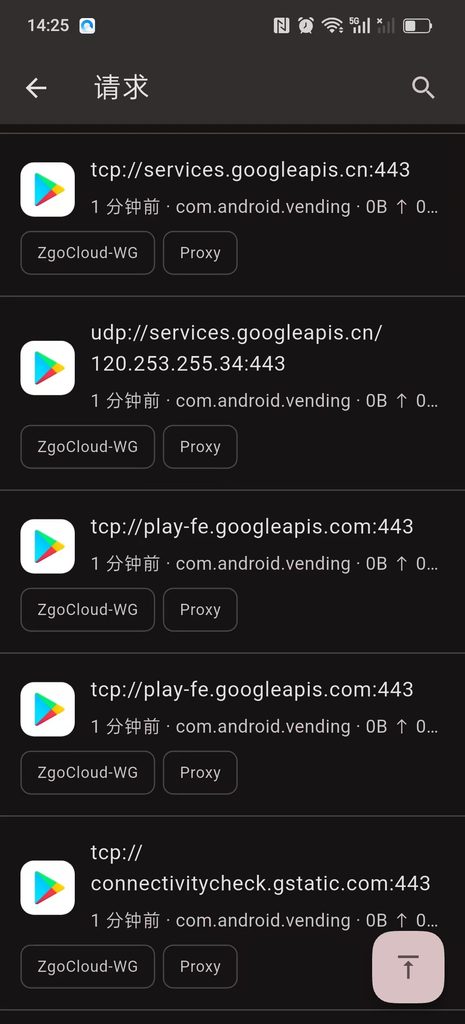
- The client shows that it seems to be connected, but there is no handshake and no traffic forwarding, and the reception has always been 0. as shown in Figure 1
The whole process of checking and positioning
- Basic connectivity check
- Using the ping server IP test: the IP delay is normal and there is no packet loss, which proves that the server IP is not walled and the routing path is normal.
# 电脑 Windows 命令提示符(CMD)执行,持续测试连通性
ping -t 139.180.154.26
# 测试完成后按 Ctrl+C 停止,查看丢包率(0% 丢包即为正常)
- PowerShell 测试 TCP 57586 端口连接失败:
# 电脑 PowerShell 执行,测试 TCP 端口(仅辅助判断)
Test-NetConnection 139.180.154.26 -Port 57586
Clarify the key misunderstanding: Test-NetConnection can only measure TCP, WireGuard only uses UDP protocol, TCP failure does not mean that UDP must not work, but can assist in judging port abnormality.
- Server status check
Log in to the VPS and execute the following command to check the WireGuard running status:
# 1. 查看 WireGuard 运行状态(确认 wg0 接口正常)
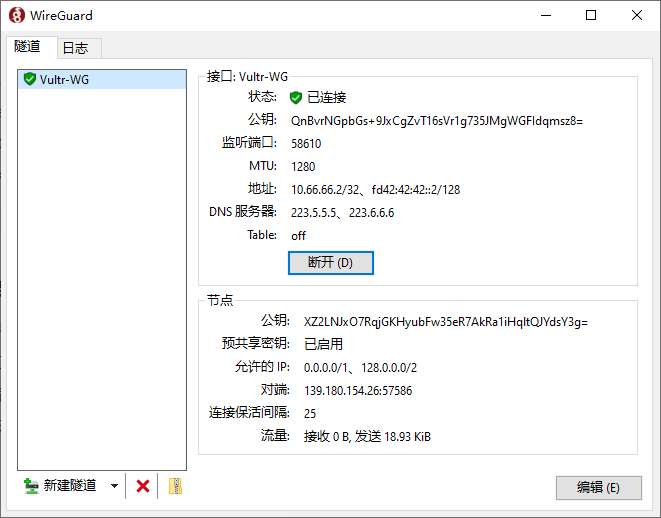
root@vultr:~# wg show
interface: wg0
public key: XZ2LNJxO7RqjGKHyubFw35eR7AkRa1iHqltQJYdsY3g=
private key: (hidden)
listening port: 57586
peer: QnBvrNGpbGs+9JxCgZvT16sVr1g735JMgWGFIdqmsz8=
preshared key: (hidden)
endpoint: 183.221.85.7:18607
allowed ips: 10.66.66.2/32, fd42:42:42::2/128
transfer: 3.04 KiB received, 1.89 KiB sent
peer: TX/hWjKXFoDyhQncE6M5DuC7d4DffzjJWHL+errBsTU=
preshared key: (hidden)
endpoint: 183.221.85.7:18650
allowed ips: 10.66.66.3/32, fd42:42:42::3/128
transfer: 1.73 KiB received, 1.08 KiB sent
root@vultr:~# client_loop: send disconnect: Connection reset
Check results:
- WireGuard service is running normally, normal monitoring port 57586;
- There is a client node record, which proves that the server configuration, programs, monitoring, and forwarding rules are all normal.
Reason for troubleshooting: It is not the server crash, not the sequelae of UFW/IPtables configuration, and it is not the server forwarding exception.
3. Failure Root Lock
3.1. All devices are cross-network (home WiFi + 5G mobile phones), all cannot shake hands, and the problem of single device and single broadband is ruled out.
3.2. Normal in the morning and sudden failure in the afternoon, without any configuration modification.
3.3. Final diagnosis: domestic operators have periodic QoS current limiting, and cross-border high-port UDP 57586 is silently intercepted and lost by the backbone network, which has nothing to do with client shunt, DNS, and local configuration.
5. Solution implementation process
1. Replace available ports (core solution, command line + background operation)
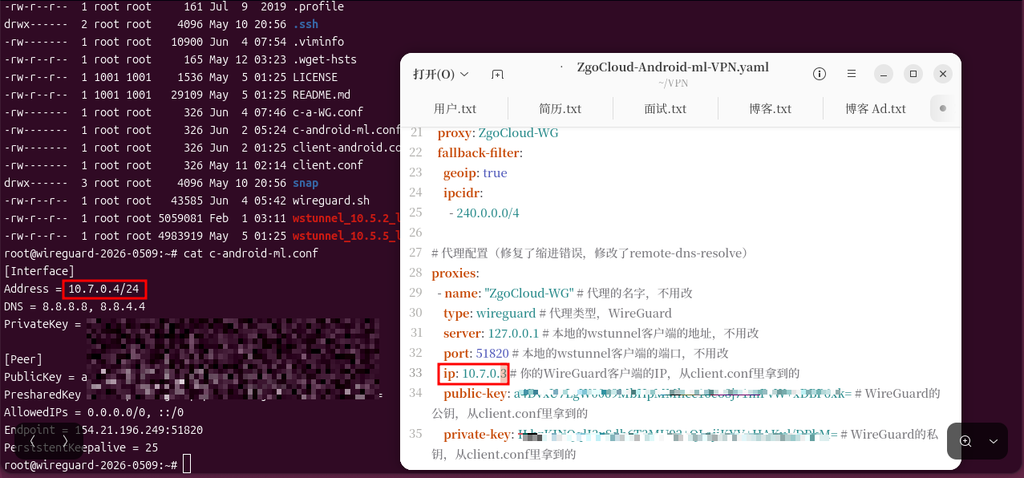
Abandon the easily blocked high-port 57586 and replace it with a more resistant regular port 2096, the steps are as follows: as shown in Figure 2
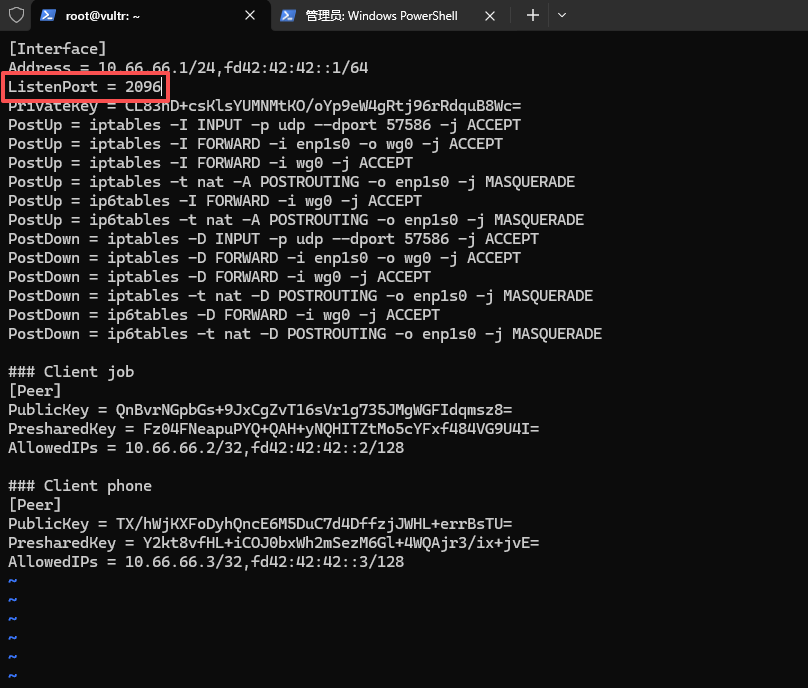
# 步骤1:VPS 端修改 WireGuard 配置文件(修改监听端口)如图2
vi /etc/wireguard/wg0.conf

# 找到 ListenPort = 57586,修改为 2096,推荐 443(几乎和普通 HTTPS 流量一模一样,很难被精准封禁。)
# 示例:ListenPort = 2096

# 保存退出 vi 编辑器

# 步骤2:重启 WireGuard 服务,使端口修改生效
root@vultr:~# wg-quick down wg0
[#] ip link delete dev wg0
[#] iptables -D INPUT -p udp --dport 57586 -j ACCEPT
[#] iptables -D FORWARD -i enp1s0 -o wg0 -j ACCEPT
[#] iptables -D FORWARD -i wg0 -j ACCEPT
[#] iptables -t nat -D POSTROUTING -o enp1s0 -j MASQUERADE
[#] ip6tables -D FORWARD -i wg0 -j ACCEPT
[#] ip6tables -t nat -D POSTROUTING -o enp1s0 -j MASQUERADE
root@vultr:~# wg-quick up wg0
[#] ip link add wg0 type wireguard
[#] wg setconf wg0 /dev/fd/63
[#] ip -4 address add 10.66.66.1/24 dev wg0
[#] ip -6 address add fd42:42:42::1/64 dev wg0
[#] ip link set mtu 1420 up dev wg0
[#] iptables -I INPUT -p udp --dport 57586 -j ACCEPT
[#] iptables -I FORWARD -i enp1s0 -o wg0 -j ACCEPT
[#] iptables -I FORWARD -i wg0 -j ACCEPT
[#] iptables -t nat -A POSTROUTING -o enp1s0 -j MASQUERADE
[#] ip6tables -I FORWARD -i wg0 -j ACCEPT
[#] ip6tables -t nat -A POSTROUTING -o enp1s0 -j MASQUERADE

# 步骤3:确认端口修改成功(查看 listening port 是否为 2096)
root@vultr:~# wg show
interface: wg0
  public key: XZ2LNJxO7RqjGKHyubFw35eR7AkRa1iHqltQJYdsY3g=
  private key: (hidden)
  listening port: 2096

peer: QnBvrNGpbGs+9JxCgZvT16sVr1g735JMgWGFIdqmsz8=
  preshared key: (hidden)
  allowed ips: 10.66.66.2/32, fd42:42:42::2/128

peer: TX/hWjKXFoDyhQncE6M5DuC7d4DffzjJWHL+errBsTU=
  preshared key: (hidden)
  allowed ips: 10.66.66.3/32, fd42:42:42::3/128
root@vultr:~# client_loop: send disconnect: Connection reset
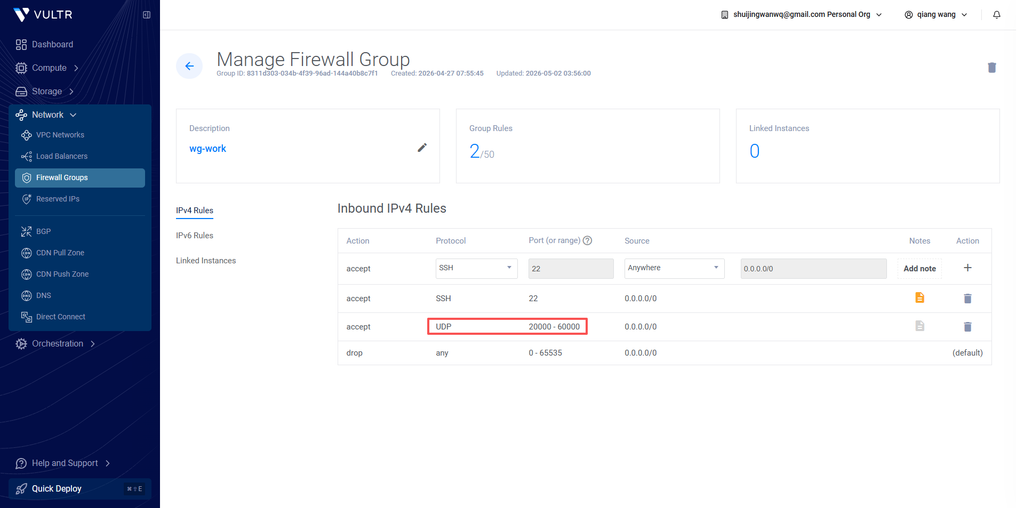
Step 4: vultr background firewall configuration (must do, otherwise the new port cannot be accessed)
- Log in to the vultr background → find the corresponding VPS → click Firewall Groups on the left;
- Find the original rules for utilizing UDP 57586 and click Delete;
- New rules: Protocol (protocol) select UDP, port (port) fill 2096, description (description) fill in WireGuard, save;
Step 5: The computer client modifies the port → reconnect, restore the handshake time, and the tunnel is smooth.
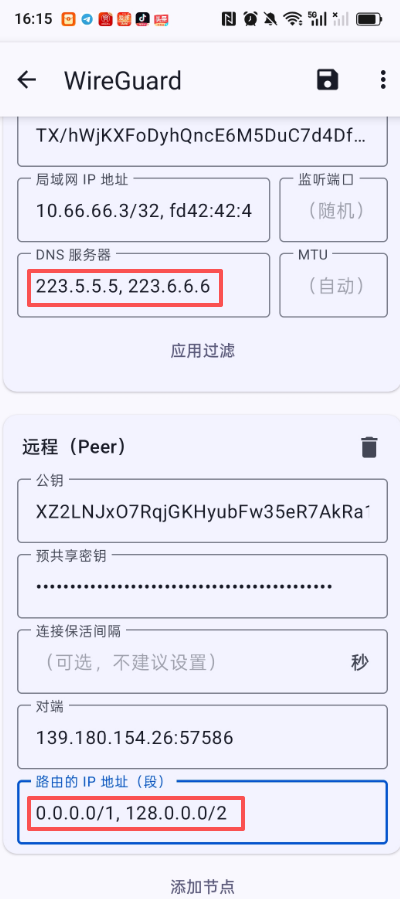
2. Recovery intelligent shunt + domestic DNS optimization
Change the client configuration back to the optimal solution for self-use, without the command line, directly edit the client configuration file:
2.1. DNS is changed to Ali Public DNS: 223.5.5.5, 223.6.6.6, the domestic web page analysis is faster and does not detour;
2.2. AllowedIPs adopts the shunt rule:
0.0.0.0/1, 128.0.0.0/2, ::/1, 8000::/1
0.0.0.0/1,128.0.0.0/2: Realize IPv4 domestic direct connection, overseas tunnel
::/1,8000::/1: Full coverage IPv6 address, overseas IPv6 traffic goes through the tunnel
2.3. Keep persistentKeePalive = 25: Prevent the router NAT from time out, and the lock screen/background is continuously lined.
3. Mobile client adaptation processing
3.1. The official Wireguard graphics interface of the mobile phone has no persistentKeePalive editing port, and cannot manually fill in the retention parameters;
3.2. Solution: delete the old tunnel, and create a new tunnel to paste the complete configuration text;
3.3. After pasting and importing, the underlying parameters will take effect.
6. Summary of key knowledge points
- WireGuard relies on UDP handshake, and the high-end (50000+) is easily banned by domestic operators during the period of time, and it is not a configuration problem;
- Ping IP pass can only prove that the routing is normal, it cannot represent the available UDP port;
- PowerShell port test only supports TCP and cannot be used to determine WireGuard UDP connectivity;
- ::/1,8000::/1 is IPv6 full coverage shunt writing method, with IPv4 shunting to realize intelligent distribution of the entire network;
- The mobile client needs a complete configuration text import to take effect to preserve the parameters, and the graphical interface cannot edit the hidden configuration;
- Select conventional camouflage ports such as 2096/4433, which is much more stable than 50000+ high ports, and there is no need to change ports frequently;
- The configuration of the UFW and iptables on the server side needs to be done and persistent at one time, and there is no need to repeatedly operate to avoid conflicts.
7. Finally, the configuration template can be used (directly copied and used)
- Computer side configuration (IP: 10.66.66.2, independent and no conflict)
[Interface]
PrivateKey = MNcoOjHNvao4gH1+xDV5I...
Address = 10.66.66.2/32, fd42:42:42::2/128
DNS = 223.5.5.5, 223.6.6.6

[Peer]
PublicKey = XZ2LNJxO7RqjGKHyubFw35eR7AkRa1iHqltQJYdsY3g=
PresharedKey = Fz04FNeapuPYQ+QAH+yN...
AllowedIPs = 0.0.0.0/1, 128.0.0.0/2, ::/1, 8000::/1
Endpoint = 139.180.154.26:2096
PersistentKeepalive = 25
- Mobile phone configuration (IP: 10.66.66.3, independent and no conflict)
[Interface]
PrivateKey = ADwndW5NwCU4YZJHC1UP...
Address = 10.66.66.3/32,fd42:42:42::3/128
DNS = 223.5.5.5, 223.6.6.6

[Peer]
PublicKey = XZ2LNJxO7RqjGKHyubFw35eR7AkRa1iHqltQJYdsY3g=
PresharedKey = Y2kt8vfHL+iCOJ0bxW...
Endpoint = 139.180.154.26:2096
AllowedIPs = 0.0.0.0/1, 128.0.0.0/2, ::/1, 8000::/1
PersistentKeepalive = 25
Note: Allowedips is incomplete configuration, it is recommended to refer to:Wireguard domestic direct connection + foreign tunnel configuration
8. Alternate command line
1. Restart the WireGuard service (port modification, configuration modification must be used)
WG-Quick Down WG0 && WG-Quick Up WG0
2. Check the iptables rules (used when forwarding exceptions)
iptables -l forward
3. Resave the iptables rule (used if the rule is missing)
netfilter-persistent save
4. Check the VPS network status (auxiliary check port monitoring)
netstat -tulnp | grep wg0
5. Restart the VPS (to solve the port is silently masked by the Vultr node)
reboot
Leave a Reply