zgocloud + wstunnel + flclash VPN configuration under android
This article can be used as a general reference for configuring WSTunnel + Wireguard VPN on Android phones. You need to prepare the following in advance:
- A server that has deployed the WSTUnnel server and the WireGuard server (refer to ZGoCloud + Wstunnel + Wireguard speed up 4 times, Clash Verge Rev automatically splits and 443 port anti-sealing actual combat)
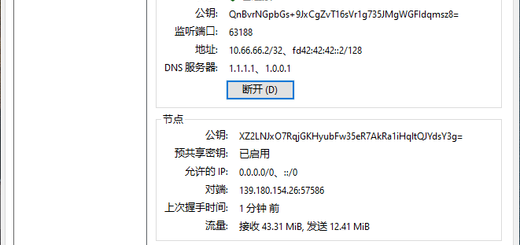
- Generate a standalone WireGuard client configuration for Android phones with four key information:
IP: Intranet IP assigned to the mobile phone (e.g.10.7.0.3)public-key: the client’s public keyprivate-key: The private key of the clientpre-shared-key: pre-shared key (if any)Download this article provided
zgocloud-android-vpn.yamlAfter configuring the file template, replace these four items with your actual value, and the rest of the configuration (such asServer: 127.0.0.1,Port: 51820etc) remain the same.Then follow the steps below to successfully enable VPN on your Android phone.
📌 Preparation
You need to download five files from the following link:
| file name | Use |
|---|---|
com.termux_1002.apk | Terminal emulator, running wstunnel |
com.termux.boot_1000.apk | Boot self-start plugin (optional) |
wstnnel(no suffix) | Tunnel client program |
| flclash | FLCLASH client program |
zgocloud-android-vpn.yaml | Your exclusive VPN profile |
以下是完整的中文内容的英文翻译,格式和内容完全对应,未作任何调整。
Below are the official websites and download channels corresponding to the first four files:
| File Name | Software Name | Official Website / Download Source | Brief Description |
|---|---|---|---|
com.termux_1002.apk | Termux | F-Droid Repository | A powerful Android terminal emulator and Linux environment, the foundation for running various command-line tools. |
com.termux.boot_1000.apk | Termux:Boot | F-Droid Repository | An official Termux add-on for running user scripts automatically at boot. |
wstunnel (no extension) | Wstunnel | GitHub Release Page | An efficient tunneling tool that encapsulates arbitrary TCP/UDP traffic in the WebSocket protocol to bypass network restrictions. |
FlClash.apk | FlClash | GitHub Release Page | A proxy client based on the Clash.Meta core, with a simple and easy-to-use interface. |
💡 Tips for Official Downloading
For your convenience, I provide the “general official website” or “official release page” for these files. Compatibility may vary for different device architectures. If you need to download the latest version yourself, or wish to adapt to a specific phone model (e.g., x86_64 architecture), you can find the latest releases via these links.
Compatibility tip: The universal versions I downloaded (e.g.,
*_universal.apkor*_arm64-v8a.apk) are compatible with the vast majority of modern Android devices. If you are unsure, you can directly use the files I provided.
⚠️ Security Reminder
Considering the complexity of the network environment, it is strongly recommended that you give priority to downloading and updating software from the above official or trusted app stores to ensure the security and reliability of the file sources. Although this might add a few seconds of extra time, it will provide better protection for your subsequent use.
I hope this collation is helpful to you. If you need any other assistance, feel free to let me know.
Note:
wstnnelThe file needs to bewstunnel_10.5.5_android_arm64.zip to unzip it. After decompression, only keep the insidewstnnelfile.
Send these files to your phone via WeChat or QQ. After sending, WeChat may give .apk file plus .1 suffix (such as com.termux_1002.apk.1), we will deal with it later.
1. Install Termux and Termux:boot
- Open the ‘File Management’ APP that comes with the phone and find
downloadFolder (or the directory where the file is saved). [Screenshot position: Figure 12 shows the download directory structure] - Have found
com.termux_1002.apk.1Andcom.termux.boot_1000.apk.1, long press them, select ‘Rename’, delete the end.1, become.apkend. [Screenshot position: Figure 7, Figure 8 shows the status before and after rename] - Click on these two APK files to install. After the installation is complete, the desktop will appear
termuxAndtermux:boottwo icons. [Screenshot position: Figure 9 shows the desktop icon] - Important: installed
termux:bootAfter, be sure to click on its icon to open it once. This step is to allow the system to allow it to run at boot time.
[Screenshot position: Figure 12 shows the download directory structure]
![[Screenshot position: Figure 12 shows the download directory structure]](https://www.shuijingwanwq.com/wp-content/uploads/2026/06/12.jpg)
[Screenshot position: Figure 7, Figure 8 shows the status before and after rename]
![[Screenshot position: Figure 7, Figure 8 shows the status before and after rename]](https://www.shuijingwanwq.com/wp-content/uploads/2026/06/7.jpg)
![[Screenshot position: Figure 7, Figure 8 shows the status before and after rename]](https://www.shuijingwanwq.com/wp-content/uploads/2026/06/8.jpg)
[Screenshot position: Figure 9 shows the desktop icon]
![[Screenshot position: Figure 9 shows the desktop icon]](https://www.shuijingwanwq.com/wp-content/uploads/2026/06/9.jpg)
2. Put the wstunnel file into the termux
- Find what you sent in the file manager
wstnnelFile (no suffix, about 9.5 MB in size). Long press it, select ‘Move’, and then paste todownloadin the root directory (that is, the path/sdcard/download/). [Screenshot position: Figure 13 shows the wstunnel file in the download directory] - Open
termuxapplication, the first startup will be initialized. Then enter the following commands in sequence:
   # 授权存储权限(会弹出系统窗口,点“允许”)
   termux-setup-storage

   # 创建 bin 目录
   mkdir -p ~/bin

   # 复制 wstunnel 文件到 Termux 的 bin 目录
   cp ~/storage/downloads/wstunnel ~/bin/

   # 赋予执行权限
   chmod +x ~/bin/wstunnel

   # 验证版本(应该显示 wstunnel-cli 10.5.5)
   ~/bin/wstunnel --version
[Screenshot position: Figure 13 shows the wstunnel file in the download directory]
![[Screenshot position: Figure 13 shows the wstunnel file in the download directory]](https://www.shuijingwanwq.com/wp-content/uploads/2026/06/13.jpg)
[Screenshot position: Figure 14 shows the execution process and successful results of the above command]
![[Screenshot position: Figure 14 shows the execution process and successful results of the above command]](https://www.shuijingwanwq.com/wp-content/uploads/2026/06/14.jpg)
3. Create a wstunnel startup script
Continue to enter the following command in Termux to create a script to start the WSTUnnel client.
# 创建 Termux:Boot 专用目录(用于开机自启,可选)
mkdir -p ~/.termux/boot

# 写入脚本内容(请将域名和 IP 替换为你的 VPN 服务器信息)
cat > ~/.termux/boot/start-wstunnel.sh << EOF
#!/data/data/com.termux/files/usr/bin/bash
termux-wake-lock
~/bin/wstunnel client -L udp://127.0.0.1:51820:127.0.0.1:51820?timeout_sec=0 --tls-sni-override 你的域名 wss://你的服务器IP:443
EOF

# 赋予执行权限
chmod +x ~/.termux/boot/start-wstunnel.sh
Note: please
your domain nameAndyour server ipReplace with the actual value (I will provide it to you). Or look up from the server configuration by yourself. Refer to:ZGoCloud + Wstunnel + Wireguard speed up 4 times, Clash Verge Rev automatically splits and 443 port anti-sealing actual combat
4. Install and configure flclash
FLCLASH is the most stable Clash Meta Android client, and perfectly supports WireGuard. I installed Tabby before and found that the file could not be imported, so I gave up. as shown in Figure 16

- download flclash
Access Flclash github releases, download the latest versionarm64-v8a-release.apkand install. Or download directly from the links provided in this article. - Import configuration file
- will receive you
zgocloud-android-vpn.yamlThe file is sent to the mobile phone through WeChat and saved todownloadfolder. - Open flclash, click ‘Configuration’ at the bottom → ‘+’ in the upper right corner → ‘Import from a file’.
- Browse and select the YAML file.
- Check the configuration (key)
- Go to ‘Configuration’ → Click the configuration you just imported → ‘Edit’.
- Have found
ProxiesDownzgocloud-wgand make sure the following fields are correct:Server: 127.0.0.1Port: 51820- The other keys remain consistent with what I provided.
- Set up automatic operation
- Click ‘Tools’ → ‘Applications’ → Open ‘Automatic Run’.
(In this way, every time flclash is opened, the VPN will be automatically connected, and there is no need to click the start button)
5. Grant system permissions (to ensure stable operation)
In order for Termux and Flclash to work in the background, you need to make the following settings:
1. Self-starting permissions
- Open the phone ‘Settings’ → ‘Applications’ → ‘Self-Start Management’.
[Screenshot position: Figure 10, Figure 21 shows the self-starting list] - Have found termux,termux:boot,flclash, turn them all on.
![[Screenshot position: Figure 10, Figure 21 shows the self-starting list]](https://www.shuijingwanwq.com/wp-content/uploads/2026/06/10.jpg)
![[Screenshot position: Figure 10, Figure 21 shows the self-starting list]](https://www.shuijingwanwq.com/wp-content/uploads/2026/06/21.jpg)
2. Power Consumption Management (Background Activities are allowed)
- Go to ‘Settings’ → ‘Applications’ → ‘Application Management’ → Find termux,termux:boot,flclash → ‘Power Consumption Management’.
[Screenshot position: Figure 20 shows the power consumption behavior control] - Select ‘Background Behavior Fully Allowed’(or ‘unrestricted’).
![[Screenshot position: Figure 20 shows the power consumption behavior control]](https://www.shuijingwanwq.com/wp-content/uploads/2026/06/20.jpg)
3. Lock the background (prevention of being cleaned) (optional)
- The multitasking interface (swipe and hover from the bottom of the screen) to find the Flclash card,Swipe down until a small lock icon appears, lock it.
6. Start VPN
- Confirm that WSTUnnel is running
You can reboot your phone, or run the script manually in Termux:
sh ~/.termux/boot/start-wstunnel.sh
Then execute ps -ef | grep wstunnel Check if the process exists.
[Screenshot position: Figure 22 shows the status of the process (the process should be displayed under normal circumstances]
![[Screenshot position: Figure 22 shows the status of the process (the process should be displayed under normal circumstances]](https://www.shuijingwanwq.com/wp-content/uploads/2026/06/22.jpg)
- Open flclash
- Click the ‘Dashboard’ at the bottom → make sure that the ‘Exit Mode’ at the top is ‘Rules’.
- Click on the lower right corner ‘Start’ button.
[Screenshot position: Figure 17 shows the dashboard interface after startup] - The system will pop up the VPN connection authorization window, click ‘OK’.
![[Screenshot position: Figure 17 shows the dashboard interface after startup]](https://www.shuijingwanwq.com/wp-content/uploads/2026/06/17.jpg)
- Verification success
- The Termux, Flclash icons appear in the status bar.
- Open browser access
https://ip.sb, the displayed IP should be your VPN server IP.
[Screenshot location: Figure 18 and Figure 19 are only examples, indicating that you can access the Internet to access applications and web pages normally]
![[Screenshot location: Figure 18 and Figure 19 are only examples, indicating that you can access the Internet to access applications and web pages normally]](https://www.shuijingwanwq.com/wp-content/uploads/2026/06/18.jpg)
![[Screenshot location: Figure 18 and Figure 19 are only examples, indicating that you can access the Internet to access applications and web pages normally]](https://www.shuijingwanwq.com/wp-content/uploads/2026/06/19.jpg)
7. Daily instructions for use
- After each boot,
wstnnelIt will run automatically (if the boot self-program has been set before). - Just open flclash manually, it will automatically connect to the VPN.
- If you don’t want to manually open flclash, you can turn on flclash in the system ‘Self-Start Management’, but some mobile phones may be invalid. It only takes a few seconds to open manually, without affecting the experience.
8. Troubleshooting common problems
| Phenomenon | possible cause | Solution |
|---|---|---|
| FLCLASH cannot access the Internet after startup | wstunnel not running | Execute in Termux ps -ef | grep wstunnel, if there is no process, restart the phone or run the script manually |
| The vpn icon disappears after opening flclash | Insufficient background permissions | Check if ‘Power Consumption Management’ is set to ‘All allow background behavior’ |
Termux Tips Permission denied | Wstunnel not copied correctly | Execution termux-setup-storage Re-authorize, copy again |
| The files sent by WeChat cannot be found | Files are renamed or moved to subdirectories | Search with mobile file manager wstnneland then move to download Root directory |
| WSTUnnel does not start after restarting | Termux:boot has not been opened once | Click on the Termux:Boot icon, then restart the phone |
9. Get help
If you still cannot use it according to this tutorial, please contact me and attach the following screenshots:
- Execute in Termux
ps -ef | grep wstunnelthe result of - flclash dashboard interface
- Status of related apps in mobile phone ‘Self-Start Management’
I will help solve it as soon as possible.
Happy use!
Stop the Hassle | Custom WireGuard VPN Setup Service
I have been testing various network optimization solutions for a long time. My personal setup has been running continuously for over a month with absolutely zero downtime. If you are tired of troubleshooting and dealing with complex server configurations, feel free to reach out for a custom solution.
What I Offer:
✅ Remote Setup Service: I will deploy an exclusive VPN on your own server. You keep full control of your data—set it once and forget about it.
✅ Free Trial: New users can apply for a one-month free trial of my self-hosted node, so you can personally experience the speed and stability.
✅ Performance Guaranteed: Deeply optimized routing rules to completely eliminate lag and connection timeouts in daily use.
Contact Me:
Telegram: @shuijingwan
WeChat: 13980074657
Email: shuijingwanwq@gmail.com