Farewell Manual Numbering: Elegantly Manage WordPress Series Articles with PublishPress Series
From title hardcoding to plugin automation, the organization and multilingual of a series of articles
1. Why did I abandon ‘Part X’ in the title
I have a ‘self-built VPN’ series on my blog, and I have written 9 articles before and after. In the early days, in order to reflect the relevance between articles, I added the prefix of ‘self-built VPN series:’ on the title of each article, like this:
- Self-built VPN Series Part 1: Disable LetsVPN to self-built Wireguard VPN full process review (with pit guide)
- Self-built VPN series Part 2: Wireguard VPN configuration optimization: domestic website direct connection, foreign traffic go to VPN (actual measurement is effective)
- ……
- Self-built VPN series Part 9: Checking the actual record: Solve the problem of ‘some websites that cannot be accessed’ under Clash Verge + Wstunnel + Wireguard
Although this approach is intuitive, the problems follow:
- Long titles: Core keywords are often truncated in mobile or search engine results.
- Inconvenient to modify: If you want to insert a new article in the middle of the series, the title number of all subsequent articles must be manually modified.
- Repeat with plug-in information: When I use the series management plug-in, the plugin itself will display ‘This entry is part 9, a total of 9 in the series Self-built VPN series’, the number in the title becomes redundant information.
So I decided to look for a more professional solution – the PublishPress Series plugin. Below is the complete tossing record, I hope it will help you.
2. Scheme selection: Why is PublishPress Series?
In the WordPress plugin library, there are several plugins that specialize in managing a series of articles. I have compared several mainstream choices:
| plugin name | Characteristic | Applicable scenarios |
|---|---|---|
| PublishPress Series | Comprehensive functions, support drag and drop sorting, automatic navigation, multi-language compatibility | Preferred, suitable for most blogs |
| Muki Series Toc | Lightweight, automatically generate directories | Just need a simple directory display |
| Manual shortcodes (tags + lists) | No plugins required | There are very few series, willing to write code |
Considering that I need to maintain multiple series for a long time, and the website also uses Polylang for multilingual, PublishPress Series is the most suitable option for features.
3. Installation and basic settings
3.1 Install the plugin
Enter the plugin in the WordPress background → install the plugin, search PublishPress Series, and click ‘Install Now’ after finding it, and then enable. as shown in Figure 1
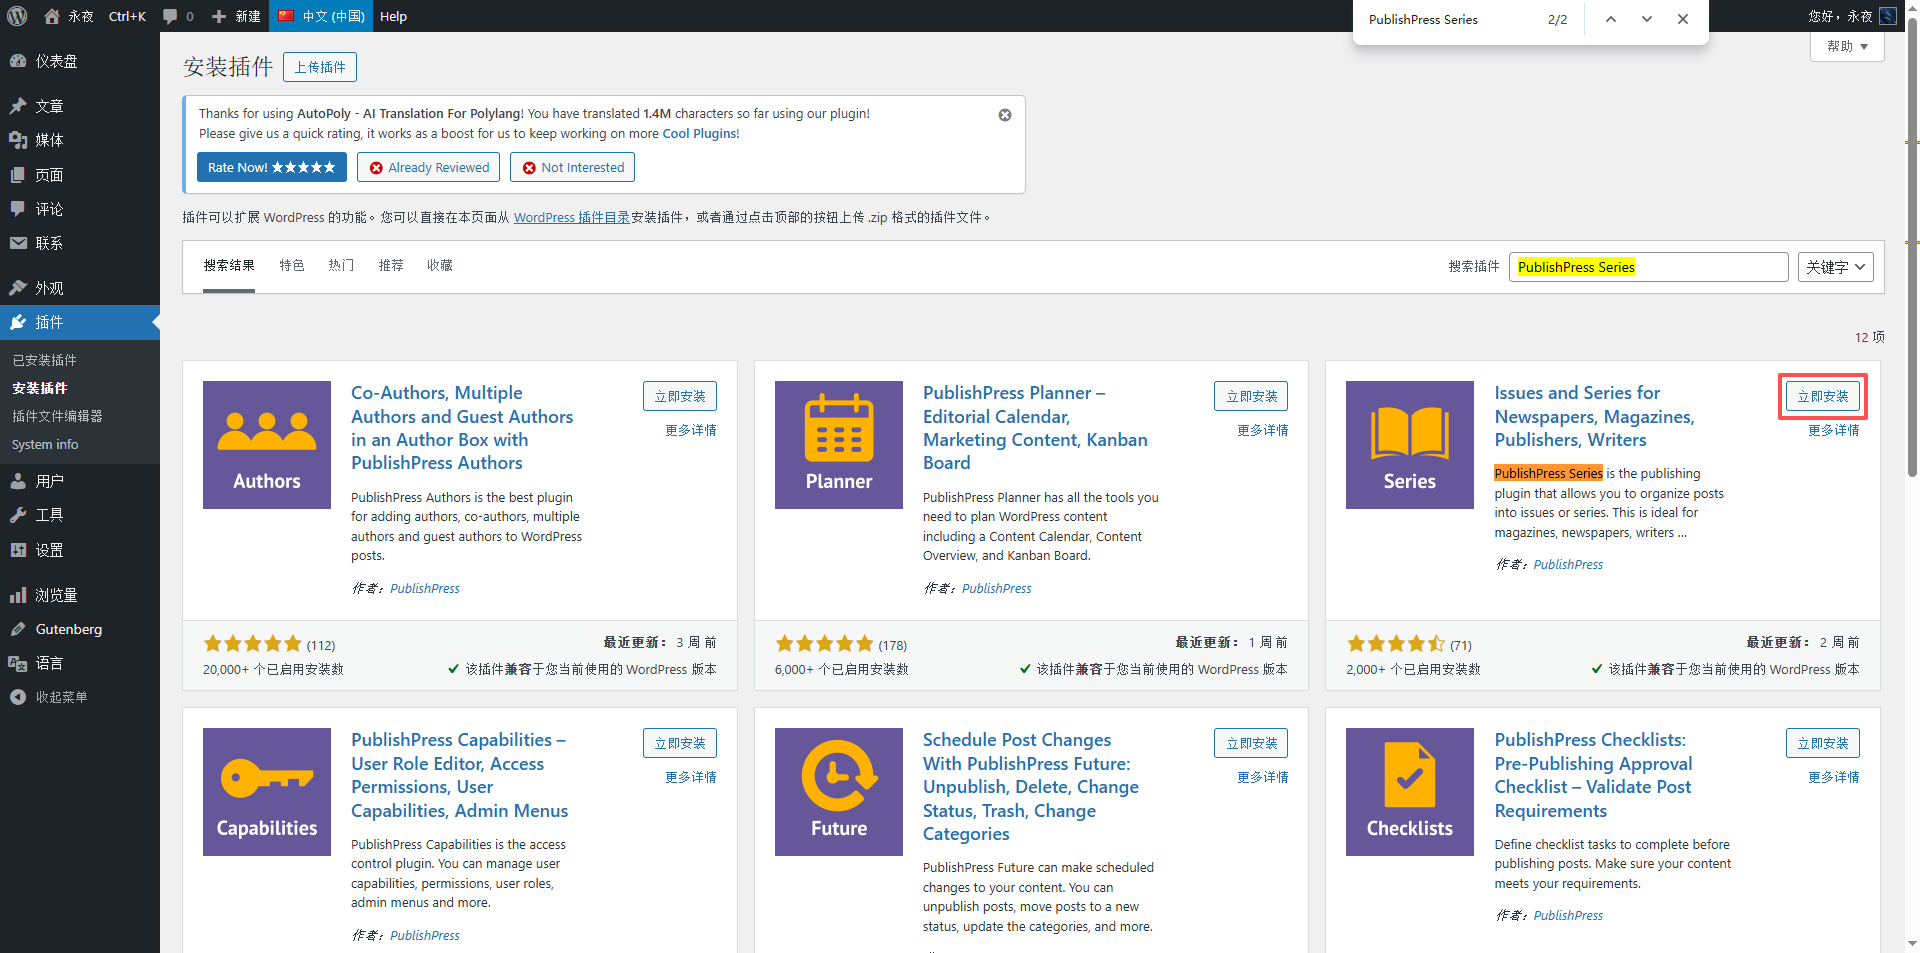
When enabled, submenu such as ‘Series’ and ‘Manage Series’ will be added under ‘Articles’ in the left menu of the background.
3.2 Create your first series
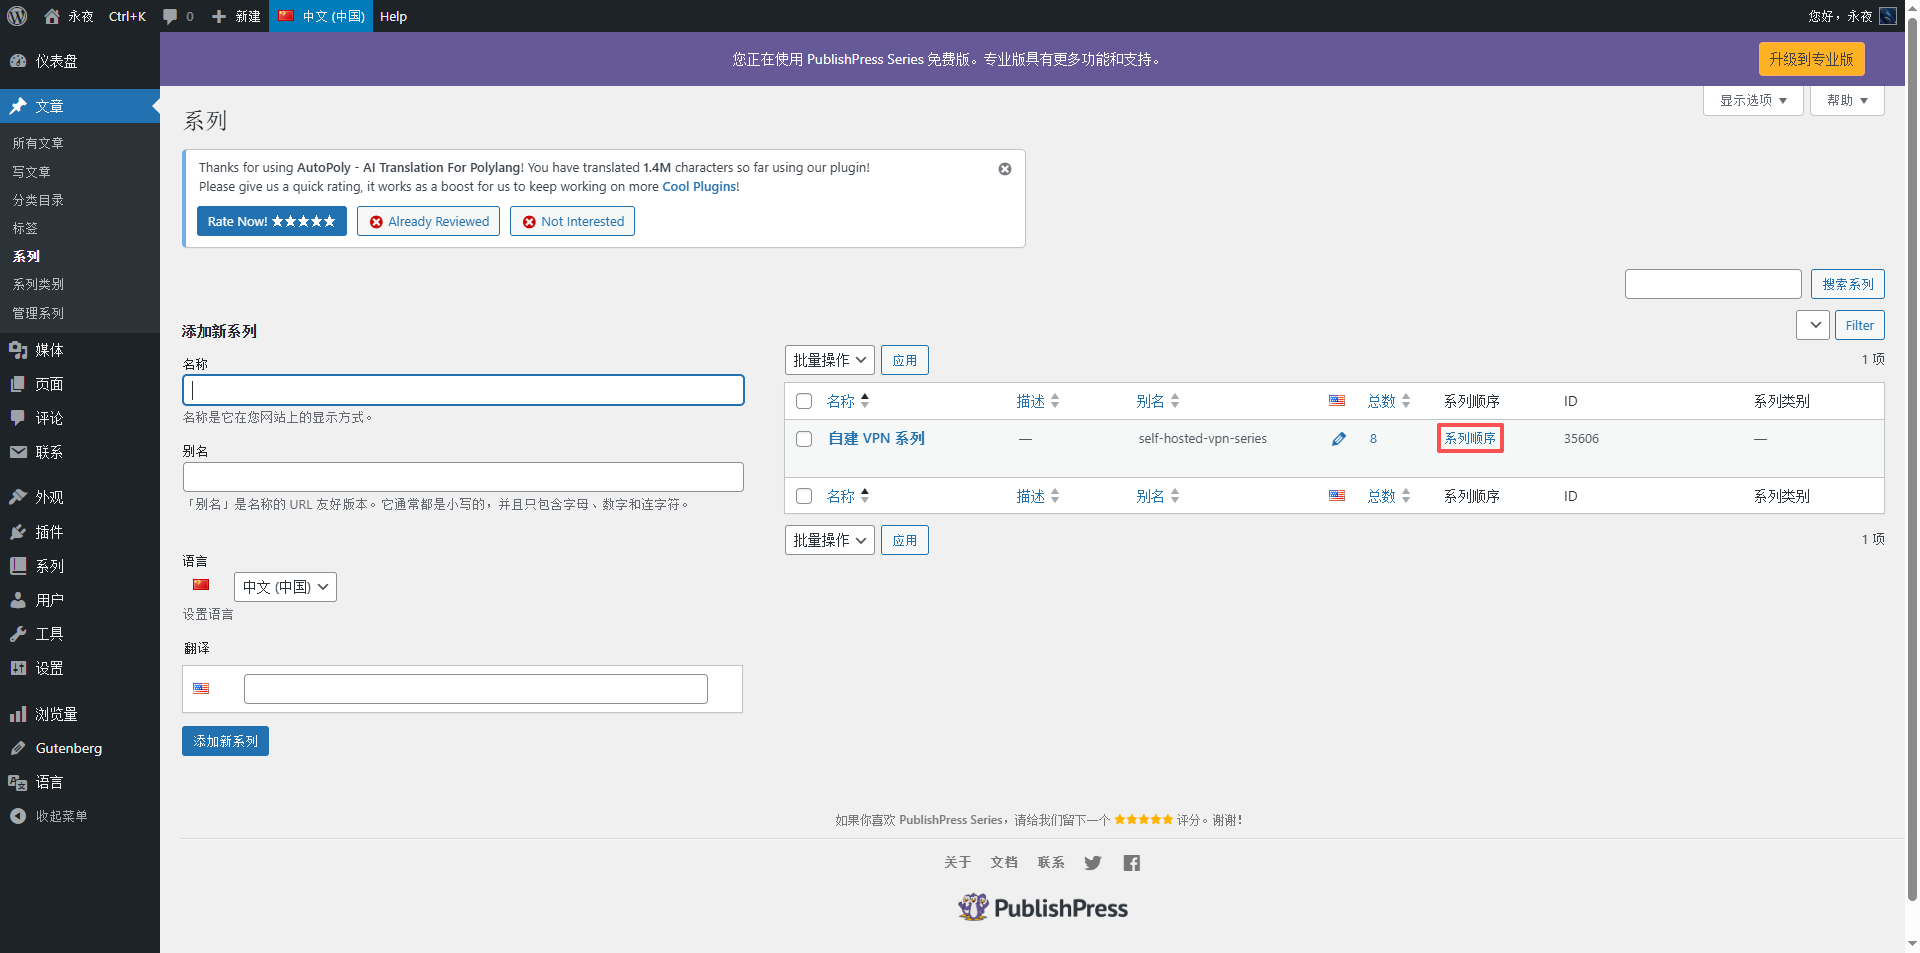
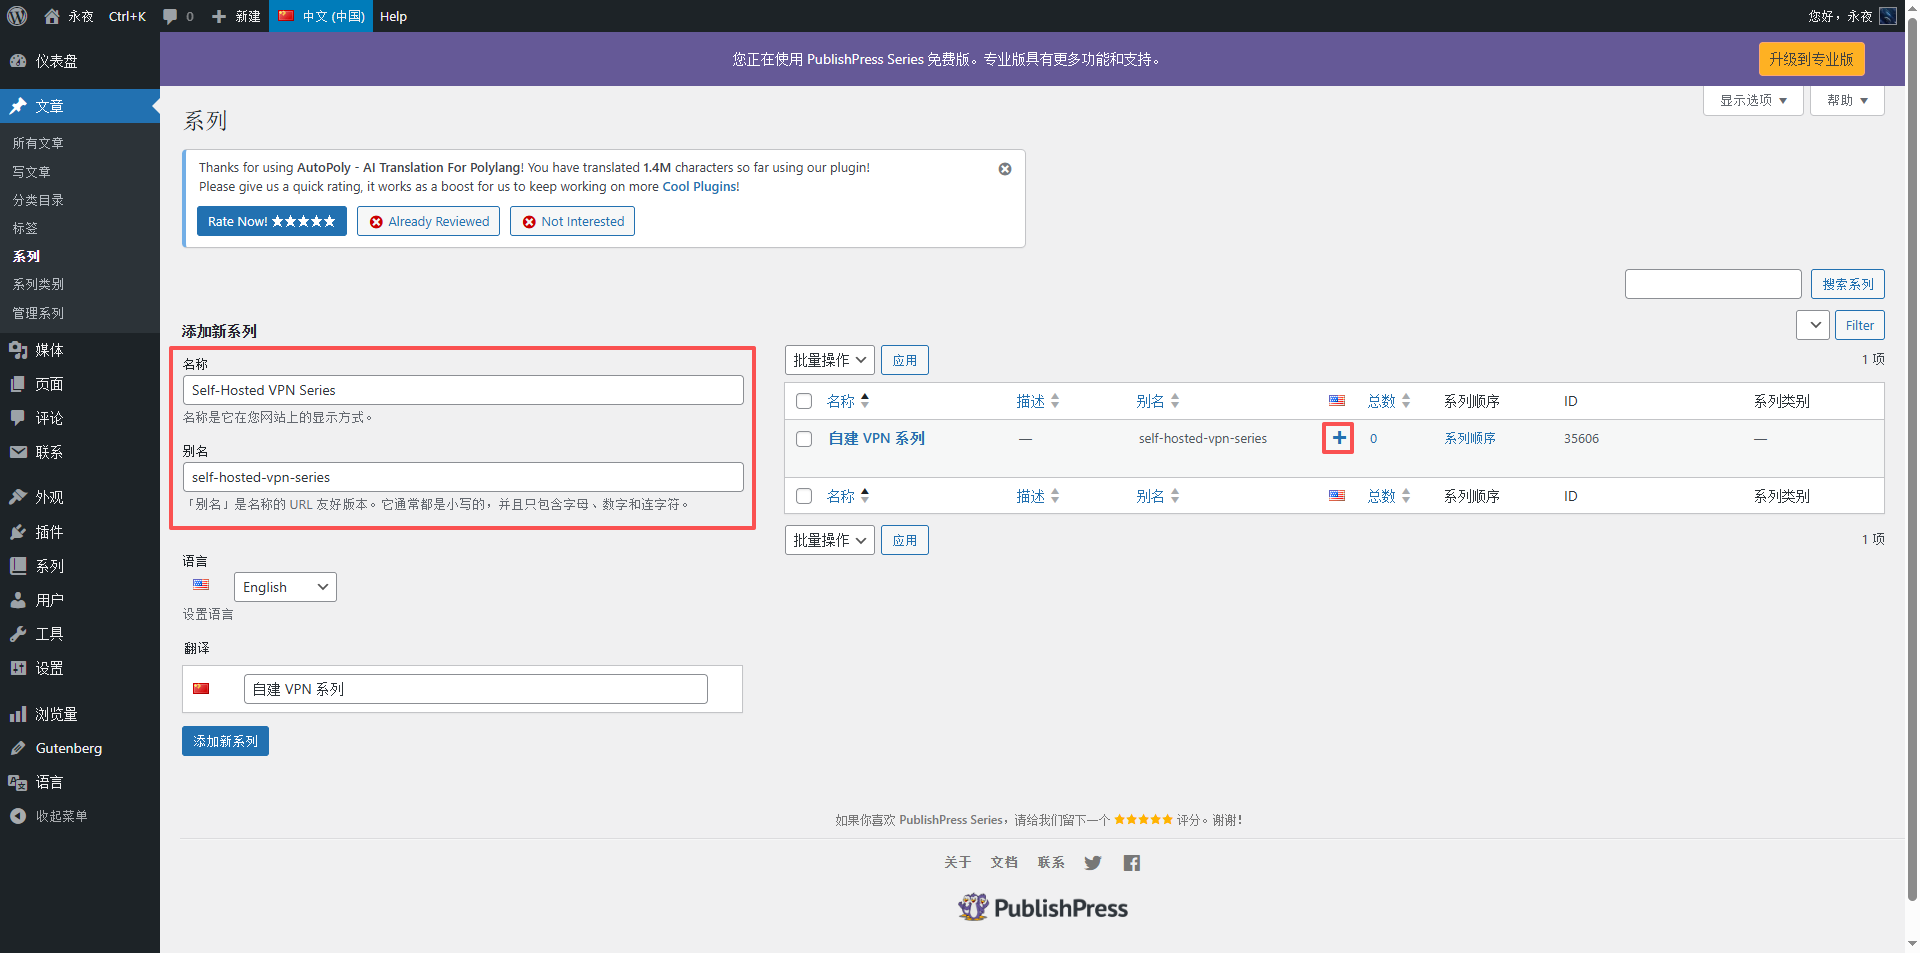
Click Article → Series → Add a new series, enter the series name (for example, ‘Self-built VPN series’), you can write a series of descriptions (not required), and then save. as shown in Figure 3
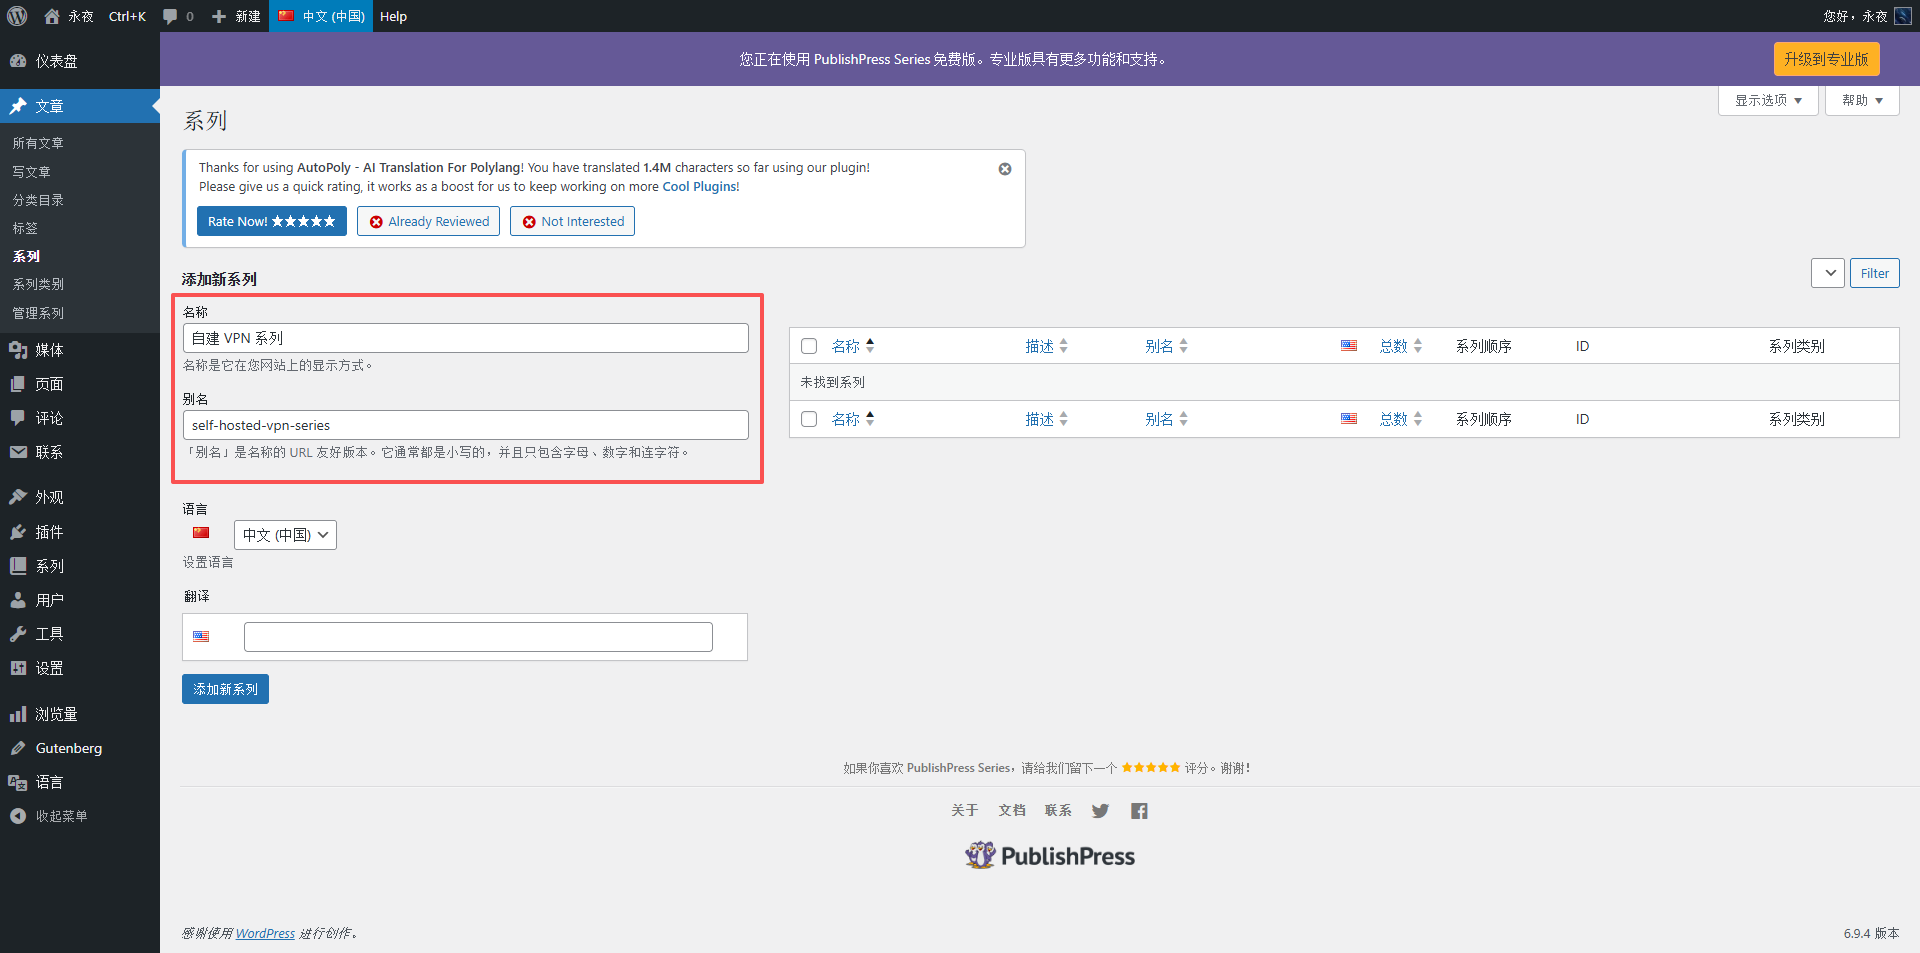
At this point, the ‘container’ of the series has been created. Next, you need to put the article into it.
Add the article to the series
There are three ways to do it, you can choose according to your own situation.
4.1 Method 1: Check directly when writing a new article
At the lower right side of the article editing interface, there will be a ‘series’ meta box, directly check the corresponding series and publish it.
4.2 Method 2: Add when editing existing articles
Open any old article, check the series in the same location, and update the article.
4.3 Method 3: Batch operation (be careful!)
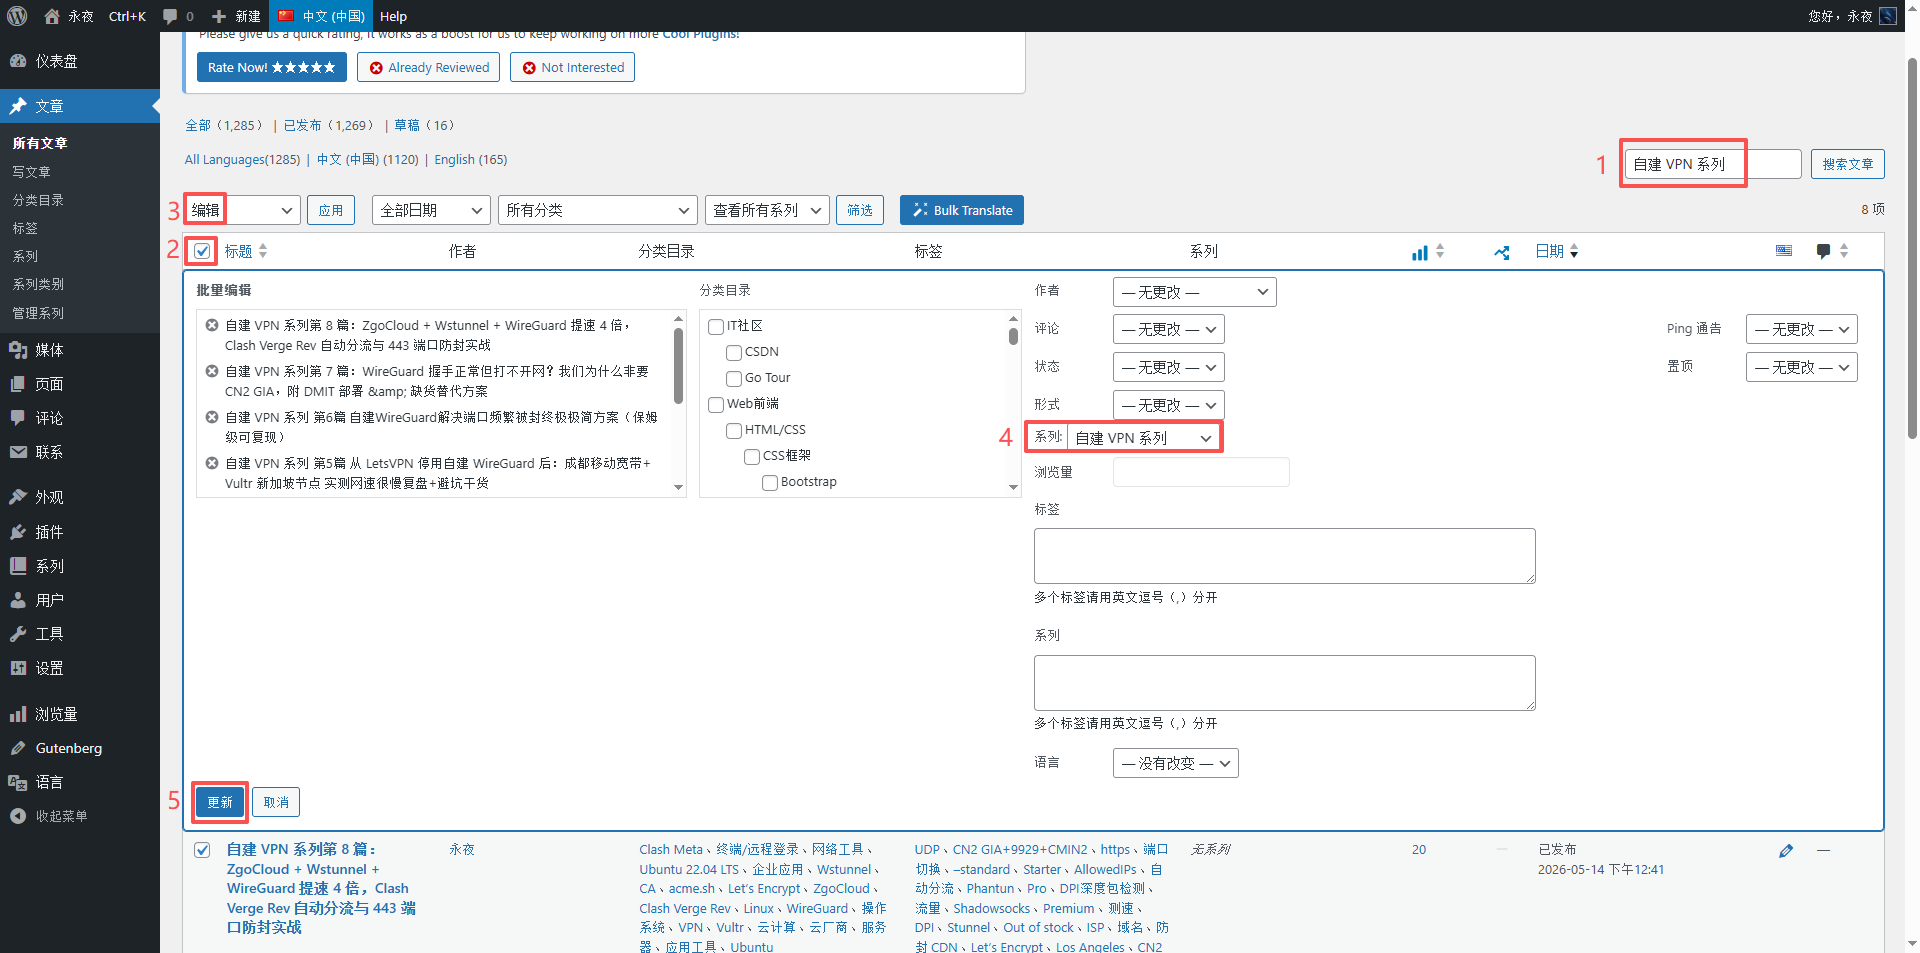
If you want to add multiple articles to a series at one time, you can enter the article list, check the article in batches, select Batch Operation → Edit, and then check the series in the new panel.
⚠️ Important reminder: When editing in batches, if the ‘label’ field is left blank, it will not affect the original label; but if you clear or fill in the content, the original label will be overwritten. Classification is accumulation, relatively safe. For absolute safety, I later chose to process one by one manually.
As shown in Figure 6 (Screenshot of the batch editing interface – show the check box of the series and the precautions for leaving the label field blank)
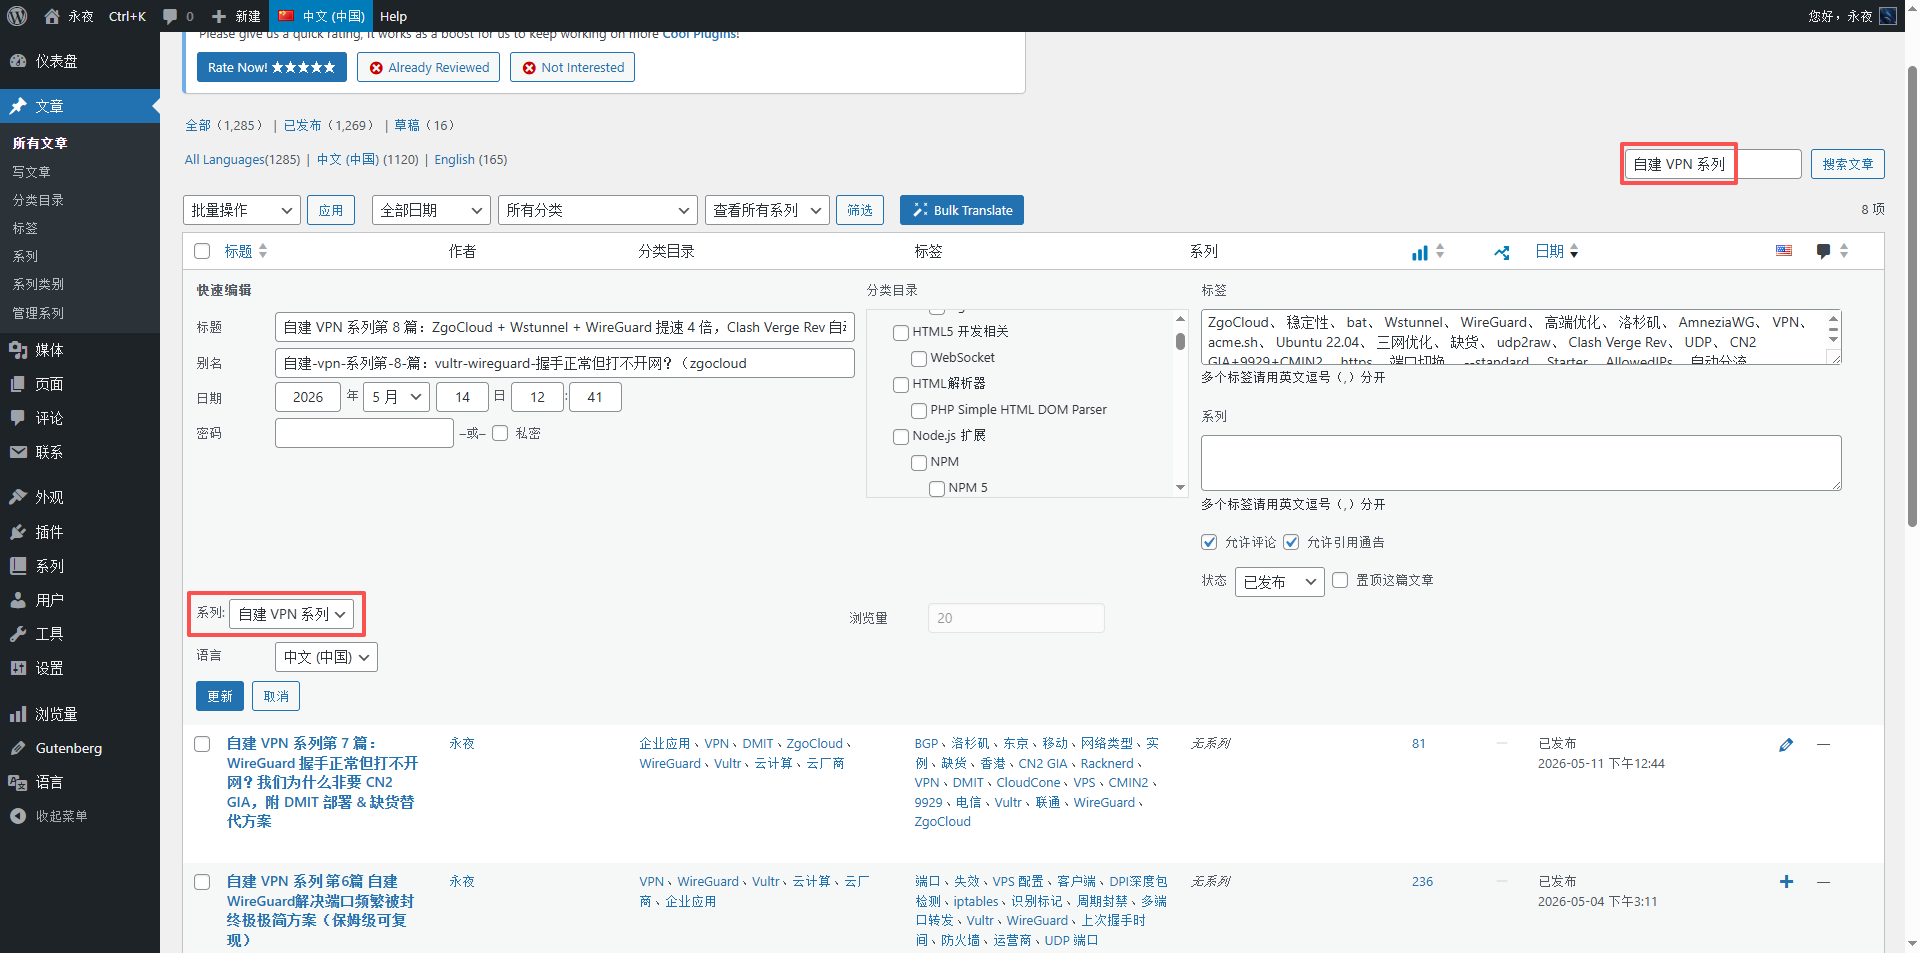
4.4 My Choice: Quick Editing (The Fastest Manual)
If you are as worried as I am that batch operations affect the original classification label, you can use the Quick Edit function.
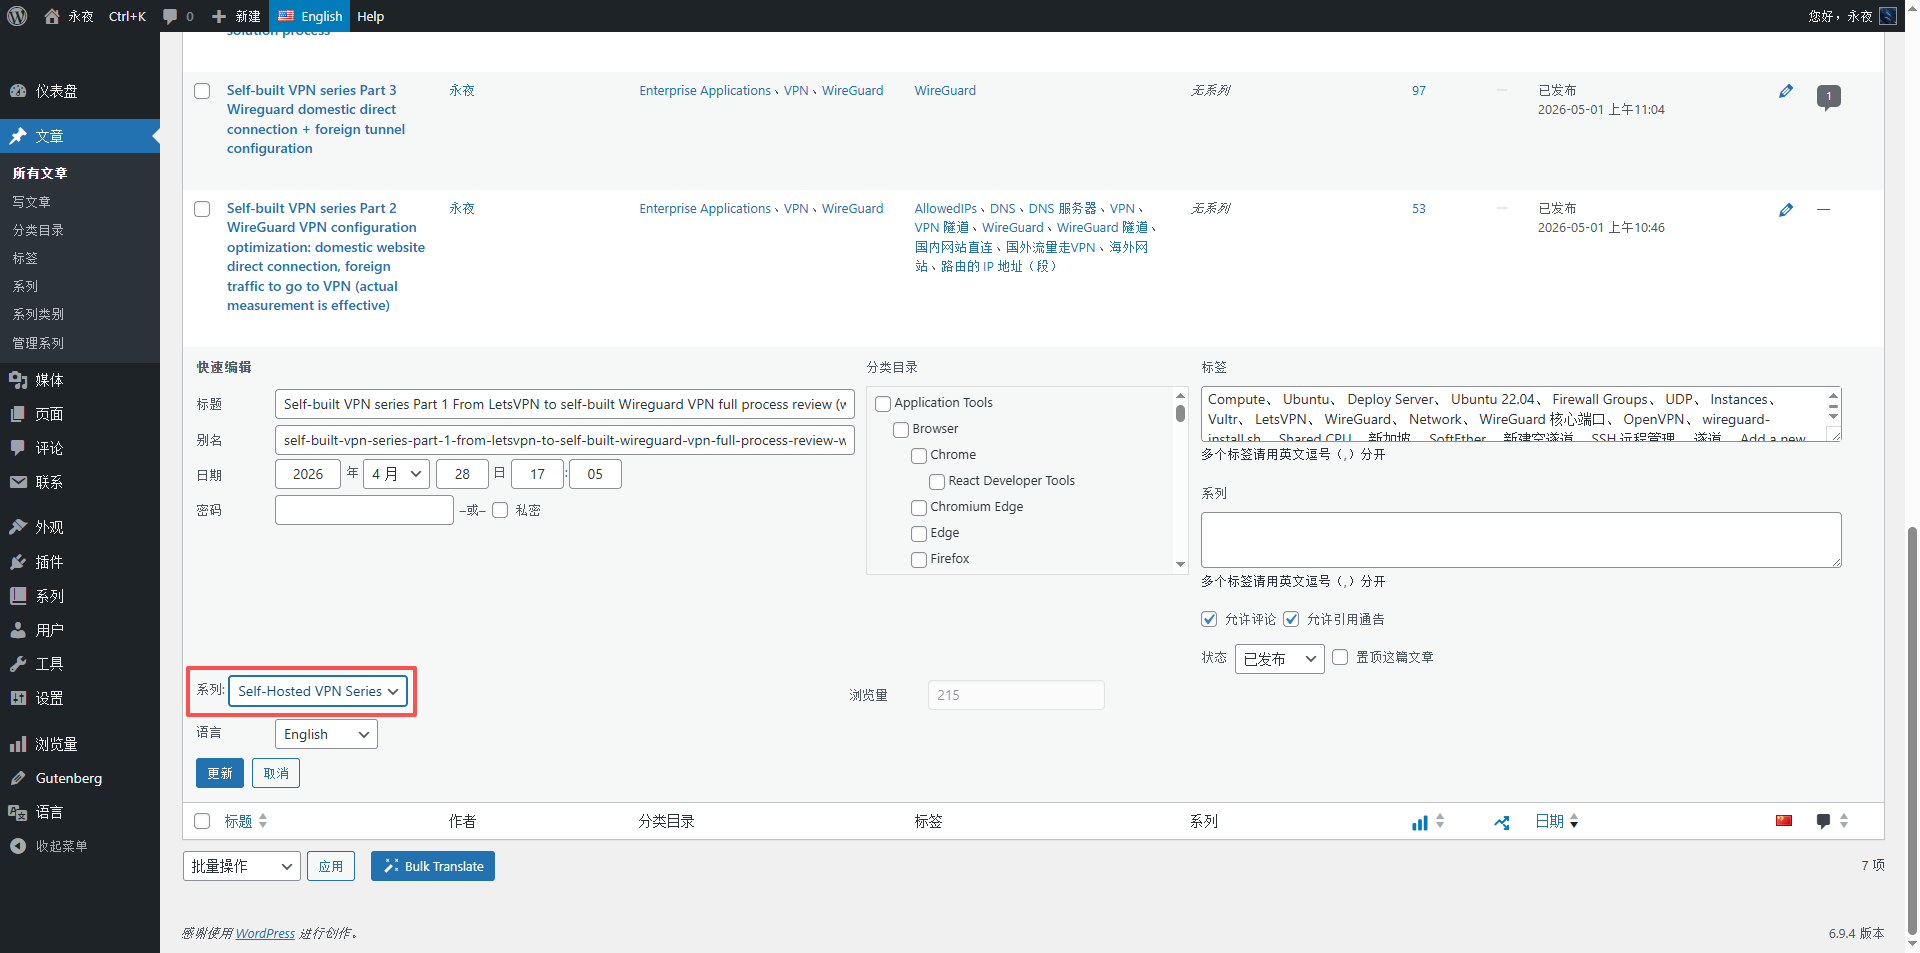
On the article list page, hover the mouse under the title of an article, click ‘Quick Edit’, there is a ‘Series’ drop-down box directly in the expanded panel, and then click ‘Update’. The whole process takes less than 10 seconds to an article.
As shown in Figure 7 (Quick Edit Panel Screenshot – Highlight Series Selection Box)
5. Adjust the order of the articles in the series
After all articles are added to the series, the order may not be the first to ninth article you want. At this time, you need to enter Article → Management series, find your series (such as ‘Self-built VPN Series’), and click the ‘Series Order’ link on the right. as shown in Figure 8
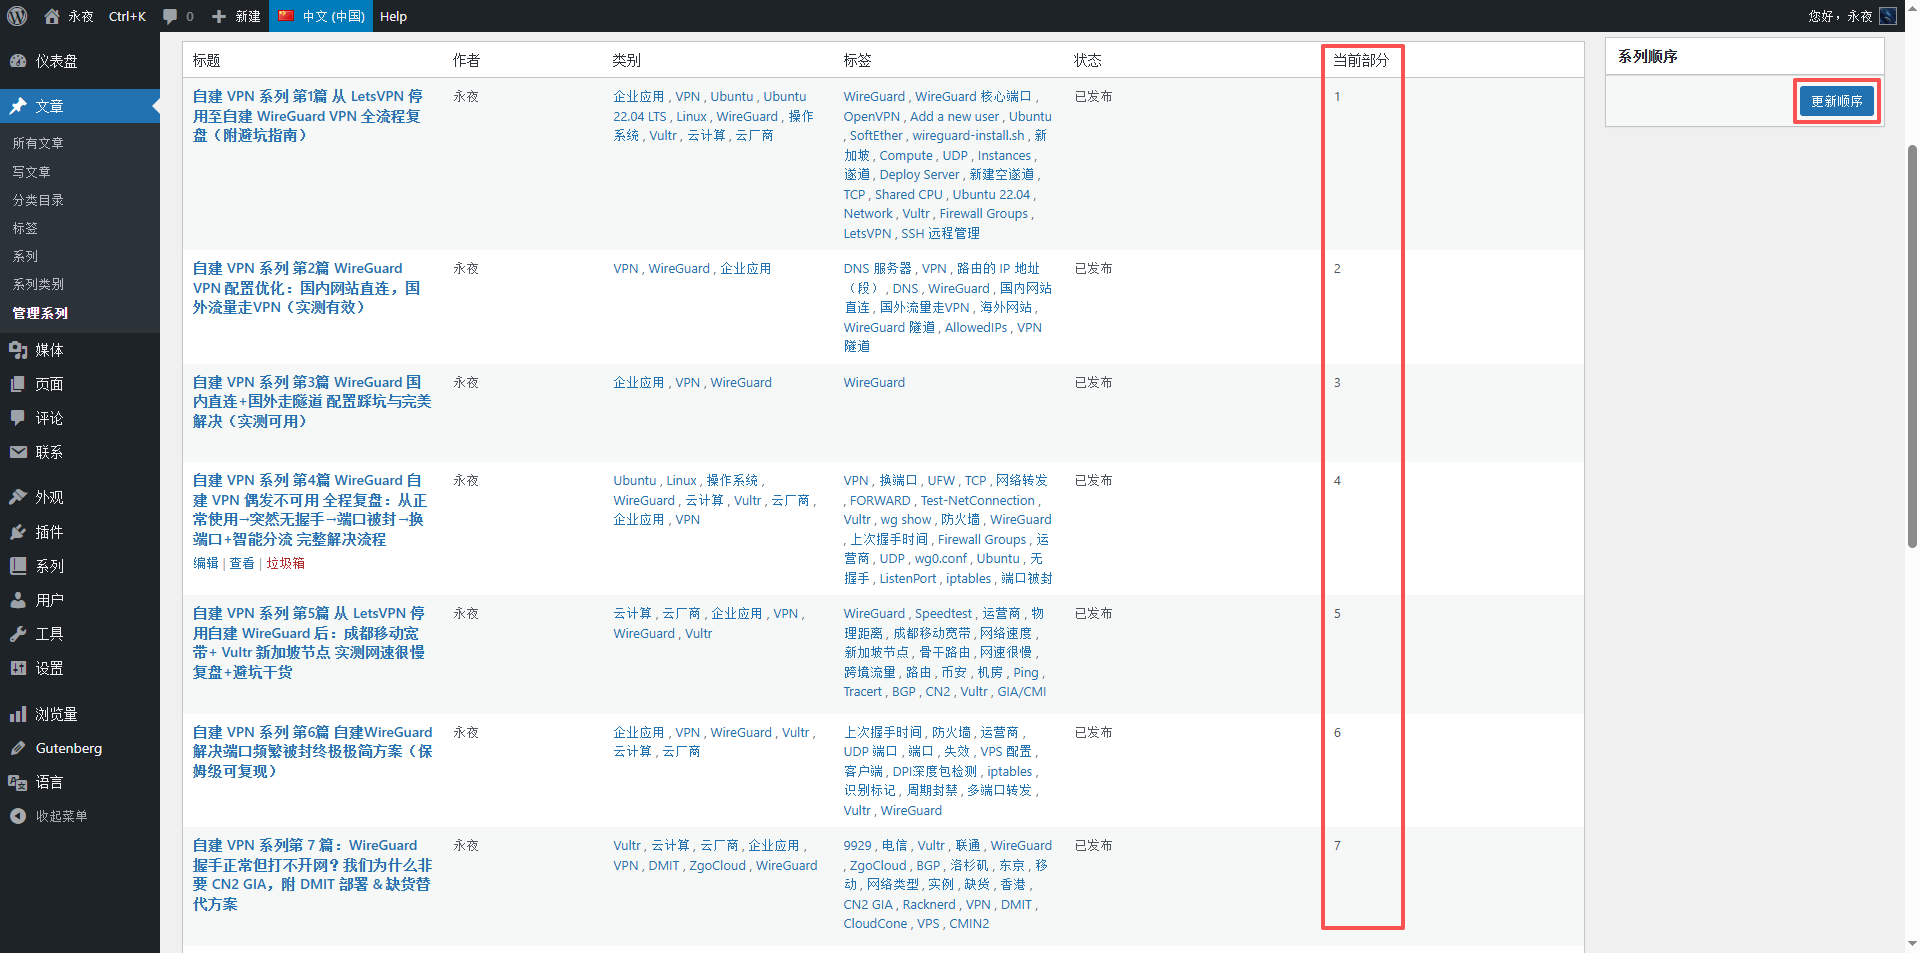
On the sorting page, drag the ‘three’ icon on the left side of the article directly with the mouse, and you can freely arrange the order. After dragging, click Save. as shown in Figure 9
6. Configuration of front desk display effect
In order for readers to clearly see the series attribution and navigation when reading the article, it is necessary to set the front desk display options.
Go to the Series → Settings tab, here are a few important options:
- Post Details: After checking, the article list will display ‘This entry is Part X, a total of Y in the series Self-built VPN series’. As shown in Figure 10
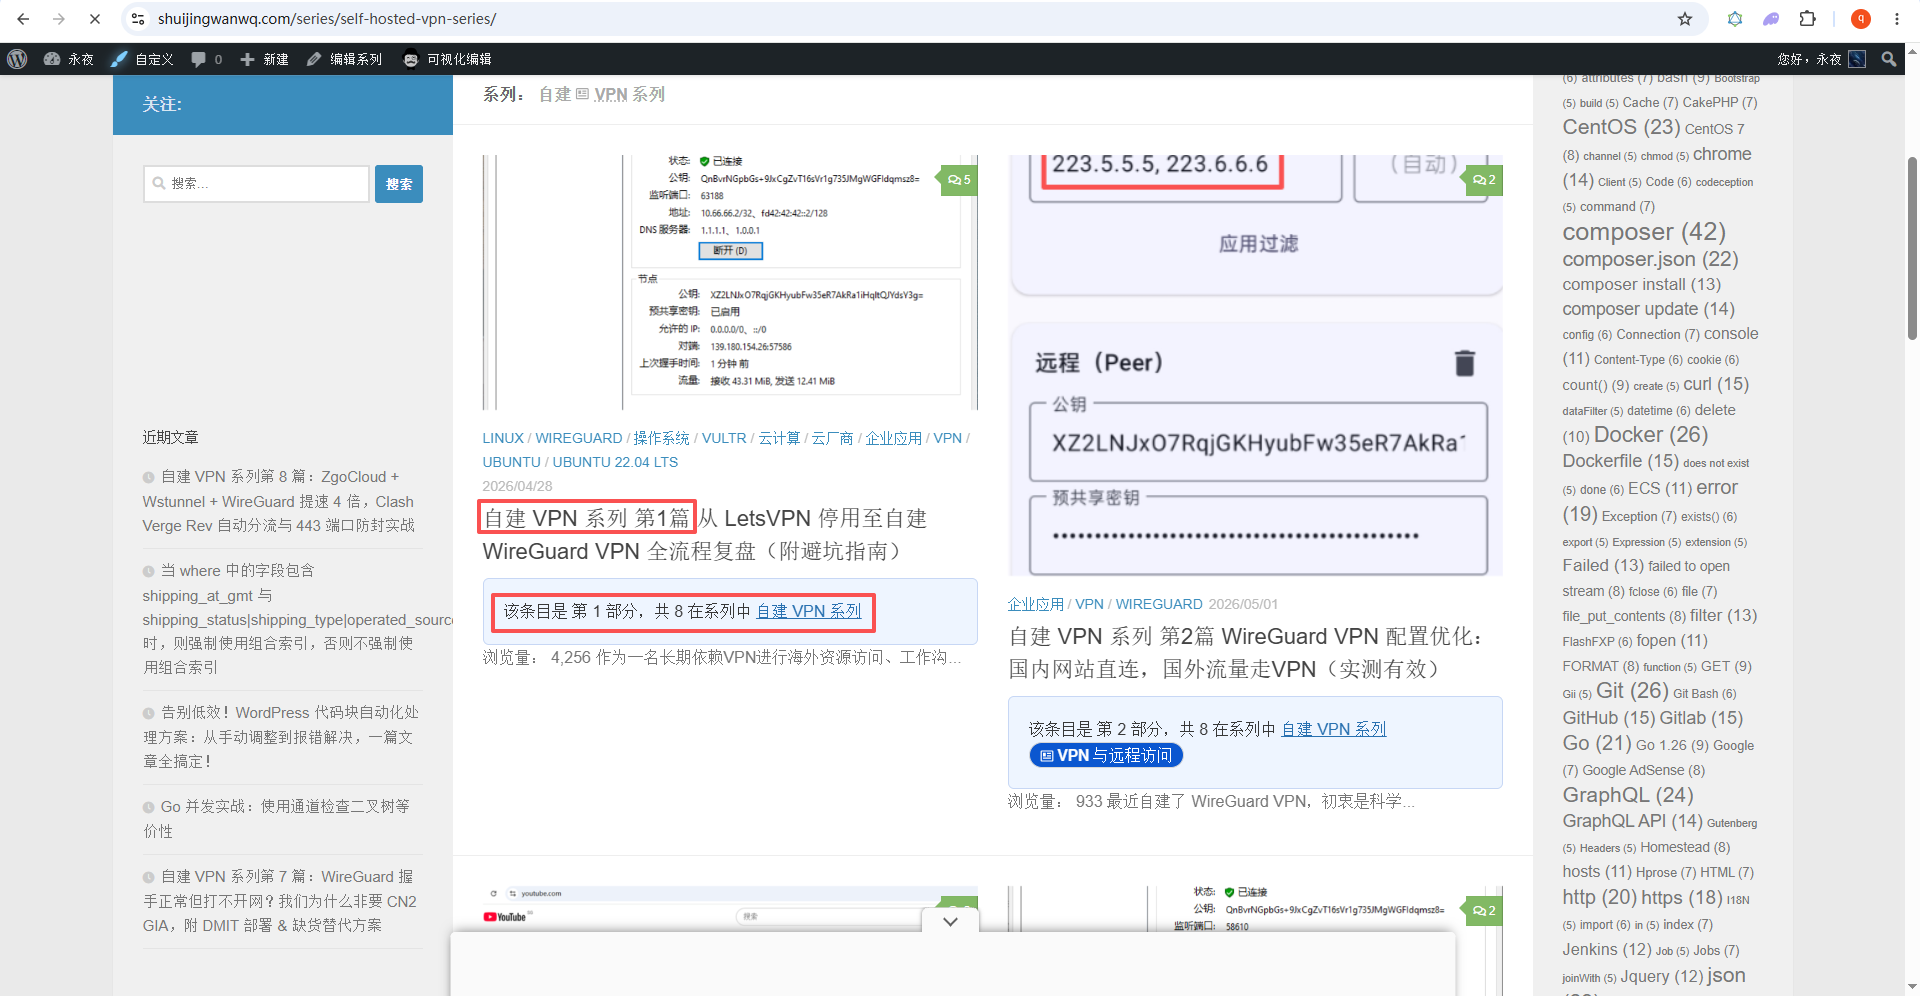
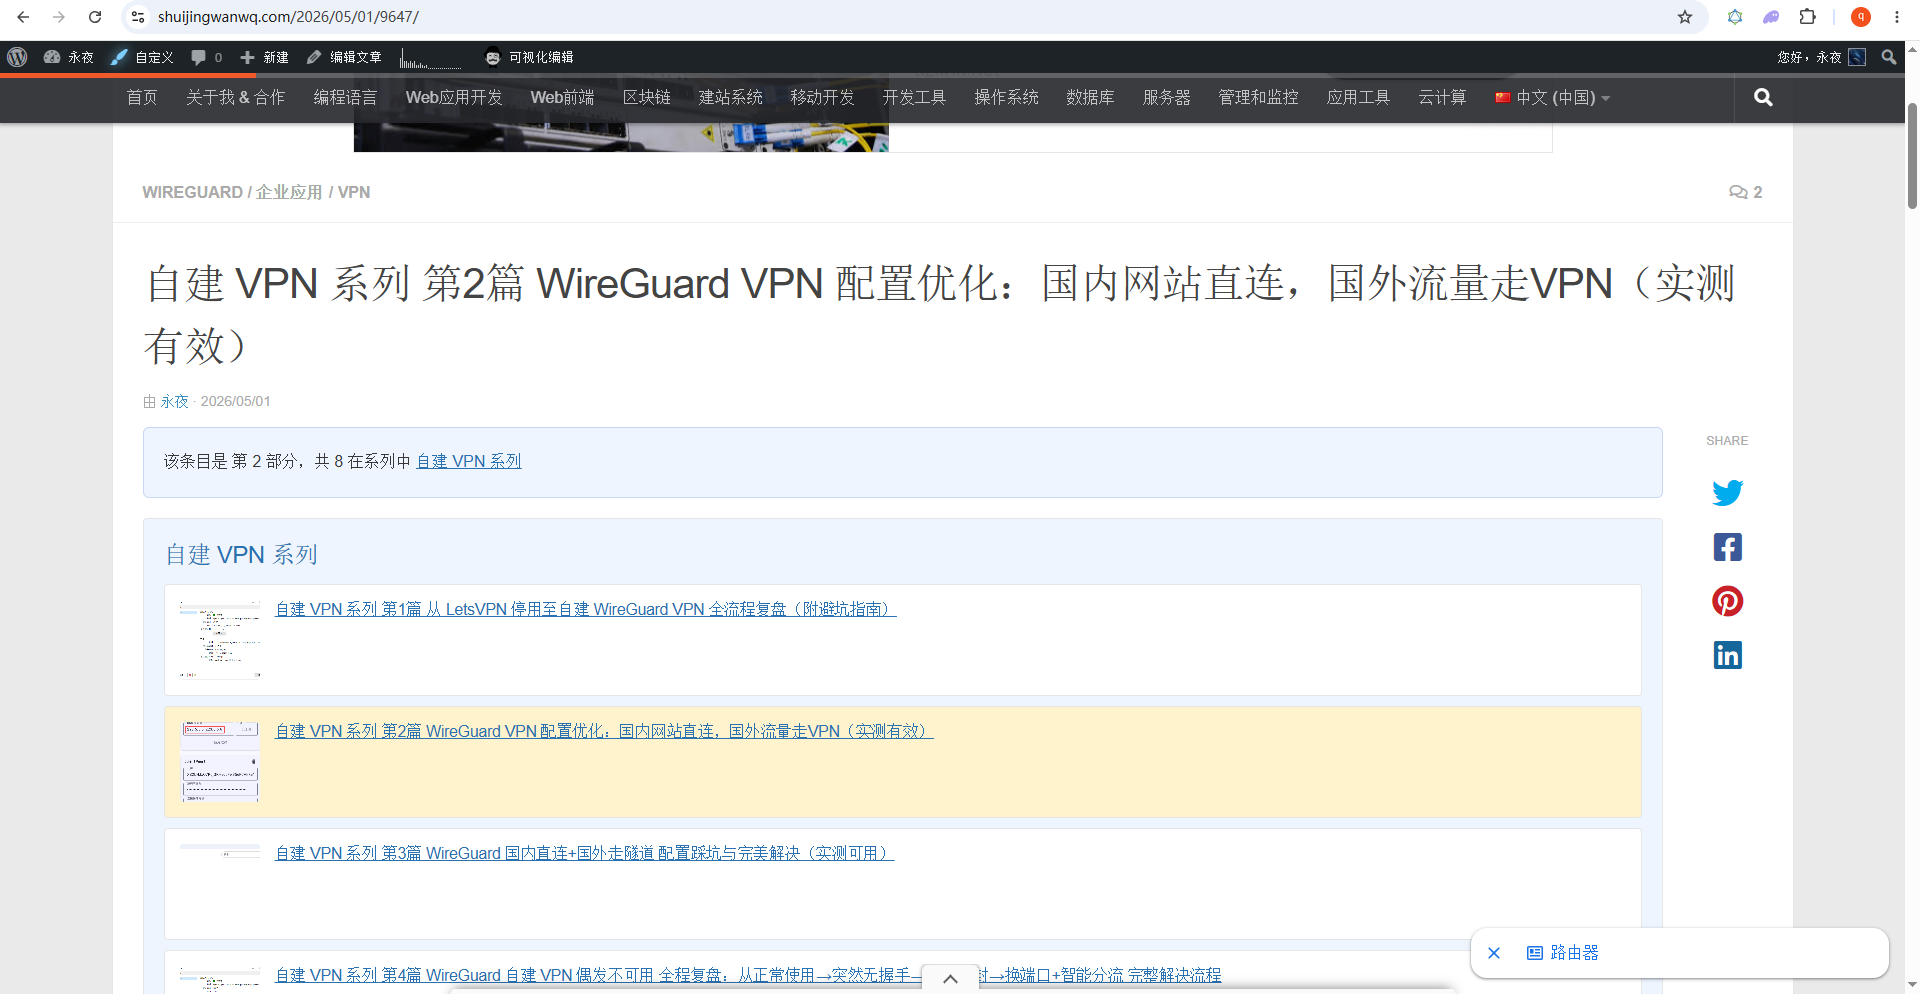
- Post list box: Display the directory (with link) of the entire series at the beginning of the article, which is convenient for jumping. as shown in Figure 11
- Post Navigation: Provides ‘Previous’ and ‘Next’ buttons.
I didn’t make adjustments, I can set it by default.
7. Cooperation with polylang multi-language plug-in
My website is bilingual in Chinese and English, and Polylang is responsible for language switching. At first, I was worried that the series pages could not be associated with translation, but after the actual test, it was found that a condition needs to be met: there must be at least one corresponding language article published in each language version.
7.1 Setting Polylang Support Series Translation
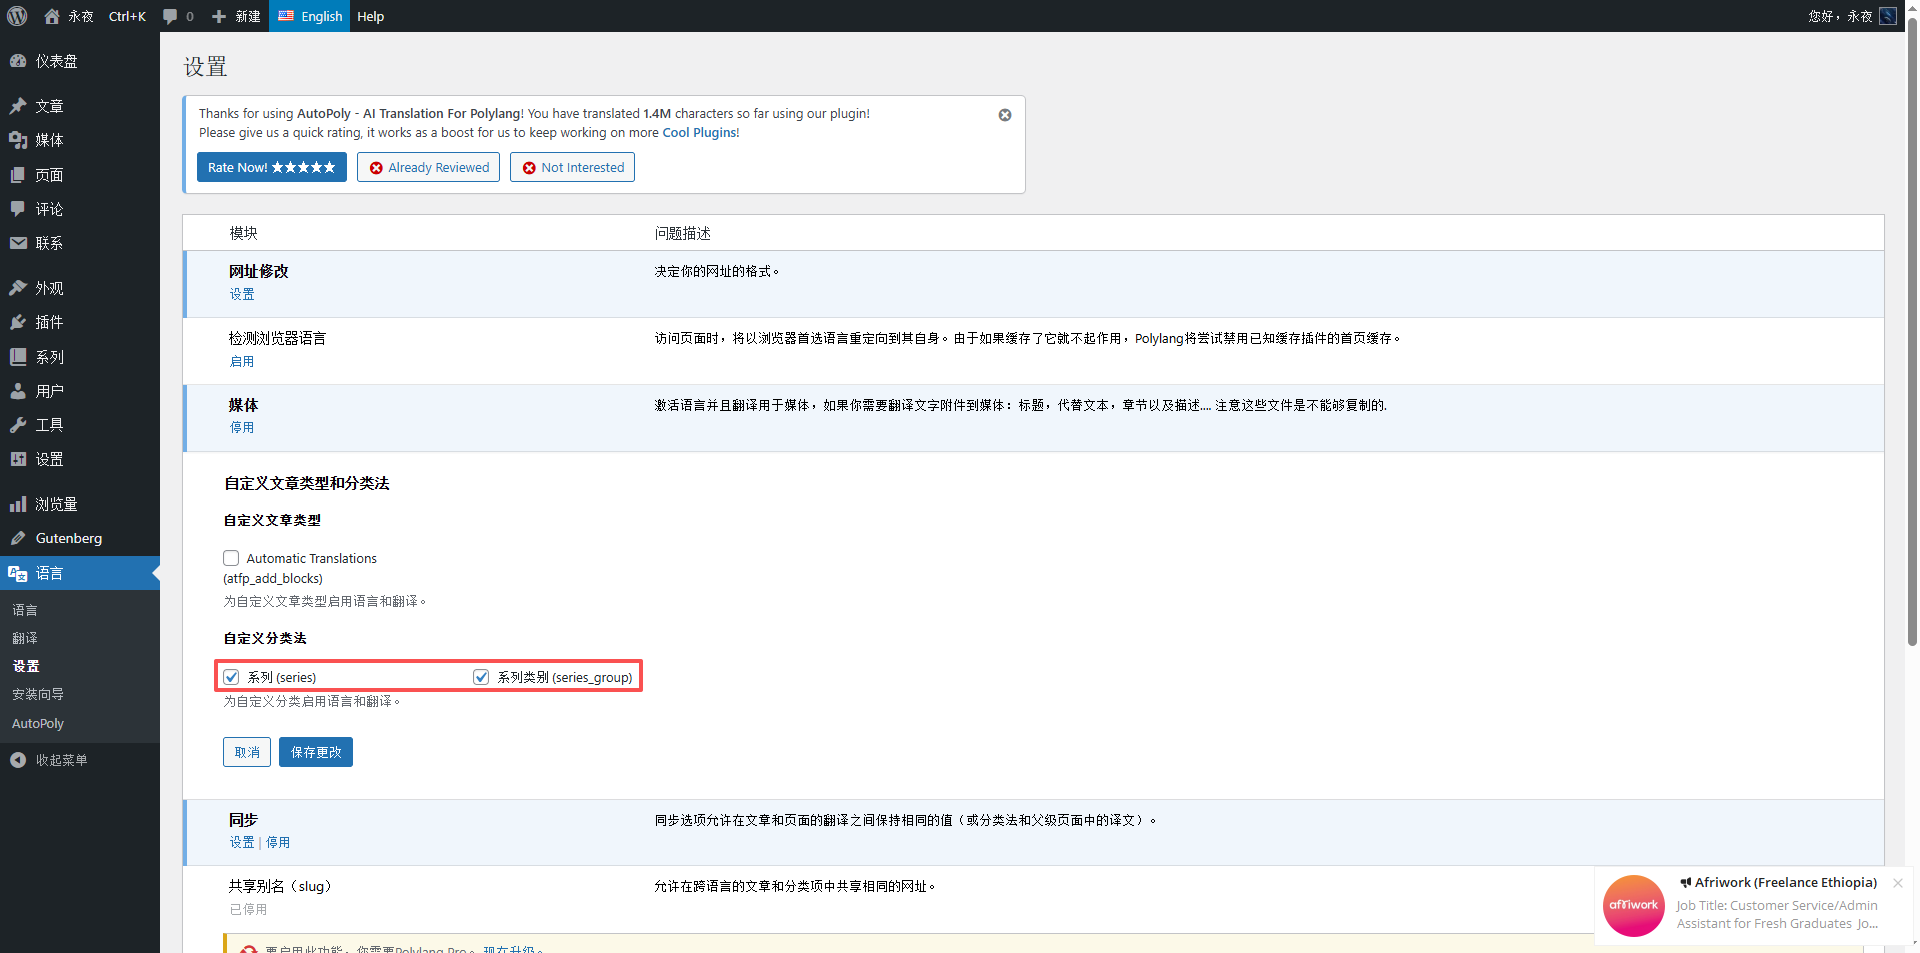
Go to Language → Settings, in the Custom Article Types and Taxonomy area, make sure that ‘Series’ and ‘Series category (SERIES_GROUP)’ are checked. as shown in Figure 2
7.2 Create an English version series
Article → Series → , click the ‘+’ link on the right to create an English name (eg Self-hosted VPN Series). After adding, the two series have established a translation relationship in the database. as shown in Figure 4
7.3 Join the article and test
Add a series of articles in the English version (also through quick editing) one by one Self-hosted VPN Series. Note: After there is at least one article under the English series, the language jump of the series page will take effect. as shown in Figure 12
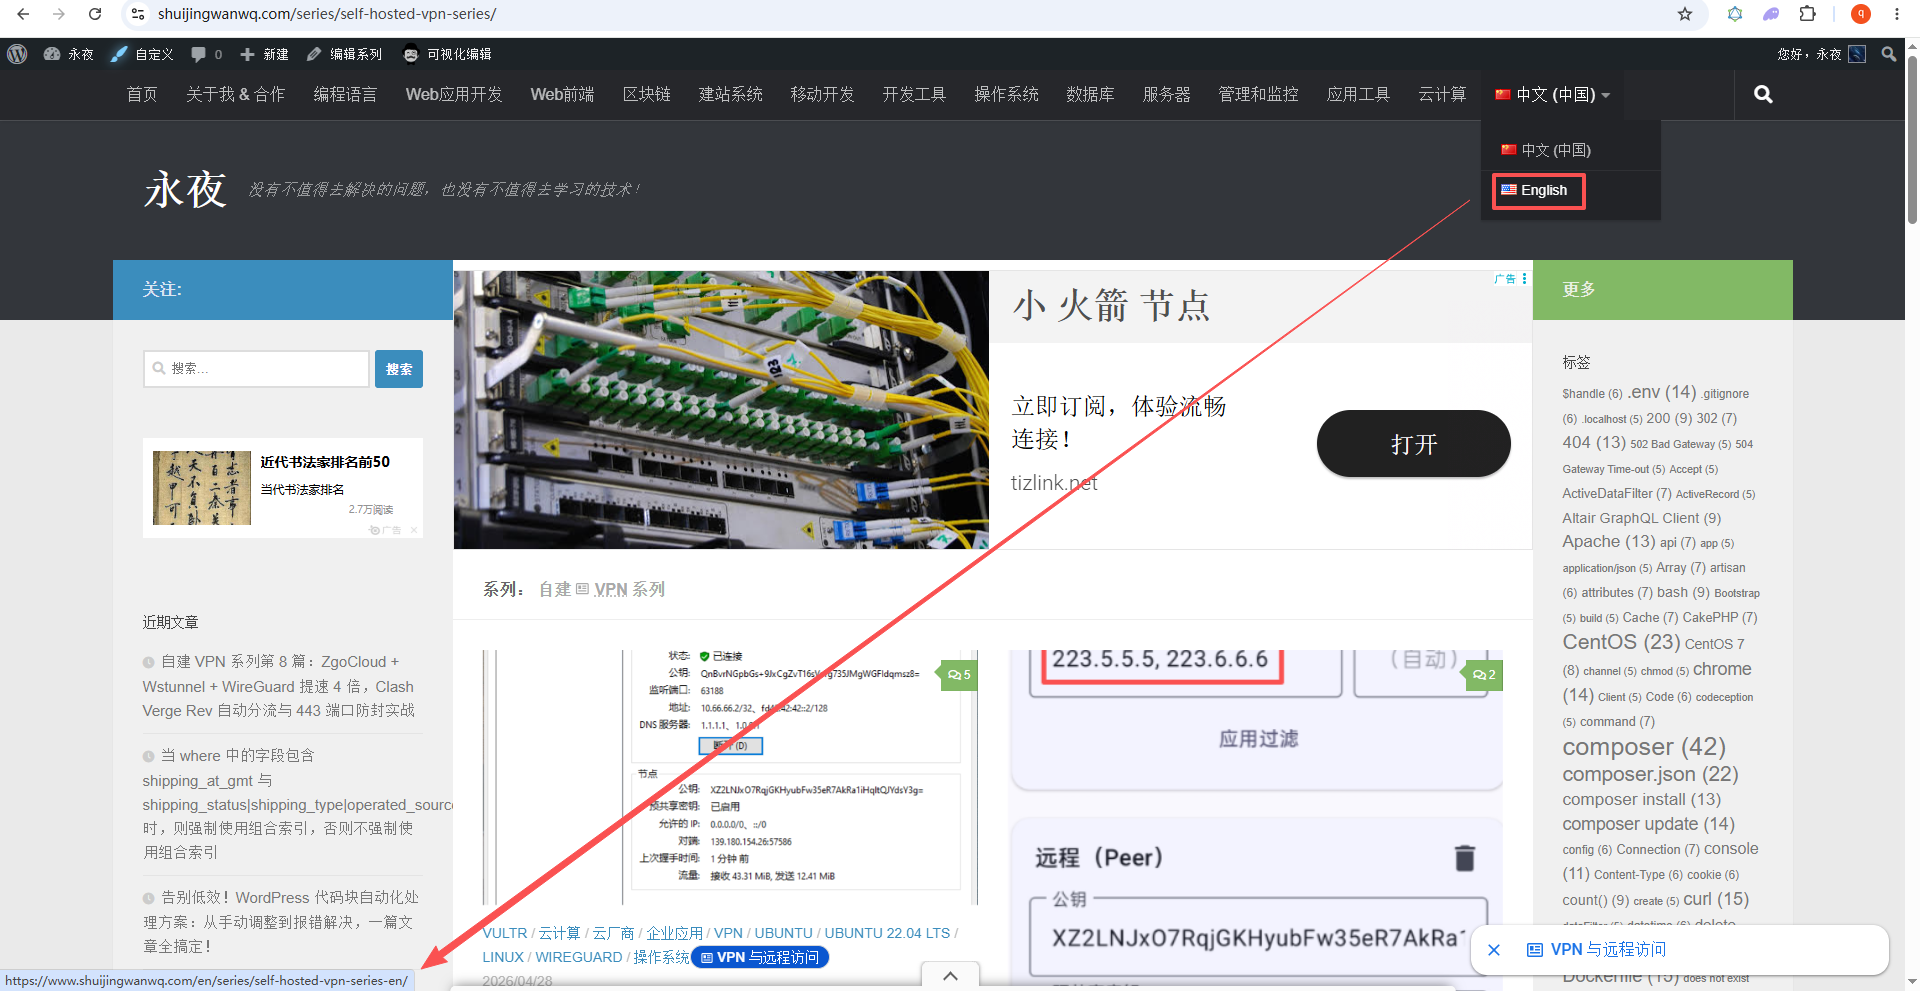
When done, visit the Chinese series page https://你的域名/series/self-hosted-vpn-series/Click the English toggle button at the top to jump to https://你的域名/en/series/self-hosted-vpn-series-en/ out. as shown in Figure 13
The final effect and summary
8.1 The title is refreshing
I deleted the prefix of ‘Self-built VPN Series Part X’ in the title of the article. For example, the original ‘self-built VPN series Part 6: The ultimate minimalist solution for frequent blocking of self-built Wireguard ports’ has become ‘the ultimate minimalist solution for frequent blocking of self-built Wireguard ports’. The series of home information is automatically displayed by the plugin, no longer redundant.
8.2 Reading Experience Improvement
Readers can clearly understand any series of articles:
- This is the first part of the series (top meta information)
- What articles are there in the entire series (the top directory)
- How to read the previous/next (navigation button)
And you can jump at will without relying on the title number.
8.3 Maintenance costs are greatly reduced
- Add a series of articles: Just check the series when editing, and drag and drop to adjust the order.
- Insert the middle chapter: Drag the new article directly to the specified position on the sorting page, and the order of subsequent articles is automatically refreshed, and there is no need to manually modify the title number.
- Multi-language synchronization: Maintain Chinese and English articles separately, and the series are associated with polylang, and do not affect each other.
8.4 A little regret (but does not affect the use)
Due to the limitation of the free version of Polylang, the URLs of the Chinese and English series pages cannot be completely consistent (Chinese is /series/self-hosted-vpn-series/, English will automatically become /en/series/self-hosted-vpn-series-en/). But this is just a matter of aesthetics, and the function is completely normal. If you need a unified URL, consider upgrading your Polylang Pro.
9. Write to you who are also tossing
If you are also fed up with the trouble of manual maintenance of the series of article numbers, the combination of PublishPress Series + Polylang is worth a try. The entire configuration process does not exceed 20 minutes, but it can improve the professionalism of the blog to a grade.
The last two reminders:
- When editing articles in batches, be sure to be careful about the ‘label’ field, and it is best to use ‘quick editing’ one by one to ensure that you are foolproof.
- The multi-language jump of the series page does not take effect? Check if there are published articles in the corresponding language version – Polylang requires at least one article to generate valid links.
I hope this record can help you step on some pits less. If you encounter other problems in use, please leave a message to exchange.